snom 370 VoIP Business Phone Quick Installation Kurzanleitung © 2007 snom technology AG All rights reserved. Version 1.0 www.snom.com VoIPon www.voipon.co.uk sales@voipon.co.
snom technology AG Gradestr. 46 D-12347 Berlin, Germany Note to the reader This is a quick guide to the installation and operation of the snom 370. The full manual will be available on our web page, www.snom.com. © 2007 snom technology Aktiengesellschaft. All Rights Reserved. This document is supplied by snom technology AG.
English Table of Contents Note to the reader ............................................................2 Installation ........................................................5 Delivery Content .............................................................5 Safety Information............................................................5 Power supply ...................................................................5 Setting up the Phone ........................................................
English 4 • VoIPon www.voipon.co.uk sales@voipon.co.
English Installation 1 Delivery Content Please check whether the delivery contains the following parts: • The base unit with display and keypad • The handset • The handset cable • The power supply (optional) Safety Information Please read the following safety notices before installing or using your snom phone. They are crucial for the safe and reliable operation of the device.
English 1 [ SNOM 370 QUICK INSTALLATION V 1.0 ] Setting up the Phone Your snom 370 is delivered with the footstand attached to the phone’s bottom shell (shaded gray in Fig. 1). Place the snom 370 on an even, horizontal surface that gives the rubber pads a secure grip. Do not place it on carpets or other materials containing fibers that could block the air vents and cause overheating.
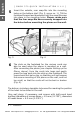
keypad available for the snom 370, you must place phone and keypad on an even, horizontal surface, as described above. 1 Fig. 3 2 Turn the phone upside down (Fig. 3). Please, ensure that you do not damage the display and/or its hinge and that you do not drop the receiver. You may want to hold the phone in your lap or have a second person hold it. Fig. 4 Lightly press the snap-fits of the footstand inwards (Fig.
English [ SNOM 370 QUICK INSTALLATION V 1.0 ] Insert the outside, rear snap-fits into the mounting holes on the bottom shell (Fig. 5, arrow no. 1). Tilt the footstand forward and downward until the snap-fits snap into place in the mounting holes. Please, make sure that the four snap-fits have securely snapped into the holes before mounting the phone on the wall. 5 1 Fig. 5 6 Fig. 6 The slots on the footstand for the various cords can also be used when the phone is mounted on a wall.
The screws must protrude approx. 0.5 cm (0.195”) from the wall for easy wall mounting of the phone. 1 Adjusting the Handset Rest The speaker of the handset has a small, rectangular indentation that fits over the rounded end of the plastic tab inserted into a slot on the top shell of the phone. When the phone is mounted on the wall, the handset must be placed on this rounded end to ensure that it will not fall off. Slide the tab out of the slot, as shown in Fig.
English [ SNOM 370 QUICK INSTALLATION V 1.0 ] 1 Fig. 9 Fig. 10 Cleaning To clean the snom 370, use an anti-static cloth. Please avoid cleaning liquids as they might damage the surface or internal electronics of the phone. 10 • Installation VoIPon www.voipon.co.uk sales@voipon.co.
English Connecting the phone 2 First connect one end of the handset cable to the handset and then to the jack labeled “ ” on the left-hand side of the phone’s bottom. Next plug the Ethernet (network) cable into the RJ45 connector labeled “ ”, and plug the other end into the network side to establish a data link. The second RJ45 connector, labeled “ ”, is for daisy-chaining further Ethernet devices without the need for a second Ethernet connection line.
English [ SNOM 370 QUICK INSTALLATION V 1.0 ] 2 12 • Connecting the phone VoIPon www.voipon.co.uk sales@voipon.co.
English Keypad The numeric keypad with the keys 0 to 9, *, and # is used to enter digits and letters. Depending on the operating mode, different actions can be performed (see the table below): • Entry of digits only (e.g., when dialing a phone number) • Typing in letters and digits by pressing the keys repeatedly (similar to a cellular phone), etc. Use the MENU key to call up the main menu. To cancel actions or input, use the CANCEL key . The ENTER key confirms actions, selections and inputs.
English [ SNOM 370 QUICK INSTALLATION V 1.0 ] The four soft keys located below the display are context-sensitive function keys. Their current mapping is depicted with symbols in the bottom line on the display. The twelve keys on the right with LEDs / next to them are the programmable function keys onto which different functionalities can be mapped. 3 By default they are mapped to trunk lines. An incoming call is indicated by the fast-blinking LED of the trunk line.
English [ SNOM 370 QUICK INSTALLATION V 1.0 ] Key Digits Lower and upper case “#” or “.” Number guessing after timeout * Toggles upper and lower case, when pressed briefly. Locks the keyboard when pressed for a few seconds, as indicated by a small lock symbol on the display; pressing the key again for a few seconds will unlock the keyboard.
English [ SNOM 370 QUICK INSTALLATION V 1.0 ] Key Description Call hold/unhold Call transfer. Announced transfer: Put the call on hold as and dial the described above or by pressing number it is to be transferred to. When the phone is answered, press the TRANSFER key. 3 Blind transfer: With the caller on the line, press the TRANSFER key, then dial the phone number .
English Index A I Additional keypad 6 Installation 5 Adjust volume 15 C K 4 Keypad 13 Call hold/unhold 14, 16 Call transfer 16 CANCEL key 13 Casing speaker 15 Cleaning 10 Connecting the phone 6, 11 L LEDs 14 LED for MWI 16 Connect to Mailbox 16 M D Display 9 Do not disturb 15 E ENTER key 13 Maintenance menu 15 Menu 15 MENU key 13 Mute microphone 15 N Numeric block 14 Numeric keypad 13 H Handset rest 9 O Open phone book 15 snom technology AG • 17 VoIPon www.voipon.co.uk sales@voipon.co.
English P Power supply 5 External power supply 5 Power feeding 5 R Record a call 16 Redial 15 4 S Safety information 5 Setting up the phone 6 Soft keys 14 W Wall mounting 6 18 • Index VoIPon www.voipon.co.uk sales@voipon.co.
Copyright © 2000 – 2007 snom technology AG. All rights reserved. snom is a registered trademark of snom technology AG and affiliates in Germany, USA and certain other countries and regions. Unless specified otherwise, all trademarks, in particular product names, in this document are legally protected trademarks of snom technology AG. Other trademarks or registered trademarks mentioned in this document are the property of their respective manufacturers or owners.