
Use and Care Manual


11
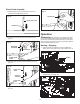
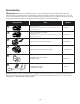
Chute Crank Assembly
1. Slide the upper chute crank through the rubber ring
located on the middle frame (Fig. 10).
2. Loosen the screw on the lower chute crank by hand
(Fig. 11).
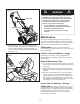
3. Slide the upper chute crank into the lower chute crank
(Fig. 12).
4. Align the screw holes and tighten the screw by hand
(Fig. 13).
Operation
m
WARNING! Keep the area to be cleared free of stones,
toys or other foreign objects that the rotor blades might pick
up and throw. Such items could be covered by snow and are
easy to overlook, so be sure to conduct a thorough inspection
of the area before beginning work.
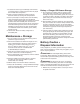
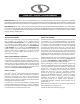
Starting + Stopping
1. Open the battery compartment covers and slide each
battery down until it clicks to lock it into position (Fig. 14).
2. Insert the safety key into the slot and close the battery
compartment cover (Figs. 15).
Fig. 10
Rubber ring
Upper chute crank
Fig. 11
Thumbscrew
Lower chute
crank
Crank rod
connector
Fig. 12
Upper chute
crank
Lower chute
crank
Crank rod
connector
Fig. 13
Thumbscrew
Fig. 14
Battery
Fig. 15
Safety key