
Use and Care Manual

Assembly
Upper and Lower Tube Assembly &
Positioning The Assist Handle
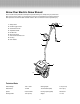
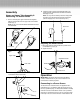
1. Prior to connecting the upper and lower tube together,
slide the assist handle onto the upper tube at the middle
section (Fig. 1).
Note: Do not try to install the assist handle after the tubes
are assembled.
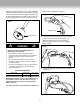
2. After sliding upper tube inside the lower tube (Fig. 2) , line
up the screw holes on each tube.
3. Insert the screw nut through the aligned holes in the
upper and lower tubes and secure other end with the
knob (Fig. 3 and 4).
Note: You may have to carefully move the wiring inside
the tube to one side if it blocks the path of the screw.
(Use the shipping wire; do not use a sharp tool.)
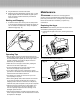
Adjusting the Assist Handle
1. Move and rotate the assist handle to a position that is
comfortable for you (Fig. 5).
2. Tighten the knob.
Operation
IMPORTANT: This Electric Snow Shovel is intended for
outdoor, residential use only, do not use it indoors or for
commercial or industrial purposes.
Connecting to a Power Source
To reduce the risk of electric shock, this appliance has a
polarized plug (i.e.,one blade is wider than the other; Fig. 6).
Use only a polarized plug, UL-listed (CSA certied in Canada)
extension cord recommended for outdoor use. A polarized
plug will t in a polarized cord only one way. If the plug does
not t fully in the cord, reverse the cord. If it still does not t,
Fig. 1
Upper Tube
Middle
Section
Lower Tube
Fig. 2
Lower Tube
Upper Tube
Fig. 3
Screw Nut
Fig. 4
Knob
Screw Nut
Adjustable Handle
Handle Knob
Fig. 5
5