This unit has been reconditioned by Home and Power Company Do not return to the manufacturer Please contact us via email at info@homeandpower.com We will very happy to assist you Home and Power Customer care.
15-AMP 18-INCH ELECTRIC SNOW THROWER Model SJ622E/SJ623E Form No. SJ-SJ622E/SJ623E-880E-MR2 OPERATOR’S MANUAL A Division of Snow Joe®, LLC IMPORTANT! heating equipment). Take necessary precautions to avoid electric shock. There is an increased risk of electric shock if your body is earthed or grounded. Safety Instructions 3. Do not abuse the cord. Keep cord away from heat, oil, sharp edges or moving parts.
Personal Safety operation clear of all spectators, particularly children and pets. 1. Stay alert – Watch what you are doing and use common sense when operating the snow thrower. Do not use the machine when tired, ill or under the influence of drugs, alcohol or medication. A moment of inattention may result in serious personal injury. • Excessive force – The snow thrower was designed to respond at a certain rate for various snow conditions for optimum safety and performance.
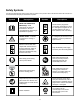
Safety Symbols The following table describes safety symbols that may appear on this product. Read, understand and follow all instructions on the machine before attempting to assemble and operate. Symbols Descriptions Symbols Descriptions READ THE OPERATOR'S MANUAL(S) – Read, understand and follow all instructions in the user manual(s) before attempting to assemble and operate. Disconnect the plug before conducting maintenance or when it is damaged or tangled.
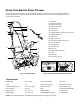
Know Your Electric Snow Thrower Read the owner’s manual and safety rules carefully before operating your electric snow thrower. Compare the illustration below to the actual unit in order to familiarize yourself with the location of the various controls and adjustments. Save this manual for future reference. 1. Handle bar 1 2. ON/OFF switch lever 2 3 3. Safety switch button 8 4. Cable restraint holder 9 10 4 5. Middle frame 6. Lower frame 19 5 11 7. Wheels (located at the back of the machine) 8.
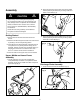
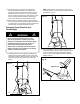
Assembly m CAUTION 2. Secure the connection of the lower frame to the middle frame by fastening the first set of joint fixing T-bolts and knobs on each side (Fig. 3). m Fig. 3 Inspect wiring, which, if damaged during shipping, may cause serious bodily injury during equipment use. If any damage is seen or suspected, do not assemble. Instead, contact the Snow Joe®/Sun Joe® customer service center at 1-866-SNOWJOE (1-866-766-9563) for assistance.
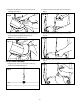
2. Lift the chute deflector and lock it securely onto the discharge chute (Fig. 6). 2. Loosen the screw on the lower chute crank by hand (Fig. 9). Fig. 9 Fig. 6 3. Raise or lower the chute deflector to the desired height of the snow stream and tighten the knob (Fig. 7). 3. Slide the upper chute crank into the lower chute crank (Fig. 10). NOTE: Do not overtighten the knob. Fig. 10 Fig. 7 4. Align the screw holes and tighten the screw by hand (Fig. 11). Chute Crank Assembly 1.
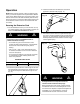
Operation 3. Insert the female end of the extension cord into the appliance's polarized male plug (Fig. 13). NOTE: Before using this machine, make sure that the power source you will use complies with the specifications detailed in this manual. Before inserting the plug into the socket, verify that the snow thrower’s roll shaft and rubber plates are firmly secured with screws, and that the rubber plates are facing the correct direction. Perform a test run to ensure that the rotor turns freely. Fig.
Powering On and Off NOTE: The light will only turn ON when the snow thrower is running. After finishing your work session, REMEMBER to TURN OFF the light switch. 1. To power on, depress and hold the safety switch button found alongside the switch housing (Fig. 15). Moving the Machine and Plowing the Snow Fig. 15 m WARNING m Foreign objects, such as rocks, broken glass, nails, wire, or string, can be picked up and thrown by the snow thrower, causing serious personal injury.
NOTE: A little lubricant, such as WD-40, will provide a smoother operation of the chute (spray at points A and B as indicated in Fig. 18). 9. Some parts of the snow thrower may freeze under extreme temperature conditions. Do not attempt to operate thesnow thrower with frozen parts. If the parts freeze while the snow thrower is in use, stop the snow thrower, unplug the extension cord and inspect for frozen parts. Free all parts before restarting or operating the snow thrower.
m WARNING 1. Detach the worn rubber plate assembly by removing the two sets of nuts and bolts used to secure it to the auger assembly (Figs. 21 & 22). m Make sure that the chute deflector snaps and locks completely onto the discharge chute. An opening between the discharge chute and the chute deflector may allow foreign objects to be picked up by the snow thrower and thrown in the direction of the operator causing serious boldly injury. Fig.
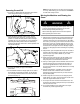
Replacing the Scraper Bar 1. The scraper bar is located at the base of the snow thrower beneath the rotor housing (Fig. 24). 1. Remove the screws from the left panel of the snow thrower and remove the left panel (Fig. 27). Fig. 27 Fig. 24 2. Lift the belt tension pulley and roll the worn belt up and off the big pulley from the top of the big pulley (Fig. 28). 2. Detach the worn scraper bar from the snow thrower by removing the two screws that hold it in place (Fig. 25). Fig. 28 Fig.
3. Inspect the snow thrower carefully for worn, loose or damaged parts. Check connections and screws and tighten if necessary. For repairing or replacing parts, contact your authorized Snow Joe®/Sun Joe® dealer or the Snow Joe®/Sun Joe® customer service center at 1-866-SNOWJOE (1-866-766-9563). Fig. 29 Belt tension 4. Store the unit, along with the disconnected extension cord, in a locked, dry place out of the reach of children to prevent unauthorized use or damage.
NOTES 13
NOTES 14
HOME AND POWER RECONDITIONED PRODUCT LIMITED WARRANTY ABOVE ALL ELSE, Home and Power is dedicated to you, our customer. We strive to make your experience as pleasant as possible. Unfortunately, there are times when a product does not work or breaks under normal operating conditions. We think it's important that you know what you can expect from us. That's why we created the Home and Power promise. OUR PROMISE: Home and Power warrants re-conditioned product for 90-days from the date of purchase.