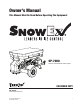
Owner’s Manual This Manual Must Be Read Before Operating The Equipment SP-7000 Serial No. 140410300001SP-7000 and higher CUSTOMER COPY Madison Heights, Michigan 48071 800-SALTERS www.snowexproducts.
Table of Contents Introduction..................................................................................................................................................................................................... 3 Safety.............................................................................................................................................................................................................. 4 Operating Instructions.............................................
Introduction This manual is intended to help you to get to know your SP-7000 Tow Pro spreader and how to operate it safely, correctly and economically. If you observe these instructions, you will prevent hazards, reduce repair costs and breakdown times, and increase the reliability and service life of the machine.
Safety Before attempting any procedure in this book, the safety information in this manual must be read and understood by all personnel who have any part in the installation, preparation, transport, service, repair or use of this equipment. For your protection, safety and information decals have been placed on the spreader to remind the operator of safety precautions and particular hazards. Never exceed the Gross Vehicle Weight Rating, Hitch Capacity, or Towing Capacity.
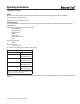
Operating Instructions Towing/Loading TOWING Back up the tow vehicle to the SP-7000 so the vehicle’s drawbar and the clevis hitch are aligned. Pin the clevis to the drawbar. Connect the Spreader and Vehicle plugs. Adjust the jack; pivot out of the way and lock. LOADING SPREADER Do not overload vehicle. Use the chart below to calculate the weight of spreader and material to comply with Vehicle Weight Ratings and Towing Capacities.
Operating Instructions Operating Control Use the ON and OFF buttons to control the main power to the spreader. Use START/STOP to turn the spinner and auger on and off. Use this as a pause button between passes or jobs. Adjust SPINNER and AUGER speeds with the two sets of arrows. Speed will be displayed on the screens. Adjust to get your desired spread width and application rate – ‘Spread Pattern.’ Use the Vibrator to loosen ‘bridged’ material and improve flow to the auger with the VIBRATE button.
Operating Instructions Spreading Tips The application rate, which is the amount of material spread on a given area, depends on three variables – Vehicle Speed, Spinner Speed and Auger Speed. For consistency in spreading results, it is best to drive at a constant speed. The Spinner Speed changes the spread width. This determines how much area the same material fed by the auger will cover. Auger Speed changes how much material is fed to the spinner.
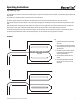
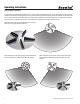
Operating Instructions Adjustable Spinner Your spreader is equipped with an adjustable spinner to assist in precise material application. The spinner plate gives the operator control of whether the material spreads toward the right, left, or is centered. Before operating the spreader, spread some material in a clear area where you can easily observe the spread pattern and how it changes with fin adjustment. Use the instructions below as a guide to get the spread pattern you desire.
Maintenance Instructions Maintenance/Cleaning/Preventing Corrosion/Storage Perform service indoors or in a sheltered area. Avoid Electric Shock. Do not use power tools in rain or snow. Disconnect electricity to spreader before servicing. Do not attempt to service controls, motors, or transmissions. Use Genuine TrynEx Parts. MAINTENANCE • Recharge batteries after each use. • Use dielectric grease on all electrical connections. Apply at the beginning and end of each season; and after washing the spreader.
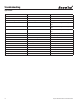
Troubleshooting Spreader PROBLEM POSSIBLE CAUSE SOLUTION Motor doesn't run Loose electrical connections Check all connections Motor seized Replace motor Hopper is empty Fill hopper Material is wet Replace with clean, dry, free-flowing material Frozen material Replace with clean, dry, free-flowing material Coarse material Replace with clean, dry, free-flowing material Auger loose on shaft Align/Tighten Coupler Material not flowing from hopper Tighten bearing Vibrator not working Check con
Troubleshooting Control PROBLEM POSSIBLE CAUSE SOLUTION Control shut down Jammed auger Clear jammed auger. Use caution Poor electrical connections Clean/replace connectors Use dielectric grease Electrical short Check all connections Check for bare wires OL/OH Control failure Replace Control Module Jammed auger Switch off, then on (for Auto-Reverse) If it continues. Turn off.
Notes 12 © TrynEx International 2014 F51537 REV-A141205
Notes © TrynEx International 2014 F51537 REV-A141205 13
Notes 14 © TrynEx International 2014 F51537 REV-A141205
Notes © TrynEx International 2014 F51537 REV-A141205 15
141205