
User Manual


© Trynex International 2009 L1159
VM4 — 24
Mounting Instructions
Step 1: Remove tailgate from pickup bed.
Step 2: Load spreader on to truck bed and mount spinner assembly.
Step 3: Slide spreader forward until deector/chute assembly makes contact with vehicle. Then, slide spreader back
approx. 1” to allow for proper clearance.
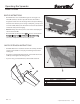
Step 4: Install stop bars using supplied hole patterns (see Fig.2). To achieve the best position, you may need to drill
additional holes in bracket in order to properly position spreader.
Step 5: Now that the spreader is positioned front to back, you will now center it left to right. Looking at the inside front
and rear corner of the lower frame area, you will notice (4) holes in the bottom of the frame. Using a paint pen or similar
marking device, mark hole locations.
Step 6: Before drilling holes, look beneath the approximate area where each hole will be located. Make sure there are no
vehicle components that will be in the path of the drill before doing this step. If there are interferences, you can relocate
holes as needed making sure there are at least two forward and two rearward of the front to back centerline.
Step 7: Install and
tighten
all (4) bolts.
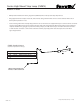
Step 8: Install ratchet straps (see V-Maxx 8500 Mounting System: Strapping Techniques). It is very important for everyone’s
safety this strapping method be used as the standard mounting procedure. (Do not use ratchet straps exclusively.)
Step 9: Connect the spreader power cord to vehicle main power plug mounted at rear of vehicle (see electrical installation).
Step 10: Connect Center High Mount Stop Lamp (CHMSL) cord from the spreader to mating half attached to vehicle
(See electrical installation).
Model # SP-8500