
User guide


© Trynex International 2009 L1600 1 — 7
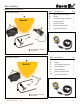
Assembly Instructions
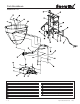
Model # SR-110 (refer to diagram on page 1-10)
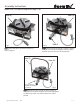
Fig 1.
Fig 2.
Fig 3.
Item (A)
Item E
Item (F)
Step 1: Place item (A) on level working surface as
shown in gure 1.
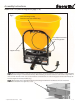
Step 2:
Mount item (E) to item (A) as shown in gure 2.
Using (4) 1/2” lock nuts and tighten securely in place
with 3/4” socket or wrench to 75 Foot pounds.
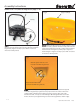
Step 3:
Mount item (F) to item (A) as shown in gure 3.
Using (4) 5/16” hex bolts and (4) 5/16” lock nuts and tighten
securely in place with 1/2” socket or wrench to 18 foot
pounds.
Hitch pin with clip
supplied with hardware
bag item (D)
Item (A)
Item (A)