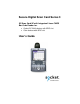
Secure Digital Scan Card Series 3 SD Scan Card 3E with Integrated Linear CMOS Bar Code Reader for: • Pocket PC 2003 devices with SDIO slot • Palm devices with SDIO slot User’s Guide
4/2005 Document # 6410-00206 D Copyright Notice Copyright © 2005 Socket Communications, Inc. All rights reserved. Socket, the Socket logo and Battery Friendly are registered trademarks of Socket Communications, Inc. SD Scan Card and SocketScan are trademarks of Socket Communications, Inc. All other brand and product names are trademarks of their respective holders. The SD Scan Card includes technology licensed under United States Patent Nos. 4,543,450, 4,603,320, 4,686,506, and 4,972,470.
Table of Contents Copyright Notice 2 1 | INTRODUCTION 5 Overview About the Software System Requirements Package Contents Product Registration 2 | SETUP FOR POCKET PC 2003 STEP 1: Uninstall Other Scanning Software STEP 2: Install the Software STEP 3: Insert the Card STEP 4: Assign a Trigger Button STEP 5: Scan Data into Your Application OPTIONAL: Select Symbologies OPTIONAL: Configure Prefix/Suffixes OPTIONAL: Configure Sounds OPTIONAL: Use SocketScan Trigger 3 | SETUP FOR PALM STEP 1: Uninstall Other
Limited Warranty Limited Software Warranty Regulatory Compliance 4 43 44 45
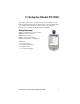
1 | Introduction Overview The Socket SD Scan Card (SDSC) 3E gives you the freedom of scanning bar codes anytime anywhere into your Pocket PC 2003 or Palm device using the smallest and most lightweight form factor available for an expansion card. In a small size totaling less than 23 grams, the card features state-of-the-art linear CMOS technology. The world’s only bar code scanner built into an SDIO card, the SD Scan Card is a small and sleek unit with no cables or batteries.
Package Contents • • • Socket SD Scan Card 3E Installation CD containing software and user documentation Booklets containing warranty and copyright information Product Registration Socket highly recommends that all users register their Socket products. Registered users receive priority for technical support. Register your Socket product online at www.socketcom.
2 | Setup for Pocket PC 2003 This chapter explains how to install and use the Socket SD Scan Card 3E with a Pocket PC running Windows Mobile 2003 or Windows Mobile 2003 Second Edition. The SocketScan software supports both portrait and landscape mode for Windows Mobile 2003 Second Edition. Setup Summary STEP 1: Uninstall other scanning software. STEP 2: Install the software. STEP 3: Insert the card. STEP 4: Assign a trigger button. STEP 5: Scan data into your application. OPTIONAL: • Select symbologies.
STEP 1: Uninstall Other Scanning Software Delete any bar code scanning software you may already have installed on your Pocket PC. You can uninstall either directly from your Pocket PC, or indirectly via ActiveSync. OPTION 1: Uninstall Directly from the Pocket PC 1. Make sure the bar code scanning software is closed, and remove the ISC from your Pocket PC. 2. Tap Start | Settings. Tap on the System tab or Control Panel. 3. Tap on the Remove Programs icon. 4.
STEP 2: Install the Software 1. Make an active connection between your Pocket PC and a host PC. Use ActiveSync and a serial/USB/Ethernet connection cable or cradle. 2. Insert the installation CD into your host PC. 3. Use My Computer or Windows Explorer to access your CD-ROM drive. In the CD, click on SETUP.EXE. 4. Follow the instructions on your screen to install the software. • Read the information in the first screen and click next. • In the Main Page, click Install Software.
5. In the File Download screen, click Run. 6. If the Security Warning screen appears, click Run. 7. The InstallShield Wizard for SocketScan Software will begin. Follow the screens that appear to install the software. 8. When software installation is complete, disconnect the Pocket PC from the host PC. Soft reset the Pocket PC by pressing the reset button. Now you are ready to insert the card.
STEP 3: Insert the Card Make sure you have soft reset your device after software installation before you insert the card. Insert the card into your Pocket PC’s SDIO slot. Make sure the card is positioned correctly. Do not insert the card upside-down or force the card in too hard. IMPORTANT! To remove the SDSC 3E, push the card completely into the slot. After the card springs back, you can safely remove the card.
STEP 4: Assign a Trigger Button Refer to your device’s user documentation to assign a trigger button. If you do not want to assign a hardware button to trigger the scanner, you can install Socket’s Floating Trigger, available on the installation CD. If SocketScan is not running yet, you can press the assigned trigger button to quickly launch SocketScan. Pressing the trigger button will fire the laser only when SocketScan is open. 1. Go to Start | Settings | Buttons. 2.
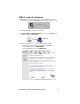
STEP 5: Scan Data into Your Application 1. Start SocketScan. Go to Start | Programs | SocketScan. Alternatively, you can press the trigger button to start the program. 2. Make sure the “Scan Card detected” icon appears in the task tray, visible from the Today screen. Icon Meaning. SD Scan Card detected SocketScan detects the scanner and is ready to scan. No scanner detected No scanner detected. The scanner is either missing or improperly inserted. 3.
4. Press the assigned trigger button and scan the code. For example, try this Code 39 bar code: When data is read, a beep should sound, and the imager should turn off. If the SD Scan Card fails to read data within a few seconds, the imager will turn off, and you must try again. If your device enters sleep mode when SocketScan is running, press the ON button to initialize the scanner and resume operation. 5. After a successful scan, data should appear in your document.
OPTIONAL: Select Symbologies The applet makes it quick and convenient to modify which symbologies you want the scanner to recognize. By default, the scanner is set to recognize nine of the most common symbologies. 1. 2. 3. Tap on the SDSC scanner icon in the menu bar to launch the applet (visible in the Today screen for Pocket PCs). In the pop-up menu, select Symbology Selector... In the screen that appears, check the symbologies you wish to enable. Uncheck those you wish to disable. Tap ok.
OPTIONAL: Configure Prefix/Suffixes The SocketScan applet lets you specify prefix and/or suffix characters to be added automatically to the data you scan. This helps to further eliminate manual data entry. to launch the 1. Tap on the SDSC scanner icon in the menu bar applet (visible in the Today screen for Pocket PCs). You can configure prefix/suffixes even if the “no scanning card detected” icon appears. 2. In the pop-up menu, select Prefix/Suffix... 3.
OPTIONAL: Configure Sounds The SocketScan applet lets you choose any WAV sound file to be played to indicate a successful scan. 1. Tap on the SDSC scanner icon in the menu bar to launch the applet (visible in the Today screen for Pocket PCs). 2. In the pop-up menu, select Sounds... 3. In the screen that appears, select a sound for indicating successful scans. Tap ok. Browse box To you want to play a .WAV file, after selecting Play .wav file, you can search through files by tapping the browse box.
OPTIONAL: Use SocketScan Trigger If you find it inconvenient or impossible to assign or use a hardware button to trigger the scanner, you can install this virtual trigger button that “floats” on top of the active application. 1. Make sure to do all of the following before using SocketScan Trigger: • Install SocketScan Trigger from the installation CD. The software must be installed separately from SocketScan. • Start SocketScan. Tap Start | Programs | SocketScan.
4. A SocketScan Trigger icon will also appear in the menu bar of the Today screen. Tap this icon to open a pop-up menu with the following options: • Tap Scan Now to activate the scanner as if you had tapped the trigger button. • Tap Remove Floating Trigger to remove the trigger button from the screen but keep the icon handy on the task bar. To restore the trigger button, tap on the menu bar icon. In the pop-up menu, tap Launch Floating Trigger. • Tap About to view SocketScan Trigger version information.
3 | Setup for Palm Setup Summary STEP 1: Uninstall other scanning software. STEP 2: Install the software. STEP 3: Insert the card. STEP 4: Configure SocketScan. STEP 5: Scan data into your application. OPTIONAL: • Select symbologies. • Perform a scan test. • View Help files. • View version information. The instructions in this chapter were based on a Tungsten T running Palm OS 5.0. The instructions for your device may differ a little. For help using SocketScan, tap on the any screen.
STEP 2: Install the Software 1. Use HotSync and a serial/Ethernet/USB cable or cradle to connect your device to a host PC. 2. Insert the Socket installation CD into your host PC. 3. Use My Computer or Windows Explorer to access your CD-ROM drive. In the CD, click on SETUP.EXE. 4. Follow the instructions in the SD Scan Card 3E Setup Center to install the SocketScan for Palm software on your Palm Desktop. • Read the instructions in the Welcome screen, then click Next.
5. In the File Download screen click Run. 6. If a Security Warning screen appears, click Run. 7. The SocketScan Installation program will begin. Follow the instructions on your screen to install the software. 8. When software installation is complete, disconnect the device from the host PC. Soft reset the device by pressing the reset button. 9. A Socket icon should appear on the screen of your device. Tap this icon to install the correct version of SocketScan on your Palm device. 10.
STEP 3: Insert the Card Insert the card into your Palm device’s SDIO slot. Make sure the card is positioned correctly. Do not force or shove the card in too hard. Older Palm m100 & m500 series devices: The SDIO slot is reversed, so the scanner must be inserted backwards. To remove the SD Scan Card 3E, push the card completely into the slot. After the card springs back, you can safely remove the card.
STEP 4: Configure SocketScan 1. Start SocketScan. Tap on the Home icon. 2. In the menu in the upper right corner, select All. 3. Scroll to the SocketScan icon. Tap on the icon. 4. The main screen of SocketScan will appear. In the Scanner Device field, make sure SD Scan Card is selected. A picture of the SD Scan Card 3E should appear. 5. In the Device Is field, tap Enabled. Buttons will appear at the bottom of the screen. Tap Configure.
6. Use the Configure screen to configure basic SocketScan options: For help on SocketScan, tap on the right corner. symbol in the upper • Scan Trigger Button: Tap to select the hardware button you would like to use to trigger the scanner. In the screen that appears, select the hardware button and tap OK. At this time, Palm utilities do not allow assignment of the Record or Voice button as a trigger.
• Prefix/Suffix: Enter any characters or functions you would like to append to each scan. Besides special functions listed in the Insert Special menu, only printable ASCII characters can be used as prefixes or suffixes. A carriage return [CR] is the default Suffix. This suffix advances the cursor to the next data field in your application. • Launch App: Check if you want SocketScan to launch an application when you start to scan. In the drop-down menu, select the application. 7.
STEP 5: Scan Data into Your Application 1. Make sure the Scanner is enabled in SocketScan. To check if the scanner is enabled, tap the Home icon. In the drop-down menu in the upper right corner, select All. Tap on the SocketScan icon. 2. If you did not assign SocketScan to launch an application, then you need to manually start the application that you want to receive data (e.g., SheetToGo). Make sure a new document or spreadsheet is open. 3. Press the assigned trigger button and scan the code.
OPTIONAL: Select Symbologies 1. In the main screen of SocketScan, make sure the SDSC scanner is enabled and tap Symbologies. 2. Use the checkboxes to select which symbologies you would like the scanner to decode. Tap OK. Enabling all possible symbologies will make the decode process slightly longer. Triop Code 39 must be enabled for Code 128 to work correctly.
OPTIONAL: Perform a Scan Test 1. In the main screen of SocketScan, make sure the SDSC scanner is enabled and tap Test. 2. Tap Scan to trigger the scanner and scan a bar code. You cannot use the hardware trigger button for the scan test. Use the Scan button to trigger the scanner. 3. SocketScan will report the encoded data, as well as its symbology type and length. To view the data in hexadecimal format, check View as Hex. 4. When done, tap OK to exit the Test Scan.
OPTIONAL: View Help Files Whenever SocketScan is open, you can access help files by simply tapping on the symbol in the upper right corner. OPTIONAL: View Version Information 1. In the main screen of SocketScan, tap on the Options button or tap on the upper left corner of the screen to access the Options menu. 2. In the Options menu, tap About SocketScan. 3. View the software version information, then tap OK.
Appendix A Specifications Physical Characteristics: SDSC Card Size: 32 x 24 x 2 mm Laser Scanner Size: 27.1 x 29.6 x 14.8 mm Total Mass: approx. 22.7 g Power Consumption (3.3 V Supply): Idle: 0.4 mA (1.32 mW) Typical: 65 mA Interface Standard: SDIO Operating System Support: Windows Mobile 2003 or 2003 Second Edition with ARM processor Palm OS v4.
Appendix B Bar Code Label Specifications All bar code symbols/labels should satisfy the appropriate AIM Uniform Symbology Specification. Background Substrate: The bar code symbol should be printed on material (media) that is reflective and has a matte (not glossy) finish. A background diffuse reflectance of at least 70% to 80% is desirable for optimum contrast. Retro-reflective media should be used to obtain decode distances greater than 36 inches.
Appendix C Enabling or Disabling Symbologies The SD Scan Card 3E is pre-set to automatically detect and decode (auto-discriminate) the most common bar code symbologies. To enable or disable symbologies, simply use SocketScan’s Symbology Selector. Notes: • The supported length of some symbologies will change after Symbology Selector is used. See Table 1. • With more symbologies enabled, the scanner must work harder to search through all the possible combinations.
The advanced symbology parameters listed in Table 2 can be modified by following the instructions in the Advanced Programming Guide or by using the SocketScan SDK. Check Socket’s website for updates. Table 2.
For more information on bar codes, symbologies, labels or other bar code related topics, visit any of the following web sites: a. www.aimglobal.org/technologies/barcode/ b. www.aimglobal.org/aimstore/stackedsymbologies.htm c. www.adams1.com d. www.bizfonts.com e. www.barcode-us.com/info_center/upc.htm (UPC Codes) f. www.barcode-us.com/info_center/bookinfo.htm (Bookland EAN) g. www.dataid.com/bcsymbology.htm h. www.aaabarcodes.com i. www.snx.com/mechanics.html j. www.pscnet.com/html/aabcsymbologies.
Appendix D Decode Zone Decode Zone The decode zone for the SD Scan Card 3E is shown below. The decode zone is a function of various symbol characteristics including density, print contrast, wide-to-narrow ratio, and edge acuity. The minimum element width (also known as the “X Dimension”, “size” or “symbol density” of a bar code) is the width in thousandths of an inch (or ‘mils’) of the narrowest element (bar or space) in the bar code.
Decode Distances The table below lists the typical and guaranteed scanning distances for selected bar code sizes. The minimum element width (“X Dimension”, “size” or "symbol density") is the width in mils of the narrowest element (bar or space) in the symbol. Symbol Density /Bar Code Type /W-N Ratio 6 mil Code 39; 2.5:1 Typical Working Ranges Guaranteed Working Ranges Near Far Near Far 123 80% MRD 2.25 in 5.72 cm 4.50 in 11.43 cm 3.00 in 7.62 cm 4.00 in 10.16 cm 7.5 mil Code 39; 2.
Appendix E Tips for Better Scanning Socket’s SD Scan Card 3E is based on miniature CMOS linear imaging technology. This device is basically a camera that captures rectangular digital images measuring about 1 degree high and 40 degrees wide. The imaging rate varies between about 20 and 40 images per second and automatically compensates for ambient lighting conditions — the more ambient light, the more images per second.
4. Position the scanner at an angle — No bar code scanner works well when positioned exactly perpendicular to the target bar code label, because the reflected light tends to “blind” the sensing mechanism. For best results, position the scanner at least 15 degrees away from the perpendicular to the surface of the bar code. 5.
Appendix F Troubleshooting For help on SocketScan, tap Start | Help on a Pocket PC, or tap on the icon on a Palm device. SYMPTOM: I get the “No Card Detected” icon in the task tray of my Pocket PC and can’t trigger the laser or scan any bar codes. POSSIBLE REASON Your Pocket PC does not recognize the SD Scan Card 3E.. SOLUTION Make sure the card is inserted properly. If necessary, remove and reinsert. If using battery power, be sure to tap Yes if asked whether you want to use battery power.
Appendix G Technical Support For help on SocketScan, tap Start | Help on a Pocket PC, or tap on the icon on a Palm device. If you have trouble installing or using SD Scan Card 3E, Socket has two technical support resources to help you. Please note that technical support is available in English only. 1. Socket On-Demand Support (SOS) Socket On-Demand Support is an interactive technical support program that focuses in on your specific problem to provide the answers you need.
2. Live Technical Support IMPORTANT! To obtain personal assistance from a Socket technical support engineer, you must first register your product online at www.socketcom.com/prodreg. After you register your product and log in, click on the Technical Support tab, then click New Trouble Ticket to submit an online request for technical support. Afterwards, you can log in anytime to monitor the status of your request.
Limited Warranty Socket Communications Incorporated (Socket) warrants this product against defects in material and workmanship, under normal use and service, for the following period from the date of purchase: Plug-in card: Three years Incompatibility is not a defect covered by Socket’s warranty.
Limited Software Warranty LIMITED WARRANTY. SOCKET warrants that the original disk or CD ROM is free from defects for 90 days from the date of delivery of the SOFTWARE. CUSTOMER REMEDIES. SOCKET’S entire liability and your exclusive remedy shall be, at SOCKET’S option, either (a) return of the price paid or (b) replacement of the SOFTWARE which does not meet SOCKET’S Limited Warranty and which is returned to SOCKET with a copy of your receipt.
Regulatory Compliance The Socket SD Scan Card 3E is designed to be compliant with the rules and regulations in locations where they are sold and will be labeled as required. This product is type approved users are not required to obtain license or authorization before using. Radio Frequency Interference Requirements This device complies with part 15 of the FCC rules.
© Socket Communications, Inc. January 2005 Printed in U.S.A.