
User's Manual
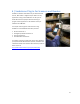
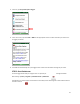
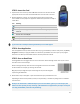


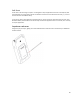
Table Of Contents
- Table of Contents
- 1 | Introduction
- Back
- Front
- 2 | Getting Started
- STEP 1: Install the Battery
- STEP 2: Charge the Battery
- STEP 3: Set up your SoMo 655
- STEP 4: Install Synchronization Software on Host PC
- STEP 5: Connect to Host Computer
- STEP 6: Set Up Your Device Partnership
- Windows 7/Vista
- Windows XP/2000
- Register SoMo 655
- Install Microsoft Windows Mobile Updates
- Set up Enhanced Wi-Fi Companion
- Set up SocketScan 10
- Configure A/B Mode Switch
- Set up Connect!Agent
- Sprite Backup Trial
- MobiScan Rapid Configuration Tool
- Set up Data Capture Triggers
- Set up WAN Connections
- Configure CF/SD slots
- 3 | Using the SoMo 655
- 4 | Wi-Fi Companion
- 5 | Socketscan 10 for CHS Series 7 Barcode Scanners
- 6 | Socketscan Plug-In for Scanners and Readers
- Appendix A
- Appendix B
- Appendix C
- Appendix E
- Appendix F
- Limited Warranty
- Disclaimer
- Limited Software Warranty
- Regulatory Compliance

53
2. In the list, tap Set up Data Capture triggers.
3. In the next screen, tap either LEFT or RIGHT in the appropriate section to select the button you want to use
to trigger your device.
4. The SoMo will automatically set up the trigger button and send a confirmation message to your inbox.
STEP 2: Start Socketscan
Press the trigger button that you assigned. This is a quick way of
starting SocketScan.
Alternatively, tap Start | Programs | SocketScan folder | SocketScan.
A SocketScan icon should appear at the bottom of the Today screen indicating that no data collection device
has been inserted.