Quick Start Guide for Bluetooth™ Connection Kit TABLE OF CONTENTS Overview Installation Steps Summary Page 2 3 BASIC SETUP STEP 1: Install the Software STEP 2: Insert the Card STEP 3: Get Connected! STEP 4: Dial-up Networking 4 6 7 11 OPTIONAL: ADVANCED FEATURES Turn Radio Transmitter On/Off Set up Your Bluetooth Card View Device Properties Set up Your Favorite Device Discover Bluetooth Device(s) Bond with Discovered Device(s) Change Views Delete a Device from the Folder 13 14 15 16 17 18 19 19 OPTI
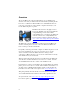
Overview The Socket Bluetooth Connection Kit makes it easy to add Bluetooth wireless connectivity to a Windows Powered Pocket PC (including Pocket PC 2002s) or a Windows CE-based HPC 2000 or Handheld PC Pro. It’s perfect for connecting any of these mobile computers wirelessly to your favorite Bluetooth phone or printer. The Bluetooth Card is the only plug-in card to incorporate all Bluetooth components within the CompactFlash Type I form factor.
Installation Steps Summary It takes only four steps to install and use the Socket Bluetooth Card: STEP 1: Install the software. STEP 2: Insert the Bluetooth Card into your mobile computer. STEP 3: Get Connected! STEP 4: Dial-up networking. This Quick Start Guide also covers several advanced features you can perform while installing and/or using the Bluetooth Card. You can also install and use the Socket Dialer, which lets you dial a number directly from your Contacts folder.
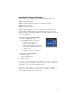
STEP 1: Install the Software Follow these steps BEFORE inserting the Bluetooth Card: 1. Make an active partnership between the mobile computer and a host PC. An active partnership exists if data can be moved between the mobile computer and the host PC via a serial/USB/Ethernet cable or cradle. 2. Insert the Socket Bluetooth Card Installation CD into the host PC. 3. Run the SETUP.HTM or SETUP.EXE file on the CD-ROM, depending on what web browser your host PC uses by default.
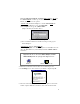
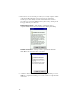
IF YOUR DEFAULT WEB BROWSER IS NETSCAPE, DO NOT run the SETUP.HTM file on Netscape, because it will not work properly. Instead, choose either of two options: OPTION ONE: Use Internet Explorer to run the SETUP.HTM file. (a) In the Internet Explorer screen, click File | Open. (b) In the Open screen, type X:\SETUP.HTM (Replace X with your CD drive letter.) Open screen from Internet Explorer 5.5 (c) Proceed with the instructions described on the previous page for Internet Explorer. OPTION TWO: Run the SETUP.
STEP 2: Insert the Card Important! Do NOT insert the card upside down or shove the card in too hard. Damage may occur! Insert the card into your mobile computer’s slot. If using a PC Card slot, first insert the Bluetooth Card into a CompactFlash-to-PC Card adapter (available separately). Make sure the blue label is on top. Insert the card directly into a CompactFlash I/O slot… …or plug the card into an adapter for use in a PC Card slot.
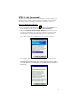
STEP 3: Get Connected! The Get Connected! Wizard guides you through a one-time setup process that prepares the mobile computer and phone for Bluetooth connections. The wizard varies depending on what phone you want to connect to. Ericsson, Nokia, Sony Phones (visible from the Today screen 1. Tap on the Bluetooth task tray icon for Pocket PCs). In the pop-up menu, select Get Connected! 2. Follow the Bluetooth “Get Connected!” Wizard.
4. When the search is complete, a list of the discovered Bluetooth phones will appear. Choose the phone you wish to connect to, and tap Select. A service discovery phase will begin, about 5-10 seconds. 5. As prompted in the next screen, set your phone to “Bondable” or “Pairable” mode. For instructions, refer to your phone manual. Have your passkey ready, then tap Next>. 6. In the next screen, enter the passkey. Tap Reply.
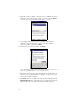
Motorola Timeport 270C (visible from the Today screen 1. Tap on the Bluetooth task tray icon for Pocket PCs). In the pop-up menu, select Get Connected! 2. Follow the Bluetooth “Get Connected!” Wizard. In the welcome screen, use the drop-down list to select the Motorola Timeport 270C. The wizard will provide tailored instructions for this phone. 3. As directed in the next two screens, assign the phone a unique name and set the phone in Discoverable mode. Then tap Next>. 4.
5. The next two screens describe procedures you can only complete outside of the wizard. Read through each screen but do not complete the described procedures until you exit the wizard. Directions for these procedures are provided in STEP 4: Dial-up Networking, starting on the next page. The two procedures are: Bonding with your phone — This must be completed in order to complete the Bluetooth connection and involves dial-up networking.
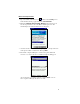
STEP 4: Dial-up Networking Before setting up dial-up networking, prepare yourself with dial-up information and other necessary settings for your office network or ISP. 1. Pocket PC — Go to Start | Settings | Connections | Modems. In the next screen, tap New Connection… Pocket PC 2002 — Go to Start | Settings | Connections | Connections. In the top field, select Internet Settings.
5. Now you are ready to start the connection. Pocket PC — Go to Start | Programs | Connections. Tap on the Bluetooth connection you just set up. Make sure the correct dialing information is entered, then tap Connect. Pocket PC 2002 — When you return to the Connections screen, under Internet Settings, tap Connect. In the next screen, make sure the correct dialing information is entered. Tap OK. HPC — Go to Start | Control Panel | Remote Networking. Tap on the Bluetooth connection you just set up.
OPTIONAL: Turn Radio Transmitter ON/OFF You may want to turn off the radio transmitter to save power or if you are entering an area with radio restrictions. should 1. After you insert the Bluetooth Card, the Bluetooth icon appear in the task tray (visible from the Today screen for Pocket PCs). Tap on the icon. 2. In the pop-up menu, select Turn Transmitter OFF. 3. The Bluetooth Card radio transmitter will shut off. The Bluetooth icon in the task tray will become gray, as will relevant menu options (e.g.
OPTIONAL: Set up Your Bluetooth Card Note: If you use the Get Connected! Wizard, which is recommended for normal usage, then this step is not necessary. This step would be used to change the friendly name of your mobile computer. 1. After you insert the Bluetooth Card, the Bluetooth icon should appear in the task tray (visible from the Today screen for Pocket PCs). Tap on the icon. 2. In the pop-up menu, select Advanced Features, then My Bluetooth Device. 3.
OPTIONAL: View Device Properties Follow these steps to view the properties of an already discovered device. 1. If not open, launch the Bluetooth Devices folder. Tap on the Bluetooth icon (in the Today screen for Pocket PCs). Select Advanced Features then Bluetooth Devices. 2. Tap and hold your stylus on the Bluetooth device you want to view information about. In the pop-up menu, select Properties. Alternatively, after selecting a device, tap on the Properties icon or tap on Device then select Properties.
OPTIONAL: Set up Your Favorite Device Follow these steps to set up a default device in the Bluetooth Devices folder. This is needed only if you want to set up a non-phone device as a favorite. Note: If the folder has only one device, it will automatically be the favorite. 1. In the Bluetooth Devices folder, tap and hold your stylus on the device you wish to set as your favorite. In the pop-up menu, select Set as Favorite. 2. Alternatively, you can tap on Tools and select My Favorites.
OPTIONAL: Discover Bluetooth Device(s) Follow these steps to discover other Bluetooth devices nearby, including non-phone devices. This is a more detailed alternative to using the Bluetooth “Get Connected!” Wizard, and it will allow you to discover both phone and non-phone devices. 1. If not open, launch the Bluetooth Devices folder: Tap on the Bluetooth icon (in the Today screen for Pocket PCs). Select Advanced Features then Bluetooth Devices. 2.
OPTIONAL: Bond with Discovered Device(s) Follow these steps to bond with an already discovered Bluetooth device. In most cases, bonding is for establishing secure communications with a Bluetooth-enabled phone. This is a more detailed alternative to using the Bluetooth “Get Connected! Wizard.” Important! • Do NOT attempt bonding with a Motorola Timeport 270C phone! • Do NOT use this method to bond with a printer. The printing software included on the installation CD handles the bonding process separately. 1.
OPTIONAL: Change Views You can switch between the Large Icons or Details views for the Bluetooth Devices folder. 1. In Bluetooth Devices, tap on View. 2. In the pop-up menu, choose between Large Icons or Details. Large Icons view Details view OPTIONAL: Delete a Device from the Folder If you no longer plan to connect with it, you can delete a device from the Bluetooth Devices folder. 1. In the Bluetooth Devices folder, tap and hold your stylus on the device you wish to delete. 2.
OPTIONAL: Install and Use the Dialer The dialer lets you dial a number directly from your Contacts list. Installing the Dialer If you have not already installed the dialer, follow these steps to do so: 1. Make an active partnership between the mobile computer and a host PC. Use a serial/USB/Ethernet cable or cradle. 2. Insert the Socket Bluetooth Card Installation CD into the host PC. 3. Go to My Computer and browse the installation CD for the Dialer Installer folder. Inside the folder, run the SETUP.
4. If you have multiple phone numbers for the contact, a screen will appear listing the different numbers. Select the one you wish to dial. 5. The mobile computer will pass the contact number to the mobile phone via Bluetooth. The phone will begin dialing the number, which should appear on the phone display. For more detailed information on using the Socket Dialer, please refer to the User’s Guide.
Limited Warranty Socket Communications Incorporated (Socket) warrants this product against defects in material and workmanship, under normal use and service, for the following periods from the date of purchase: Plug-in card: Three years Incompatibility is not a defect covered by Socket’s warranty.
Limited Software Warranty LIMITED WARRANTY. SOCKET warrants that the original disk or CD ROM is free from defects for 90 days from the date of delivery of the SOFTWARE. CUSTOMER REMEDIES. SOCKET’S entire liability and your exclusive remedy shall be, at SOCKET’S option, either (a) return of the price paid or (b) replacement of the SOFTWARE which does not meet SOCKET’S Limited Warranty and which is returned to SOCKET with a copy of your receipt.
Regulatory Compliance The Socket Bluetooth Card is designed to be compliant with the rules and regulations in locations where they are sold and will be labeled as required. This product is type approved — users are not required to obtain license or authorization before using. Radio Frequency Interference Requirements This device complies with part 15 of the FCC rules.
The user may find the following booklet helpful: How to Identify and Resolve Radio-TV Interference Problems. This booklet is available from the U.S. Government Printing Office, Washington, D.C. 20402. Radio Frequency Interference Requirements – Canada This Class B digital apparatus meets the requirements of the Canadian Interference-Causing Equipment Regulations. Cet appareil numérique de la Classe B respecte toutes les exigencies du Reglement sur le Matériel Brouilleur du Canada.
Safety and Usage Tips Please follow these guidelines while operating the Bluetooth Card: Antenna Care and Efficient Use Do not place a metallic shield around your Bluetooth Card since it will reduce the radio transmission efficiency. Driving RF energy may affect some electronic systems in motor vehicles, such as car stereo, safety equipment, etc. Check with your vehicle manufacturer’s representative to be sure that your Bluetooth Card will not affect the electronic system in your vehicle.
Technical Support If you have trouble installing or using the Bluetooth Card, please refer to the “Troubleshooting” section in the User’s Guide in the Docs folder on the Socket Bluetooth Card Installation CD. You can visit Socket’s online forum for users to discuss technical support issues at: www.socketforum.com If you still have trouble, contact Socket’s technical support department prepared with the following information: • The part number (with revision level) and serial number of the card.
© Copyright 2002 Socket Communications, Inc. The Bluetooth Card includes technology licensed under United States Patent Nos. 4,543,450, 4,603,320, and 4,972,470. Bluetooth and the Bluetooth logos are trademarks owned by Bluetooth SIG, Inc., U.S.A. and licensed to Socket Communications, Inc. Printed in U.S.A.