
User's Manual
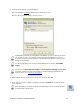

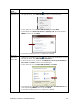

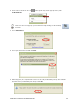
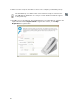
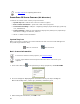
Table Of Contents
- Copyright Notice
- 1 | Introduction
- 2 | Scanner Setup
- 3 | Setup for Windows PC
- 4 | Setup for Windows Mobile
- 5 | Setup for Apple
- 6 | Setup for Android
- 7 | Setup for BlackBerry
- Appendix A Specifications
- Appendix B Safety and Usage Tips
- Appendix C Barcode Label Specifications
- Appendix D Decode Zone
- Appendix E Command Barcodes for CHS 7C
- Appendix F Command Barcodes for CHS 7E, 7M, 7P, 7NRx
- Appendix G Special Button Sequences
- Appendix H CAB Installation
- Appendix I Connection Barcodes
- Appendix J Troubleshooting
- Appendix K Technical Support
- Limited Warranty
- SocketScan Software License Agreement
- Regulatory Compliance

CHAPTER 3: SETUP FOR WINDOWS PC 21
5. The SocketScan Settings screen will appear.
Select an available incoming
COM port for SocketScan 10 to use.
Note the Bluetooth stack at the top of the screen.
Click Ports if a suitable incoming Bluetooth COM port is not listed and you would
like to add one. Also, if SocketScan Settings lists multiple COM ports, you can
determine if any are already paired to a Socket Bluetooth barcode scanner and/or
which one is incoming.
For the Toshiba Bluetooth stack, incoming COM ports are listed as LocalCOM-
Server.
For most users, Use keyboard wedge and Show keyboard wedge icon in tray
should be selected. For more information on keyboard wedge and VIN decode
options, please see SocketScan 10 Settings
.
6. After making all your selections in SocketScan 10 Settings, click OK.
7. In the last screen of the software installation wizard, click Finish. If prompted, restart
your computer.
After installation, a SocketScan 10 shortcut will appear on your desktop. Click it to
quickly launch SocketScan 10.