
User's Manual
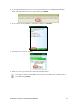
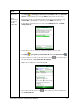
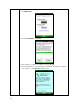

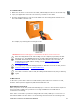
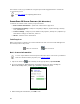
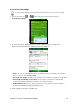
Table Of Contents
- Copyright Notice
- 1 | Introduction
- 2 | Scanner Setup
- 3 | Setup for Windows PC
- 4 | Setup for Windows Mobile
- 5 | Setup for Apple
- 6 | Setup for Android
- 7 | Setup for BlackBerry
- Appendix A Specifications
- Appendix B Safety and Usage Tips
- Appendix C Barcode Label Specifications
- Appendix D Decode Zone
- Appendix E Command Barcodes for CHS 7C
- Appendix F Command Barcodes for CHS 7E, 7M, 7P, 7NRx
- Appendix G Special Button Sequences
- Appendix H CAB Installation
- Appendix I Connection Barcodes
- Appendix J Troubleshooting
- Appendix K Technical Support
- Limited Warranty
- SocketScan Software License Agreement
- Regulatory Compliance

50
Scanner Settings
You can access Scanner Settings only when the CHS is connected to your PDA.
1. Tap on the CHS icon
in the task tray. In the pop-up menu, tap Scanner settings…
2. The CHS will disconnect from SocketScan 10, indicated by two beeps. The Scanner
Settings screen will appear with an empty field.
3. After a few seconds, the CHS will connect to Scanner Settings and beep once. Your CHS
will appear in the list. Make sure your CHS is selected, and tap Properties.
4. After the utility has read you scanner settings, the General properties screen will appear,
reporting the Bluetooth friendly name, Bluetooth Device Address, Type of device,
firmware version, and battery level.
If desired, tap in the Name field to change the Bluetooth friendly name of the CHS.