
User's Manual
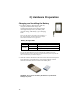
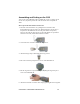
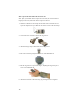
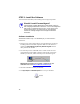
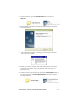
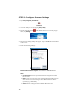
Table Of Contents
- Copyright Notice
- _
- 1 | Introduction
- Scanner Versions
- About the Software
- About Combining Scanning with Bluetooth
- System Requirements
- Package Contents
- _
- 2 | Hardware Preparation
- 3 | Setup for Windows Mobile
- _
- Setup Summary
- STEP 1: Install the Software
- STEP 2: Configure Scanner Settings
- STEP 3: Connect CRS to Host Device with Bluetooth
- STEP 4: Assemble and Put on the CRS
- STEP 5: Scan Data into Your Application
- OPTIONAL: Select Symbologies
- OPTIONAL: Configure Prefix/Suffixes
- OPTIONAL: Configure Sound
- OPTIONAL: Run Scan Demo
- 4 | Setup for Windows XP
- _
- Setup Summary
- STEP 1: Install the Software
- STEP 2: Configure Bluetooth Settings
- STEP 3: Configure Scanner Settings
- STEP 4: Start SocketScan and Connect to CRS
- STEP 5: Assemble and Put on the CRS
- STEP 6: Scan Data into Your Application
- OPTIONAL: Assign Sound and Prefix/Suffix Settings
- OPTIONAL: Configure Advanced Bluetooth Settings
- OPTIONAL: Assign a Remote Trigger Button
- OPTIONAL: Select Symbologies
- _
- Appendix A Specifications
- Appendix B Safety and Usage Tips
- Appendix C Bar Code Label Specifications
- Appendix D Enabling or Disabling Symbologies
- _
- Appendix E Decode Zone
- _
- Appendix F Troubleshooting
- _
- Appendix G Technical Support
- Limited Warranty
- Regulatory Compliance

2 | Hardware Preparation
Charging and Installing the Battery
1. The battery must be charged before initial use,
using the included Socket charger. The
Charging LED will be yellow during charging.
After approximately 4 hours, the battery will
reach full charge, indicated by a green Charging
LED.
Do not use the charger with other types of batteries. A
fully charged battery should provide at least 10,000
scans and more than 8 hours of operation.
Battery Charger LEDs
LED LED Activity Meaning
Power Red Plugged into valid power source
Yellow Charging
Charging
Green Battery is fully charged
You can also check the battery level by checking the CS HW screen of the
SocketScan settings utility. The utility will report the battery level only when the
CRS is connected to your mobile computer.
2. Slide the switch at the bottom of the wrist unit to unlock the battery door.
Insert the battery so that the battery contacts align with the contacts
inside the wrist unit, then close and lock the battery door.
WARNING: Do not insert the battery backwards or upside-down.
Damage may result.
12