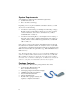
Cordless Hand Scanner Series 7 with Bluetooth® Wireless Technology For Symbian Series 60 & Series 80 Featuring a Bluetooth enabled bar code scanner and SocketScan software for wirelessly scanning bar codes into Bluetooth enabled Symbian Series 60 and Series 80 Smartphones User’s Guide
6/2005 Document # 6410-00245 D Copyright Notice Copyright © 2005 Socket Communications, Inc. All rights reserved. Socket, the Socket logo and Mobility Friendly are registered trademarks of Socket Communications, Inc. Cordless Hand Scanner with Bluetooth Wireless Technology is a trademark of Socket Communications, Inc. Bluetooth and the Bluetooth logos are trademarks owned by Bluetooth SIG, Inc., U.S.A. and licensed to Socket Communications, Inc.
Table of Contents COPYRIGHT NOTICE 2 1 | INTRODUCTION 4 About the Software About Combining Scanning with Bluetooth System Requirements Package Contents Product Registration Hardware Features 2 | SETUP FOR SYMBIAN S60/S80 4 5 6 6 7 7 9 STEP 1: Install Batteries and Attach Tether STEP 2: Charge the Scanner STEP 3: Uninstall Other Scanning Software STEP 4: Install the Software 9 10 10 11 3 | SOCKETSCAN FOR SYMBIAN S60 16 How Do I Connect the Scanner to the Phone? How Do I Scan Data into My Applicat
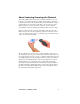
1 | Introduction If you need to collect bar coded data but don't want to be tied to your mobile or desktop computer, Socket's Cordless Hand Scanner (CHS) Series 7 with Bluetooth wireless technology is just what you're looking for. This innovative device combines the power of laser bar code scanning with the convenience of Bluetooth wireless technology in a single compact, lightweight device that is ergonomically designed to fit comfortably in the palm of your hand.
About Combining Scanning with Bluetooth The Cordless Hand Scanner represents an optimal combination of proven laser bar code scanning technology and state-of-the-art Bluetooth wireless connectivity. Because of the problems inherent in the intermittent storage of scanned data in on-board memory if the Bluetooth connection is lost, the CHS is designed to operate only when connected to the host, with the powerful Class 1 radio providing the maximum possible connection range.
System Requirements Your Smartphone should meet these minimum requirements: • Symbian Series 60 or 80 • Bluetooth wireless technology Depending on how you plan to install the SocketScan software, you will also need one of the following: • A method for synchronizing your Smartphone with desktop or laptop PC. This requires synchronization software for you phone as well as connection hardware, such as Bluetooth hardware for your PC, a serial/USB cable or cradle, etc.
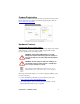
Product Registration Socket highly recommends that all customers register their Socket products. Product registration is required for technical support. Register online at: www.socketcom.com/prodreg Hardware Features Rechargeable Battery and AC Adapter Recharge the internal battery by using the included AC adapter. The adapter rating is 5V, 2A, positive pole center. A fully charged battery should provide roughly 8 hours of normal operation. WARNING: Charge ONLY NiMH batteries in the CHS.
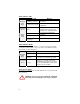
Status Indicator LED LED LED Activity 1 blink per second Bluetooth Status (Blue) Good Read (Green) Battery Status (Red) Meaning Bluetooth radio is on, but not connected. 1 blink per 5 seconds Bluetooth radio is on, connection established. Green Data successfully scanned and transmitted to host device. This setting can be enabled/disabled. 1 blink per second Less than 20% of battery life remaining. Solid red Batteries are charging. Off when connected to charger Batteries are fully charged.
2 | Setup for Symbian S60/S80 This chapter explains how to install and use the Cordless Hand Scanner (CHS) with a Bluetooth enabled Symbian Series 60/80 Smartphone. Setup Summary STEP 1: Install batteries and attach tether. STEP 2: Charge the scanner. STEP 3: Uninstall other scanning software. STEP 4: Install the software. STEP 1: Install Batteries and Attach Tether 1. Use a coin or screwdriver to unlock and remove the battery cover. Turn the lock underneath the scanner to a horizontal position.
STEP 2: Charge the Scanner Use the included AC adapter to charge the Cordless Hand Scanner. The scanner’s NiMH batteries must be charged for at least 4 hours before the first use. The Battery Status LED will emit a solid red light while charging, and turn off when the batteries are fully charged. WARNING: Do not use the scanner when it is being charged, or the battery may have problems achieving a full charge in the future.
STEP 4: Install the Software You can install the SocketScan software into your Smartphone via either of the following methods: • Install the software via the phone’s synchronization software (Recommended). This requires synchronization software for your phone, as well as a data transfer mechanism, such as a serial/USB cable or cradle, Bluetooth enabled PC, infrared, etc.
Install the software via the phone’s synchronization software. 1. Insert the SocketScan Installation CD into your host PC. 2. Connect the phone to the PC. You can establish either a cabled or wireless connection. For instructions, refer to the user documentation for your phone and connection hardware/software. 3. Start the synchronization software on the PC. Use the synchronization software to install the SocketScan_s60.SIS or SocketScan_s80.SIS file from the CD into the Smartphone.
Transfer the software to your phone, then install from the phone 1. Insert the SocketScan Installation CD into your host PC. 2. Connect the phone to the PC and transfer the SocketScan_s60.SIS or SocketScan _s80.SIS file from the CD to the phone. You can establish either a cabled or wireless connection to transfer the file via Bluetooth, infrared, an email or SMS attachment, etc. For instructions, refer to the user documentation for your phone and connection hardware/software.
5. When asked if you want to install Socket Keyboard Wedge, press Yes. 6. When presented with installation options, select Install and press OK. 7. Follow the remaining screens to complete the installation. When installation is complete, disconnect the phone from your PC.
Bluetooth File Transfer via Socket CF Connection KIt 1. Make sure the SocketScan Installation CD is inserted into your PC. 2. Turn on your phone and make sure it is ready for a Bluetooth connection. Refer to your phone’s user documentation for instructions. 3. Make sure the Socket card is inserted and start BlueSoleil. 4. In BlueSoleil, click on the red ball to begin a device search. 5. After the search, double-click on the icon for your Smartphone.
3 | SocketScan for Symbian S60 This chapter explains how to use SocketScan on a Symbian Series 60 device. Make sure you have completed the setup instructions in Chapter 2 before you begin the instructions in this chapter.
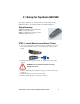
How Do I Connect the Scanner to the Phone? Note: Nokia 3660 screens are shown. Your device screens may vary slightly. 1. Turn on the Cordless Hand Scanner. Press the small power button for five seconds, until you see the LED turn blue. The LED should blink blue once every second to show that the Bluetooth radio is on but not connected. If the LED begins blinking red, the battery needs to be recharged.
4. The main screen of SocketScan will appear. 5. Press Options | Connect. After you connect to the CHS, the Smartphone will save information about the CHS for future connections. Whenever you want to connect to a CHS again, your Smartphone will ask if you want to connect to the previous CHS.. 6. Your phone will begin searching for Bluetooth enabled devices in range. After your phone detects the Socket CHS, press Stop. Select Socket CHS.
The Cordless Hand Scanner will appear as Socket CHS [xxxxxx], where the characters in brackets are the last 6 characters of the scanner’s Bluetooth MAC address. If multiple Cordless Hand Scanners were detected, identify yours by checking the MAC address printed on a label in the battery compartment. 7. Your device will automatically connect to the CHS. If a passkey is requested, enter 1234. To indicate the connection, the CHS will beep once.
How Do I Scan Data into My Application? 1. Start the Symbian application that you want to receive the data (e.g., Notes). Make sure a document or spreadsheet is open. 2. Make sure the application is in Number Mode. The status bar near the top of the screen will display Abc if it is in Alpha Mode, and 123 if it is in Number Mode. To change the mode, press the text entry button and select Number mode. 3. Press the trigger button and scan the code.
4. After a successful scan, data should appear in your document. For example, after you scan the code above into a Notes page, data should appear on the first line. The default “CR” (carriage return) suffix will advance the cursor to the next line, ready for the next scan. Note: • Wait for the “Good Scan” indication before you scan another bar code. If you try to scan too fast, the device can lock up until you stop scanning.
How Do I Select the Symbologies to Be Read? The applet makes it quick and convenient to modify which symbologies you want the scanner to recognize. By default, the scanner is set to recognize nine of the most common symbologies. 1. In the main screen of SocketScan, press Options | Symbology Selector. 2. In the screen that appears, symbologies will be listed along with their configuration status. To change the setting for a symbology, select it and press the joystick/cursor.
How Do I Configure the Scanning Settings? The SocketScan applet lets you specify a variety of scanning settings, including prefixes, suffixes, the beeper frequency, and good read indicators. 1. In the main screen of SocketScan, press Options | Settings. You can configure prefix/suffixes whether or not the CHS is connected to your Smartphone. 2. A screen will appear explaining special prefix/suffix options you can configure. Read the screen and press OK.
3. In the screen that appears, enter your desired scan settings. • Prefix/Suffix: Select to have SocketScan automatically append characters before or after each scan. In the screen that appears, enter up to 128 characters. Press OK. Only printable ASCII characters can be used as prefixes or suffixes. The default suffix is a carriage return.
• Beeper Frequency: Select to adjust the sound of the CHS beeper. In the screen that appears, select the frequency you want. You may want to alter the frequency if using the CHS in a noisy environment. Press OK. • Good Scan Beep: Select Enabled if you would like the CHS to beep every time it successfully reads and transmits a bar code. • Good Scan LED: Select Enabled if you would like the CHS LED to flash green every time it successfully reads and transmits a bar code.
• Reconnect Retries: Select how many times you would like the Cordless Hand Scanner to try connecting back to your phone in case the Bluetooth connection is lost. • Reconnect Interval: Select the time you would like the Cordless Hand Scanner to wait between reconnect retries. • After entering your settings, press OK.
4 | SocketScan for Symbian S80 This chapter explains how to use SocketScan on a Symbian Series 80 device. Make sure you have completed the setup instructions in Chapter 2 before you begin the instructions in this chapter.
How Do I Connect the Scanner to the Phone? Note: Nokia 9500 screens are shown. Your device screens may vary slightly. 1. Turn on the Cordless Hand Scanner. Press the small power button for five seconds, until you see the LED turn blue. The LED should blink blue once every second to show that the Bluetooth radio is on but not connected. If the LED begins blinking red, the battery needs to be recharged.
4. The main screen of SocketScan will appear. Press Connect to search through all Bluetooth devices in range, or press Connect to Previous to connect to the CHS you previously connected to. After you connect to the CHS, the Smartphone will save information about the CHS for future connections. 5. Your phone will begin searching for Bluetooth enabled devices in range. After your phone detects the Socket CHS, press Stop. Select Socket CHS.
If the phone is turned off or the CHS is taken out of range, the Bluetooth connection will be lost, and the CHS will beep twice. After the phone is turned on again or the CHS returns within range, you must reconnect the CHS with SocketScan. For more information about the meanings of LEDs and beeps, please see page 8. 7. Send SocketScan to the background. In the main screen of SocketScan, press Send to background. 8. You will return to the Main Menu of your phone.
How Do I Scan Data into My Application? 1. Start the Symbian application that you want to receive the data (e.g., Note, Documents, Sheets, etc.). Make sure a document or spreadsheet is open. 2. Press the trigger button and scan the code. For example, try this bar code: When data is read and transmitted to your phone, the laser will turn off. Depending on the scanning settings you chose, the scanner may beep and/or the LED may flash green.
How Do I Select the Symbologies to Be Read? The applet makes it quick and convenient to modify which symbologies you want the scanner to recognize. By default, the scanner is set to recognize nine of the most common symbologies. 1. While viewing the main screen of SocketScan, press the Menu button of your phone. Highlight Symbology Selector and press Select. 2. In the screen that appears, symbologies will be listed along with their configuration status.
How Do I Configure the Scanning Settings? 1. While viewing the main screen of SocketScan, press the Menu button of your phone. Highlight Settings, then press Select. You can configure the scanning settings whether or not the CHS is connected to your Smartphone. 2. In the screen that appears, enter your desired scanning settings. • Prefix/Suffix: Select to have SocketScan automatically append characters before or after each scan. Enter a maximum of 128 characters for each.
• Reconnect Retries: Select how many times you would like the CHS to try to connect back to the phone in case the Bluetooth connection is lost. • Reconnect Interval: Select how long you would like the CHS to wait between reconnect retries. 3. After entering your settings, press OK.
Appendix A Specifications Physical Characteristics Size: 125l x 31h x 35w (mm) 4.9l x 1.2h x 1.4w (in.) Total Mass: approx. 90 g (0.2 lb) Power Source: Two AAA NiMH rechargeable batteries Expected Battery Life with Normal Operation: 8,000 scans Operating Temp: 32 to 120°F (0 to 50°C) Operating Humidity: 5% to 95% (Non-condensing) Operating System Support: Symbian OS Series 60 or Series 80 A separate version of SocketScan is available that supports Palm OS, Windows Mobile, Windows XP, and Tablet XP.
About Bluetooth Range The Cordless Hand Scanner features a powerful Class 1 Bluetooth radio to provide the maximum possible range. As with all wireless technologies, the connection range can vary widely depending on many factors such as the brand and placement of the host device, the type and size of physical obstacles and the presence and activity level of competing radio transmissions.
Appendix B Safety and Usage Tips About Bluetooth and Health Bluetooth wireless technology allows you to use short-range radio signals to connect a variety of devices, such as bar code scanners, mobile phones, Pocket PCs, notebook computers, printers, LAN access points, and many other devices at home or work. These radio signals replace the cables that have traditionally connected these devices. Bluetooth products have small radio transmitters and receivers.
Efficient Use For optimum performance, please make sure that there is no metal surrounding your Cordless Hand Scanner. Driving RF energy may affect some electronic systems in motor vehicles, such as car stereo, safety equipment, etc. Check with your vehicle manufacturer to be sure that the Cordless Hand Scanner will not affect the vehicle’s electronics. Aircraft • Turn off your Cordless Hand Scanner before boarding any aircraft.
Appendix C Bar Code Label Specifications All bar code symbols/labels should satisfy the appropriate AIM Uniform Symbology Specification. Background Substrate: The bar code symbol should be printed on material (media) that is reflective and has a matte (not glossy) finish. A background diffuse reflectance of at least 70% to 80% is desirable for optimum contrast. Retro-reflective media should be used to obtain decode distances greater than 36 inches.
Appendix D Enabling or Disabling Symbologies The Cordless Hand Scanner is pre-set to automatically detect and decode (auto-discriminate) the most common bar code symbologies. To enable or disable symbologies, simply use the Symbology screen, accessible from Options menu from the main screen of .SocketScan. Notes: • The length of some symbologies will change after Symbology Selector is used. See Table 1.
Table 2.
For more information on bar codes, symbologies, labels or other bar code related topics, visit any of the following web sites: a. www.aimglobal.org/technologies/barcode/ b. www.aimglobal.org/aimstore/stackedsymbologies.htm c. www.adams1.com d. www.bizfonts.com e. www.barcode-us.com/info_center/upc.htm (UPC Codes) f. www.barcode-us.com/info_center/bookinfo.htm (Bookland EAN) g. www.dataid.com/bcsymbology.htm h. www.aaabarcodes.com i. www.snx.com/mechanics.html j. www.pscnet.com/html/aabcsymbologies.
Appendix E Decode Zone The decode zones for the Cordless Hand Scanner is shown below. The minimum element width (“X Dimension” or bar code “size”) is the width in thousandths of an inch (mils) of the narrowest element (bar or space) in the symbol. The figures shown are the typical scanning distances (depths of field) for selected bar code sizes. The maximum usable length of a bar code symbol (Width of Field) at any given range is also shown.
Appendix F Troubleshooting SYMPTOM: When I try to scan, the laser activates, but no data appears on my screen, and the laser eventually turns off. POSSIBLE REASON SOLUTION The scanner is too close or too far from the bar code. Practice so you get accustomed the most effective distance and scanning angle. Try scanning a bar code that is correctly formatted or printed well, such as on a retail package. Find out the bar code’s symbology. If needed, use the Symbology screen to enable the symbology.
Appendix G Technical Support If you have trouble installing or using the Cordless Hand Scanner with Bluetooth Wireless Technology, contact Socket’s technical support department for assistance. IMPORTANT! To obtain personal assistance from a Socket technical support engineer, you must first register your product online at www.socketcom.com/prodreg. After you register your product, click on the Technical Support tab and click New Trouble Ticket.
Limited Warranty Socket Communications Incorporated (Socket) warrants this product against defects in material and workmanship, under normal use and service, for the following period from the date of purchase: Cordless Hand Scanner: Two years Incompatibility is not a defect covered by Socket’s warranty.
Limited Software Warranty LIMITED WARRANTY. SOCKET warrants that the original disk or CD ROM is free from defects for 90 days from the date of delivery of the SOFTWARE. CUSTOMER REMEDIES. SOCKET’S entire liability and your exclusive remedy shall be, at SOCKET’S option, either (a) return of the price paid or (b) replacement of the SOFTWARE which does not meet SOCKET’S Limited Warranty and which is returned to SOCKET with a copy of your receipt.
Regulatory Compliance The Socket Cordless Hand Scanner is designed to be compliant with the rules and regulations in locations where they are sold and will be labeled as required. This product is type approved — users are not required to obtain license or authorization before using. This product has been certified as conforming to technological standards.
This equipment generates and radiates radio-frequency energy. To comply with FCC RF exposure compliance requirements, the following antenna installation and device operating configurations must be satisfied: (1) Users are not permitted to make changes or modify the system in any way, and (2) connecting external antennas to the Cordless Hand Scanner is prohibited. This device and its antenna must not be co-located or operated with any other antenna or transmitter.
CE Marking & European Union Compliance Products intended for sale within the European Union are marked with a CE Mark which indicates compliance to applicable Directives and European Normes (EN), as follows.
PRODUCT DISPOSAL: Your device should not be placed in municipal waste. Please check local regulations for disposal of electronic products. Battery Warning: • Your device contains a rechargeable NiMH battery. Never throw the battery into a fire, as that could cause the battery to explode. • Never short-circuit the battery by bringing the terminals in contact with another metal object. This could cause personal injury or a fire, and could also damage the battery.
© Socket Communications, Inc. 6/2005 Printed in U.S.A.