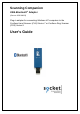
Scanning Companion USB Bluetooth® Adapter (Part no.
11/2007 Document # 6410-00176 I COPYRIGHT NOTICE Copyright © 2007 Socket Communications, Inc. dba Socket Mobile, Inc. All rights reserved. Socket, the Socket logo, Battery Friendly, SocketScan, Cordless Hand Scanner, Cordless Ring Scanner, Connect!Agent and SocketScan are registered trademarks or trademarks of Socket Communications, Inc. dba Socket Mobile, Inc. Bluetooth and the Bluetooth logos are registered trademarks owned by Bluetooth SIG, Inc., U.S.A. and licensed to Socket Mobile, Inc.
TABLE OF CONTENTS COPYRIGHT NOTICE 2 1 | INTRODUCTION 5 ™ ACTIVEPAIRING SYSTEM REQUIREMENTS PACKAGE CONTENTS PRODUCT REGISTRATION HARDWARE FEATURES 6 6 6 6 7 2 | HARDWARE AND SOFTWARE INSTALLATION 8 STEP 1: INSERT THE INSTALLATION CD STEP 2: PLUG IN SCANNING COMPANION STEP 3: COMPLETE THE FOUND NEW HARDWARE WIZARD 9 9 10 3 | MANUAL BLUETOOTH CONNECTIONS STEP 1: TURN ON THE CHS/CRS STEP 2: ADD CHS/CRS TO MICROSOFT BLUETOOTH UTILITY STEP 3: START SOCKETSCAN STEP 4: CONFIGURE SCANNER SETTINGS STEP 5
DISCONNECTING 38 APPENDICES A | SPECIFICATIONS 39 B | SAFETY AND USAGE TIPS 41 C | TECHNICAL SUPPORT 43 LIMITED WARRANTY 44 REGULATORY COMPLIANCE 48 4
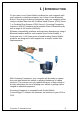
1 | INTRODUCTION Do you want to use Socket Mobile cordless bar code scanners with your notebook or desktop computer, but it doesn’t have Bluetooth built in? Just plug in Scanning Companion, and your computer will be ready to capture data from the Cordless Hand Scanner (CHS) Series 7 or Cordless Ring Scanner (CRS) Series 9. Scanning Companion features a USB 2.0 interface and a powerful Class 1 Bluetooth radio with a range of 100 meters (328 feet).
ACTIVEPAIRING™ Socket Mobile ActivePairing technology enables you to quickly pair/unpair the CRS with a computer by simply scanning a special bar code. It is ideal for users who need to roam from system to system but still use the same CRS unit. By making Bluetooth connections easy for any user, ActivePairing helps to eliminate support costs and downtime in enterprise deployments. The Scanning Companion package includes labels pre-printed with ActivePairing bar codes customized for your Scanning Companion.
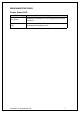
HARDWARE FEATURES Power Status LED LED Activity On (Blue) Off Meaning Scanning Companion is receiving power from your computer Scanning Companion is off CHAPTER 1: INTRODUCTION 7
2 | HARDWARE AND SOFTWARE INSTALLATION This chapter explains how to install Scanning Companion in a Windows XP computer for use with the Cordless Hand Scanner (CHS) Series 7 or the Cordless Ring Scanner (CRS) Series 9. After completing the instructions in this chapter, proceed to the appropriate chapter for connection instructions, based on Bluetooth connection method you plan to use. INSTALLATION SUMMARY STEP 1: Insert the installation CD. STEP 2: Plug in Scanning Companion.
STEP 1: INSERT THE INSTALLATION CD Note: For the best user experience, Socket Mobile recommends that you uninstall any third-party Bluetooth stacks on your computer. Insert the installation CD into the CD drive of your computer STEP 2: PLUG IN SCANNING COMPANION Plug Scanning Companion into the USB port of your computer. The LED should turn on (blue) to indicate that it is on. Note: The LED indicates power only.
STEP 3: COMPLETE THE FOUND NEW HARDWARE WIZARD 1. After you insert Scanning Companion, the Found New Hardware Wizard will automatically launch. Click Next. 2. The wizard will begin searching for the software.
3. After the wizard finds the software, it will begin installing. 4. In the last screen click Finish. 5. A series of notification balloons will appear in the bottom right of your screen. The last one should report that the new hardware is installed and ready to use.
6. After software installation, a Bluetooth icon may appear in the bottom right corner, depending on your task tray.
3 | MANUAL BLUETOOTH CONNECTIONS This chapter explains how to manually connect Scanning Companion to the Cordless Hand Scanner (CHS) Series 7 or the Cordless Ring Scanner (CRS) Series 9 using the Microsoft Bluetooth utility built into Windows XP. If you would like automatic Bluetooth connections using Socket Mobile Connect!Agent software, please refer to Chapter 4. If you would like to pair and connect using Socket Mobile ActivePairing, please refer to Chapter 5. SETUP SUMMARY STEP 1: Turn on the CHS/CRS.
STEP 1: TURN ON THE CHS/CRS Turn on the CHS/CRS. Make sure it has sufficient battery power. Refer to your CHS/CRS documentation for instructions. STEP 2: ADD CHS/CRS TO MICROSOFT BLUETOOTH UTILITY 1. Use the Add Bluetooth Device Wizard to discover and connect to the CHS/CRS. Click on the Bluetooth icon in the task tray. In the pop-up menu, click Add a Bluetooth Device. Note: If the Bluetooth icon does not appear, click Start | Control Panel | Bluetooth Devices. In the Bluetooth Devices utility, click Add.
4. During the device search, select Socket CHS [xxxxxx] or Socket CRS [xxxxxx]. Click Next. The characters in brackets are the last 6 characters of the scanner’s Bluetooth MAC address. 5. In the next screen, select Use the passkey found in the documentation. Enter the default passkey 1234. Click Next.
6. Your computer will connect to the CHS/CRS. 7. The last screen will report the COM port numbers. Remember the Outgoing COM port number. Click Finish. Note: If you forget the COM port number, click: Start | Control Panel | Bluetooth Devices | COM Ports.
STEP 3: START SOCKETSCAN 1. Start SocketScan. Double-click on the SocketScanXP icon on your desktop. 2. The SocketScan icon will appear at the bottom of your screen. STEP 4: CONFIGURE SCANNER SETTINGS 1. Click on the SocketScan icon. In the pop-up menu, click Settings. Alternatively, click Start | Control Panel | SocketScanXP Settings. 2. The SocketScanXP Settings utility will appear. Click on the CS tab.
3. Enter the following settings: • Enable CS support: Check this box. IMPORTANT!!! • Enable ActivePairing: Uncheck. • Bluetooth stack: Select Microsoft SP2. • COM Port: Select the Standard Serial over Bluetooth link with the Outgoing COM port number reported by the Add New Bluetooth Device Wizard. • CS trigger operation: Select whether you want the CHS/CRS to scan only when a Bluetooth connection to the device is detected.
• Auto re-connect: Select the maximum number of tries and time limit for the CHS/CRS to try to reconnect to your computer in case they move out of range. • Battery Level: No progress bar should appear since you are not connected to the CHS/CRS. • Power management: By default, the CHS/CRS automatically shuts off if there is no Bluetooth connection for 20 minutes. Check to disable.
STEP 6: CONNECT TO CHS/CRS 1. Right-click the SocketScan icon at the bottom of the screen and click Connect CS. 2. A balloon will appear reporting that a Bluetooth device wants to connect to your computer. Click on the balloon. 3. When prompted, enter the passkey 1234. Complete the rest of the wizard to connect.
SocketScan will not be able to connect if you have another device assigned as your favorite or default Bluetooth serial device. 4. Your computer will connect to the CHS/CRS, indicated by a beep and a notification balloon. 5. The task tray icon at the bottom of your screen will change to an image of the CHS or CRS to indicate that SocketScan has connected. Now you are ready to begin scanning bar code data into your Windows XP computer. Please refer to your CHS/CRS documentation for instructions.
AUTO-RECONNECT If your computer suspends or the CHS/CRS turns off or moves out of range, the connection will be lost. After the computer turns on again or the CHS/CRS turns on again or returns to range, SocketScan will try to reconnect according to the auto reconnect settings you chose in SocketScan. After the time limit for reconnection attempts has passed, you can click on the Socket CS Connect icon on the desktop to manually initiate reconnection.
4 | CONNECT!AGENT This chapter explains how to use Connect!Agent to connect Scanning Companion to the Cordless Hand Scanner (CHS) Series 7 or the Cordless Ring Scanner (CRS) Series 9. In order to use Connect!Agent, you must install it on your computer. Refer to your CHS/CRS documentation for more information. SETUP SUMMARY STEP 1: Turn on the CHS/CRS. STEP 2: Start SocketScan. STEP 3: Configure scanner settings. STEP 4: Restart SocketScan. STEP 5: Connect to CHS/CRS.
STEP 1: TURN ON THE CHS/CRS Turn on the CHS/CRS. Make sure it has sufficient battery power. Refer to your CHS/CRS documentation for instructions. STEP 2: START SOCKETSCAN 1. Start SocketScan. Double-click on the SocketScanXP icon on your desktop. 2. The SocketScan icon will appear at the bottom of your screen. STEP 3: CONFIGURE SCANNER SETTINGS 1. Click on the SocketScan icon. In the pop-up menu, click Settings. Alternatively, click Start | Control Panel | SocketScanXP Settings. 2.
3. Enter the following settings: • Enable CS support: Check this box. IMPORTANT!!! • Enable ActivePairing: Uncheck. • Bluetooth stack: Select Socket Connect!Agent. • CS trigger operation: Select whether you want the CHS/CRS to scan only when a Bluetooth connection to the device is detected. If you select Scan only when connected to host, scanning will be a few milliseconds slower (Error Proof Protocol will be enabled).
• Battery Level: No progress bar should appear since you are not connected to the CHS/CRS. • Power management: By default, the CHS/CRS automatically shuts off if there is no Bluetooth connection for 20 minutes. Check to disable. • Advanced: When the computer is connected to the CHS/CRS, you can modify the Bluetooth friendly name and security settings of the CHS/CRS. For more information, please refer to the CHS/CRS documentation 4. After entering settings, click OK to save the changes. 5.
STEP 5: CONNECT TO CHS/CRS 1. Right-click the SocketScan icon at the bottom of the screen and click Connect CS. 2. If this is your first time connecting, Connect!Agent will automatically search for the CHS/CRS and configure the connection. The Connect CS option will not appear unless you selected Enable CS Support in the SocketScanXP settings. See page 25. SocketScan will not be able to connect if you have another device assigned as your favorite or default Bluetooth serial device. 3.
SocketScan Icon Meaning No scanner connected. Cordless Hand Scanner connected. Cordless Ring Scanner connected. AUTO-RECONNECT If your computer suspends or the CHS/CRS turns off or moves out of range, the connection will be lost. After the computer turns on again or the CHS/CRS turns on again or returns to range, SocketScan will try to reconnect according to the auto reconnect settings you chose in SocketScan.
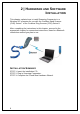
5 | ACTIVEPAIRING This chapter explains how to use ActivePairing to pair and connect Scanning Companion to the Cordless Ring Scanner (CRS) Series 9. Scanning Companion comes with ActivePairing bar code labels for easy deployment. ActivePairing enables CRS Series 9 scanners to connect to a Windows XP host computer without requiring the host computer to initiate the connection. With ActivePairing, the CRS can pair/ unpair with a computer by simply scanning a special bar code.
Scanning Companion comes with a set of ActivePairing bar code labels. For instructions on how to print more labels, please refer to the CRS documentation. SETUP SUMMARY STEP 1: Turn on the CRS. STEP 2: Add the CRS to the Microsoft Bluetooth utility. STEP 3: Start SocketScan. STEP 4: Configure scanner settings. STEP 5: Restart SocketScan. STEP 6: Stick ActivePairing Bar Code Labels onto Computer STEP 7: Scan the Initiator Bar Code.
STEP 1: TURN ON THE CRS Turn on the CRS. Make sure it has sufficient battery power. Refer to your CRS documentation for instructions. STEP 2: ADD CRS TO MICROSOFT BLUETOOTH UTILITY 1. Use the Add Bluetooth Device Wizard to discover and connect to the CRS. Click on the Bluetooth icon in the task tray. In the popup menu, click Add a Bluetooth Device. Note: If the Bluetooth icon does not appear, click Start | Control Panel | Bluetooth Devices. In the Bluetooth Devices utility, click Add. 2.
4. During the device search, select Socket CRS [xxxxxx]. Click Next. The characters in brackets are the last 6 characters of the scanner’s Bluetooth MAC address. 5. In the next screen, select Use the passkey found in the documentation. Enter the default passkey 1234. Click Next.
6. Your computer will connect to the CRS. 7. A series of notification balloons will appear. 8. In the last screen, remember the Incoming COM port number. Click Finish. Note: If you forget the COM port number, click: Start | Control Panel | Bluetooth Devices | COM Ports.
STEP 3: START SOCKETSCAN 1. Start SocketScan. Double-click on the SocketScanXP icon on your desktop. 2. The SocketScan icon will appear at the bottom of your screen. STEP 4: CONFIGURE SCANNER SETTINGS 1. Click on the SocketScan icon. In the pop-up menu, click Settings. Alternatively, click Start | Control Panel | SocketScanXP Settings. 2. The SocketScanXP Settings utility will appear. Click on the CS tab. 3.
• Enable CS support: Check this box. IMPORTANT!!! • Enable ActivePairing: Check this box. IMPORTANT!!! • Bluetooth stack: Select Microsoft SP2. • COM Port: Select the Standard Serial over Bluetooth link with the Incoming COM port number reported by the Add New Bluetooth Device Wizard. • CS trigger operation: Select whether you want the CRS to scan only when a Bluetooth connection to the device is detected.
• Auto re-connect: Select the maximum number of tries and time limit for the CRS to try to reconnect to your computer in case they move out of range. • Battery Level: No progress bar should appear since you are not connected to the CRS. • Power management: By default, the CRS automatically shuts off if there is no Bluetooth connection for 20 minutes. Check to disable. • Advanced: When the computer is connected to the CRS, you can modify the Bluetooth friendly name and security settings of the CRS.
STEP 8: ENTER PASSKEY 1. Within 10 seconds after scanning the Initiator bar code, you will be prompted to enter a passkey. Enter the passkey 1234 . 2. Your computer will connect to the CHS/CRS, indicated by a beep and a notification balloon. 3. The task tray icon at the bottom of your screen will change to an image of the CRS to indicate that SocketScan has connected. SocketScan Icon Meaning No scanner connected. Cordless Ring Scanner connected.
PAIRING AND CONNECTING TO ANOTHER COMPUTER 1. Scan the “Acceptor” bar code, (the FNA bar code on the bottom of the included label) to disconnect from the first host computer. 2. Move within Bluetooth range of the second host computer. 3. Scan the “Initiator” bar code associated with the second host computer. 4. Within 10 seconds, you will be prompted to enter a passkey. Enter the passkey 1234 .
APPENDIX A SPECIFICATIONS Physical Characteristics Size: 69 x 20 x 8.6 mm (2.7 x 0.79 x 0.34 in.) Total Mass: 11 g (0.39 oz) Interface: USB 2.0 LED: Power (blue) Environmental Characteristics: Operating Temp: 32 to 113°F (0 to 45°C) Storage Temp: -4 to +113°F (-20 to +45°C) ambient Operating/Storage Humidity: 90% maximum non-condensing Bluetooth Characteristics Protocol: Bluetooth 2.
About Bluetooth Range Scanning Companion features a powerful Class 1 Bluetooth radio to provide the maximum possible range. As with all wireless technologies, the connection range can vary widely depending on many factors such as the placement of the peripheral devices, the type and size of physical obstacles and the presence and activity level of competing radio transmissions.
APPENDIX B SAFETY AND USAGE TIPS About Bluetooth and Health Bluetooth wireless technology allows you to use short-range radio signals to connect a variety of devices, such as bar code scanners, mobile phones, Pocket PCs, notebook computers, printers, LAN access points, and many other devices at home or work. These radio signals replace the cables that have traditionally connected these devices. Class I Bluetooth products have small radio transmitters and receivers.
Efficient Use For optimum performance, please make sure that there is no metal surrounding your Scanning Companion. Driving RF energy may affect some electronic systems in motor vehicles, such as car stereo, safety equipment, etc. Check with your vehicle manufacturer to be sure that Scanning Companion will not affect the vehicle’s electronics. Aircraft • Turn off Scanning Companion before boarding any aircraft.
APPENDIX C TECHNICAL SUPPORT Socket On-Line Support (SOS) SOS is a virtual technical support assistant that can help you with your product support questions or FAQs. SOS responds immediately to your inquiry, and no product registration is required to use the system. To access SOS, please visit: www.socketmobile.com/support/faq/ Live Technical Support If you have trouble installing or using Scanning Companion, contact the Socket Mobile technical support department for assistance.
LIMITED WARRANTY Socket Communications Incorporated (Socket) warrants this product against defects in material and workmanship, under normal use and service, for one (1) year from the date of purchase. EXCLUDES: Consumables such as batteries, removable cables, cases, straps, chargers, and CF-to-PC Card adapters (90 day coverage only) An extended warranty is available separately for the Cordless Hand Scanner or Cordless Ring Scanner. For more information, please visit: www.socketmobile.
This product may contain fully tested, recycled parts, warranted as if new. For warranty information, please visit: www.socketmobile.
LIMITED SOFTWARE WARRANTY LIMITED WARRANTY. SOCKET warrants that the original disk or CD ROM is free from defects for 90 days from the date of delivery of the SOFTWARE. CUSTOMER REMEDIES. SOCKET’S entire liability and your exclusive remedy shall be, at SOCKET’S option, either (a) return of the price paid or (b) replacement of the SOFTWARE which does not meet SOCKET’S Limited Warranty and which is returned to SOCKET with a copy of your receipt.
or portion thereof, to be unenforceable, the remainder of this License shall continue in full force and effect.
REGULATORY COMPLIANCE The Socket Mobile Scanning Companion is designed to be compliant with the rules and regulations in locations where they are sold and will be labeled as required. This product is type approved — users are not required to obtain license or authorization before using. This product has been certified as conforming to technological standards.
• Reorient or relocate the receiving antenna. • Increase the separation between the equipment and receiver. • Connect the equipment into an outlet on a circuit different from that to which the receiver is connected. • Consult the dealer or an experienced radio/TV technician for help. FCC Caution: Any changes or modifications not expressly approved by the party responsible for compliance could void the user's authority to operate this equipment. This device complies with part 15 of the FCC rules.
equipment off and on, the user may try to correct the interference by one or more of the following measures: • Reorient or relocate the receiving antenna of the radio or television. • Increase the distance separating the equipment and the receiver. • Connect the equipment to an outlet on a different branch circuit than that of the receiver. • Consult the dealer or an experienced radio/TV technician for help.
CE Marking & European Union Compliance Products intended for sale within the European Union are marked with a CE Mark which indicates compliance to applicable Directives and European Normes (EN), as follows.
11/2007 Printed in U.S.A.