
User's Manual


Setting Up the Safe@Office Appliance
32 Check Point Safe@Office User Guide
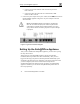
Connect one end of the Ethernet cable to the WAN port at the
back of the unit.
Connect the other end of the cable to a Cable Modem, xDSL
modem or office network.
4. Connect the power adapter to the power socket, labeled PWR, at the back of
the Safe@Office appliance. Plug in the AC power adapter to the wall
electrical outlet.
Warning: The Safe@Office appliance AC adapter is compatible with
either 100, 120 or 230 VAC input power. Please verify that the wall
outlet voltage is compatible with the voltage specified on your power
supply. Failure to observe this warning may result in injuries or damage
to equipment.
Figure 5: Typical Connection Diagram
Setting Up the Safe@Office Appliance
After you have installed the Safe@Office appliance, you must set it up using
the steps shown below.
When setting up your Safe@Office appliance for the first time after
installation, these steps follow each other automatically. After you have
logged on and setup your password, the Setup Wizard automatically opens
and displays the dialog boxes for configuring your Internet connection. After
you have configured your Internet connection, the Setup Wizard
automatically displays the dialog boxes for registering your Safe@Office
appliance. If desired, you can exit the Setup Wizard and perform each of
these steps separately.