
User's Manual


Configuring Network Settings
82 Check Point Safe@Office User Guide
Changing IP Addresses
If desired, you can change your Safe@Office appliance’s internal IP address.
Using Safe@Office 110 or 225, you can also change the entire range of IP
addresses in your internal network. You may want to perform these tasks if,
for example, you are adding the Safe@Office appliance to a large existing
network and don't want to change that network’s IP address range, or if you
are using a DHCP server other than the Safe@Office appliance, that assigns
addresses within a different range.
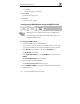
To change IP addresses
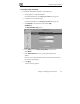
1. Click Network in the main menu, and click the My Network tab.
The My Network page appears.
2. To change the Safe@Office appliance’s internal IP address, enter the new
IP address in the Safe@Office LAN IP field.
3. To change the internal network range, enter a new value in the LAN Subnet
Mask field.
Note: The internal network range is defined both by the Safe@Office
appliance’s internal IP address and by the subnet mask.
For example, if the Safe@Office appliance’s internal IP address is
192.168.100.7, and you set the subnet mask to 255.255.255.0, the
network’s IP address range will be 192.168.100.1 – 192.168.100.254.
4. To reset the network to its default settings, do the following:
a. Click Default.
A confirmation message appears.
b. Click OK.
The internal network range is set to 192.168.10.*, and DHCP and
Hide NAT are enabled.