Using Static Routes c. Click Apply. The changes are saved. Deleting a Static Route Note: The “default” route cannot be deleted. To delete a static route 1. Click Network in the main menu, and click the Routes tab. The Static Routes page appears, with a listing of existing static routes. 2. In the desired route row, click the Delete A confirmation message appears. 3. Click OK. The route is deleted. 140 Check Point Safe@Office User Guide icon.
Viewing the Event Log Chapter 6 Viewing Reports This chapter describes the Safe@Office Portal reports. This chapter includes the following topics: Viewing the Event Log....................................................................... 141 Viewing Computers............................................................................ 144 Viewing Connections .........................................................................
Viewing the Event Log An event marked in Indicates… Green Traffic accepted by the firewall. this color… By default, accepted traffic is not logged. However, such traffic may be logged if specified by a security policy downloaded from your Service Center. The logs detail the date and the time the event occurred, and its type.
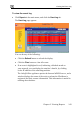
Viewing the Event Log To view the event log • Click Reports in the main menu, and click the Event Log tab. The Event Log page appears. You can do any of the following: • Click the Refresh button to refresh the display. • Click the Clear button to clear all events. • If an event is highlighted in red, indicating a blocked attack on your network, you can display the attacker’s details, by clicking on the IP address of the attacking machine.
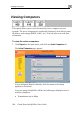
Viewing Computers Viewing Computers This option allows you to view the currently active computers on your network. The active computers are graphically displayed, each with its name, IP address, and settings (DHCP, Static, etc.). You can also view node limit information. To view the active computers 1. Click Reports in the main menu, and click the Active Computers tab. The Active Computers page appears. If you configured High Availability, both the master and backup appliances are shown.
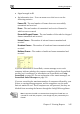
Viewing Computers • Signal strength in dB • An information icon - You can mouse-over this icon to see the following statistics: Frames OK - The total number of frames that were successfully transmitted and received Errors - The total number of transmitted and received frames for which an error occurred Discarded/Dropped Frames - The total number of discarded or dropped frames transmitted and received Unicast Frames - The number of unicast frames transmitted and received Broadcast Frames - The number of bro
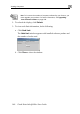
Viewing Computers Note: To increase the number of computers allowed by your license, you must upgrade your product. For further information, see Upgrading Your Software Product on page 258. 2. To refresh the display, click Refresh. 3. To view node limit information, do the following: a. Click Node Limit. The Node Limit window appears with installed software product and the number of nodes used. b. Click Close to close the window.
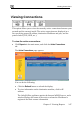
Viewing Connections Viewing Connections This option allows you to view the currently active connections between your network and the external world. The active connections are displayed as a list, specifying source IP address, destination IP address and port, and the protocol used (TCP, UDP, etc.). To view the active connections • Click Reports in the main menu, and click the Active Connections tab. The Active Connections page appears.
Viewing Connections 148 Check Point Safe@Office User Guide
Setting the Firewall Security Level Chapter 7 Setting Your Security Policy This chapter describes how to set up your Safe@Office appliance security policy. You can enhance your security policy by subscribing to services such as Web Filtering and Email Antivirus scanning. You can also subscribe to SecureDesk, which includes and enforces the use of McAfee VirusScan ASaP Web-based antivirus service. For information on subscribing to services and SecureDesk, see Using Subscription Services on page 165.
Setting the Firewall Security Level Table 21: Firewall Security Levels This Does this… Further Details Low Enforces basic control on All inbound traffic is blocked incoming connections, to the external Safe@Office while permitting all appliance IP address, except outgoing connections. for ICMP echoes ("pings"). level… All outbound connections are allowed. Medium Enforces strict control on All inbound traffic is blocked. all incoming connections, while permitting safe outgoing connections.
Setting the Firewall Security Level This Does this… Further Details High Enforces strict control on All inbound traffic is blocked. level… all incoming and outgoing Restricts all outbound traffic connections. except for the following: Web traffic (HTTP, HTTPS), email (IMAP, POP3, SMTP), ftp, newsgroups, Telnet, DNS, IPSEC IKE and VPN traffic. Note: If the security policy is remotely managed, this lever might be disabled.
Configuring Servers To change the firewall security level 1. Click Security in the main menu, and click the Firewall tab. The Firewall page appears. 2. Drag the security lever to the desired level. The Safe@Office appliance security level changes accordingly. Configuring Servers Note: If you do not intend to host any public Internet servers (Web Server, Mail Server etc.) in your network, you can skip this section.
Configuring Servers Note: Configuring servers allows you to create simple Allow and Forward rules for common services, and it is equivalent to creating Allow and Forward rules in the Rules page. For information on creating rules, see Using Rules on page 154. To allow a service to be run on a specific host 1. Click Security in the main menu, and click the Servers tab. The Servers page appears, displaying a list of services and a host IP address for each allowed service. 2.
Using Rules In this Do this… VPN Only Select this option to allow only connections made column… through a VPN. Host IP Type the IP address of the computer that will run the service (one of your network computers) or click the corresponding This Computer button to allow your computer to host the service. To stop the forwarding of a service to a specific host 1. Click Security in the main menu, and click the Servers tab.
Using Rules User-defined rules have priority over the default rules and provide you with greater flexibility in defining and customizing your security policy. The following rule types exist: Table 23: Firewall Rule Types Rule Description Allow and This rule type enables you to do the following: Forward • Permit incoming access from the Internet to a specific service in your internal network. • Forward all such connections to a specific computer in your network.
Using Rules Rule Description Allow This rule type enables you to do the following: • Permit outgoing access from your internal network to a specific service on the Internet. Note: You can allow outgoing connections for services that are not permitted by the default security policy. • Permit incoming access from the Internet to a specific service in your internal network. • Assign traffic to a QoS class.
Using Rules Adding and Editing Rules To add or edit a rule 1. Click Security in the main menu, and click the Rules tab. The Rules page appears. If you are using Safe@Office 105 or 110, the QoS column does not appear. 2. Click Add Rule.
Using Rules The Safe@Office Firewall Rule wizard opens, with the Step 1: Rule Type dialog box displayed. 3. Select the type of rule you want to create. 4. Click Next. The Step 2: Service dialog box appears. The example below shows an Allow rule. 5. Complete the fields using the relevant information in the table below. 6. Click Next.
Using Rules The Step 3: Destination and Source dialog box appears. 7. Complete the fields using the relevant information in the table below. The Step 4: Done dialog box appears. 8. Click Finish. The new rule appears in the Firewall Rules page.
Using Rules Table 24: Firewall Rule Fields In this field… Do this… Any Service Click this option to specify that the rule should apply to any service. Standard Click this option to specify that the rule should apply to Service a specific standard service. You must then select the desired service from the drop-down list. Custom Service Click this option to specify that the rule should apply to a specific non-standard service. The Protocol and Port Range fields are enabled. You must fill them in.
Using Rules In this field… Do this… Source Select the source of the connections you want to allow/block. To specify an IP address, select Specified IP and type the desired IP address in the filed provided. To specify an IP address range, select Specified Range and type the desired IP address range in the fields provided. Destination Select the destination of the connections you want to allow or block. To specify an IP address, select Specified IP and type the desired IP address in the text box.
Using Rules In this field… Do this… Quality of Select the QoS class to which you want to assign the Service Class specified connections. If Traffic Shaper is enabled, Traffic Shaper will handle these connections as specified in the bandwidth policy for the selected QoS class. If Traffic Shaper is not enabled, this setting is ignored. For information on Traffic Shaper and QoS classes, see Using Traffic Shaper on page 120. This drop-down list only appears when defining an Allow rule in Safe@Office 225.
Defining an Exposed Host Deleting Rules To delete an existing rule 1. Click Security in the main menu, and click the Rules tab. The Rules page appears. 2. Click the icon of the rule you wish to delete. A confirmation message appears. 3. Click OK. The rule is deleted. Defining an Exposed Host The Safe@Office appliance allows you to define an exposed host, which is a computer that is not protected by the firewall. This is useful for setting up a public server.
Defining an Exposed Host The Exposed Host page appears. 2. In the Exposed Host field, type the IP address of the computer you wish to define as an exposed host. Alternatively, you can click This Computer to define your computer as the exposed host. 3. Click Apply. The selected computer is now defined as an exposed host.
Connecting to a Service Center Chapter 8 Using Subscription Services This chapter explains how to start subscription services, and how to use Software Updates, Web Filtering, and Email Antivirus services. For information on using the SecureDesk service, see Using SecureDesk on page 183. Note: Check with your reseller regarding availability of subscription services, or surf to www.sofaware.com/servicecenters to locate your nearest Service Center.
Connecting to a Service Center The Account page appears. 2. In the Service Account area, click Connect. The Safe@Office Services Wizard opens, with the Service Center dialog box displayed. 3. Make sure the Connect to a different Service Center check box is selected.
Connecting to a Service Center 4. Do one of the following: • To connect to the SofaWare Service Center, select usercenter.sofaware.com. • To specify a Service Center, select Specified IP and then in the Specified IP field, enter the desired Service Center’s IP address, as given to you by your system administrator. 5. Click Next. • The Connecting… screen appears. • If the Service Center requires authentication, the Service Center Login dialog box appears.
Connecting to a Service Center • The Confirmation dialog box appears with a list of services to which you are subscribed. 6. Click Next. The Done screen appears with a success message. 7. Click Finish. The following things happen: • If a new firmware is available, the Safe@Office appliance may start downloading it. This may take several minutes. Once the download is complete, the Safe@Office appliance restarts using the new firmware. • The Welcome page appears.
Viewing Services Information • The services to which you are subscribed are now available on your Safe@Office appliance and listed as such on the Account page. See Viewing Services Information on page 169 for further information. • The Services submenu includes the services to which you are subscribed. Viewing Services Information The Account page displays the following information about your subscription.
Viewing Services Information Table 25: Account Page Fields This field… Displays… Service Center The name of the Service Center to which you are Name connected (if known). Gateway ID Your gateway ID. Subscription will The date on which your subscription to services will end on end. Service The services available in your service plan. Subscription The status of your subscription to each service: Status • Subscribed • Not Subscribed The status of each service: Information • Connected.
Refreshing Your Service Center Connection Refreshing Your Service Center Connection This option restarts your Safe@Office appliance’s connection to the Service Center and refreshes your Safe@Office appliance’s service settings. To refresh your Service Center connection 1. Click Services in the main menu, and click the Account tab. The Account page appears. 2. In the Service Account area, click Refresh. The Safe@Office appliance reconnects to the Service Center. Your service settings are refreshed.
Disconnecting from Your Service Center Your Service Center Web site opens. 3. Follow the on-screen instructions. Disconnecting from Your Service Center If desired, you can disconnect from your Service Center. To disconnect from your Service Center 1. Click Services in the main menu, and click the Account tab. The Account page appears. 2. In the Service Account area, click Connect. The Safe@Office Services Wizard opens, with the first Subscription Services dialog box displayed. 3.
Web Filtering after they have provided the administrator password via the Web Filtering pop-up window. Note: Web Filtering is only available if you are connected to a Service Center and subscribed to this service. Enabling/Disabling Web Filtering Note: If you are remotely managed, contact your Service Center to change these settings. To enable/disable Web Filtering 1. Click Services in the main menu, and click the Web Filtering tab. The Web Filtering page appears. 2.
Web Filtering Selecting Categories for Blocking You can define which types of Web sites should be considered appropriate for your family or office members, by selecting the categories. Categories will remain visible, while categories marked with will be marked with blocked and will require the administrator password for viewing. Note: If you are remotely managed, contact your Service Center to change these settings. To allow/block a category 1. In the Allow Categories area, click category.
Virus Scanning • The Snooze button changes to Resume. • The Web Filtering Off popup window opens. 3. To re-enable the service, click Resume, either in the popup window, or on the Web Filtering page. • The service is re-enabled for all internal network computers. • If you clicked Resume in the Web Filtering page, the button changes to Snooze. • If you clicked Resume in the Web Filtering Off popup window, the popup window closes.
Virus Scanning Note: Email Antivirus is only available if you are connected to a Service Center and subscribed to this service. Enabling/Disabling Email Antivirus Note: If you are remotely managed, contact your Service Center to change these settings. To enable/disable Email Antivirus 1. Click Services in the main menu, and click the Email Antivirus tab. The Email Antivirus page appears. 2. Drag the On/Off lever upwards or downwards.
Virus Scanning Selecting Protocols for Scanning If you are locally managed, you can define which protocols should be scanned for viruses: • Email retrieving (POP3). If enabled, all incoming email in the POP3 protocol will be scanned • Email sending (SMTP). If enabled, all outgoing email will be scanned Protocols marked with not. will be scanned, while those marked with will Note: If you are remotely managed, contact your Service Center to change these settings.
Virus Scanning 2. Click Snooze. • Email Antivirus is temporarily disabled for all internal network computers. • The Snooze button changes to Resume. • The Email Antivirus Off popup window opens. 3. To re-enable the service, click Resume, either in the popup window, or on the Email Antivirus page. • The service is re-enabled for all internal network computers. • If you clicked Resume in the Email Antivirus page, the button changes to Snooze.
Automatic and Manual Updates Automatic and Manual Updates The Software Updates service enables you to check for new security and software updates. Note: Software Updates are only available if you are connected to a Service Center and subscribed to this service. Checking for Software Updates when Locally Managed If your Safe@Office appliance is locally managed, you can set it to automatically check for software updates, or you can set it so that software updates must be checked for manually.
Automatic and Manual Updates 2. To set the Safe@Office appliance to automatically check for and install new software updates, drag the Automatic/Manual lever upwards. The Safe@Office appliance checks for new updates and installs them according to its schedule. Note: When the Software Updates service is set to Automatic, you can still manually check for updates. 3. To set the Safe@Office appliance so that software updates must be checked for manually, drag the Automatic/Manual lever downwards.
Automatic and Manual Updates The Software Updates page appears. 2. Click Update Now. The system checks for new updates and installs them.
Automatic and Manual Updates Chapter 9 Using SecureDesk SecureDesk allows you to make access through the firewall conditional upon the state of a computer's antivirus software. For example, you can configure SecureDesk to allow access for computers on which the antivirus software is enabled but not up-to-date, or to block access for computers on which the antivirus software is up-to-date, but not the most recent build.
Installing McAfee VirusScan ASaP Installing McAfee VirusScan ASaP Once you have subscribed to SecureDesk and connected to the Service Center (see Connecting to a Service Center on page 165), you must install McAfee VirusScan ASaP on all computers in your network. Note: You must disable the Windows XP "Internet Connection Firewall" option before you install McAfee VirusScan ASaP. The VirusScan installer automatically uninstalls most antivirus programs before installing VirusScan.
Installing McAfee VirusScan ASaP The SecureDesk page appears. 2. Do one of the following: • To install VirusScan on this computer only, click Download and install the latest antivirus software. • To install VirusScan on all the computers in your network, click Run the desktop security software Push Installer. The McAfee Security page opens in a new window, with the McAfee Secure-1 VirusScan ASaP popup window on top. 3. Follow the online instructions to complete installation.
Updating McAfee VirusScan ASaP on All Computers Updating McAfee VirusScan ASaP on All Computers If the version of VirusScan installed on a computer is not up-to-date, SecureDesk may block access through the firewall for that computer, depending on the SecureDesk security level. You can update the installed version of VirusScan on all computers in the network simultaneously, using the Push Installer.
Setting the SecureDesk Security Level Note: If the security policy is remotely managed, this lever might be disabled. Table 26: SecureDesk Security Levels This security Enforces these conditions... level... Off None. SecureDesk is disabled, and users can freely access the Internet, regardless of whether antivirus software is installed or not. Note: You can disable SecureDesk for a specific computer or network, using the information in Using Network Objects on page 129.
Setting the SecureDesk Security Level This security Enforces these conditions... level... High The most recent antivirus software must be installed and enabled. In order for the antivirus software to qualify as the most recent, the installed antivirus components' version numbers must match the version numbers displayed in the Service Status table's Current column. To change the SecureDesk security level 1. Click Security in the main menu, and click the SecureDesk tab. The SecureDesk page appears. 2.
Checking Antivirus Compliancy VirusScan is updated on all computers in the network. For information on updating VirusScan on all compters in the network, see Updating McAfee VirusScan ASaP on All Computers on page 186. Checking Antivirus Compliancy You can check whether a computer's antivirus software complies with the SecureDesk security level conditions. To check antivirus compliancy for your computer 1. Click Security in the main menu, and click the SecureDesk tab.
Checking Antivirus Compliancy The McAfee Security page opens in a new window, with the McAfee Secure-1 VirusScan ASaP popup window on top. b. Follow the online instructions to complete updating. VirusScan is updated on all computers in the network. To check antivirus compliancy for all computers in the network 1. Click Reports in the main menu, and click the Active Computers tab. The Active Computers page appears.
Checking Antivirus Compliancy Table 27: SecureDesk Status Messages Message Explanation SecureDesk is The antivirus software complies with the SecureDesk compliant security level conditions, and access through the firewall is not blocked. Compliant, but The antivirus software complies with the SecureDesk SecureDesk not security level conditions, and access through the firewall most up-to-date is not blocked.
Checking Antivirus Compliancy Message Explanation SecureDesk not The antivirus software components' version numbers are up-to-date less than the version numbers displayed in the Service Status table's Minimum column. Access through the firewall may be blocked, depending on whether the SecureDesk security level conditions require that the antivirus software is up-to-date. Update your software.
Checking Antivirus Compliancy Message Explanation SecureDesk is The antivirus software does not comply with the not compliant SecureDesk security level conditions, and access through the firewall is blocked. Check the SecureDesk security level conditions, and make changes to your antivirus software accordingly. For information on SecureDesk security levels, see Setting the SecureDesk Security Level on page 186.
Checking Antivirus Compliancy Message Explanation Excluded from SecureDesk is disabled for this computer/network. Antivirus compliance checking Access through the firewall is not blocked. For information on enabling SecureDesk, see Using Network Objects on page 129. Table 28: SecureDesk Status Message Color Coding Color Explanation Red Error. The antivirus software does not comply with the SecureDesk security level conditions, and access through the firewall is blocked. Orange Warning.
Overriding SecureDesk Overriding SecureDesk SecureDesk blocks access through the firewall if your computer's antivirus software does not comply with the SecureDesk security level conditions. When you attempt to connect to the Internet, the following things happen: • The Access Denied page appears • The Event Log specifies that the connection was blocked by SecureDesk.
Viewing SecureDesk Reports 3. Click OK. SecureDesk is temporarily disabled for your computer only. The page you were blocked from accessing appears. The Antivirus Off popup window appears. 4. To re-enable the service, click Resume in the popup window. The service is re-enabled for your computer. Viewing SecureDesk Reports You can view reports on SecureDesk's activities for all computers in your network. Note: You must be connected to the Internet to view SecureDesk reports.
Viewing SecureDesk Reports The SecureDesk page appears. 2. Click SecureDesk Reports. A SecureDesk report opens in a new window. This may take some time.
Overview Chapter 10 Working With VPNs This chapter describes how to use your Safe@Office appliance as a Remote Access VPN Client, server, or gateway. This chapter includes the following topics: Overview ............................................................................................ 199 Setting Up Your Safe@Office Appliance as a Remote Access VPN Server........................................................................................................
Overview using Remote Access VPN Clients, such as Check Point SecuRemote. Unless the Remote Access VPN Server is also a Remote Access VPN Client, it cannot initiate a connection to other VPN sites. • Site-to-Site VPN Gateway - Can connect with another Site-to-Site VPN Gateway in a permanent, bi-directional relationship. • Remote Access VPN Client - Can connect to a Remote Access VPN Server, but other VPN sites cannot initiate a connection to the Remote Access VPN Client.
Overview Site-to-Site VPNs A Site-to-Site VPN consists of two or more Site-to-Site VPN Gateways that can communicate with each other in a bi-directional relationship. The connected networks function as a single network. You can use this type of VPN to mesh office branches into one corporate network.
Overview To create a Site-to-Site VPN with two VPN sites 1. On the first VPN site’s Safe@Office appliance, do the following: a. Define the second VPN site as a Site-to-Site VPN Gateway, or create a PPPoE tunnel to the second VPN site, using the procedure Adding and Editing VPN Sites on page 206. b. Enable the Remote Access VPN Server using the procedure Setting Up Your Safe@Office Appliance as a Remote Access VPN Server on page 204. 2. On the second VPN site’s Safe@Office appliance, do the following: a.
Overview Remote Access VPNs A Remote Access VPN consists of one Remote Access VPN Server or Siteto-Site VPN Gateway, and one or more Remote Access VPN Clients. You can use this type of VPN to make an office network remotely available to authorized users, such as employees working from home, who connect to the office Remote Access VPN Server with their Remote Access VPN Clients.
Setting Up Your Safe@Office Appliance as a Remote Access VPN Server To create a Remote Access VPN with two VPN sites 1. On the remote user VPN site's Safe@Office appliance, add the office Remote Access VPN Server as a Remote Access VPN site. See Adding and Editing VPN Sites on page 206. The remote user's Safe@Office appliance will act as a Remote Access VPN Client. 2. On the office VPN site's Safe@Office appliance, enable the Remote Access VPN Server.
Setting Up Your Safe@Office Appliance as a Remote Access VPN Server The VPN Server page appears. 2. Drag the Enabled/Disabled lever to Enabled. The Remote Access VPN Server is enabled. The check box is enabled. 3. To allow authenticated users to bypass NAT when connecting to your internal network, select Bypass NAT. 4. To allow authenticated users to bypass the firewall and access your internal network without restriction, select Bypass the firewall. 5.
Adding and Editing VPN Sites using Safe@Office 110 and 225 Adding and Editing VPN Sites using Safe@Office 110 and 225 To add or edit VPN sites 1. Click VPN in the main menu, and click the VPN Sites tab. The VPN Sites page appears with a list of VPN sites. 2. Do one of the following: • To add a VPN site, click New Site. • To edit a VPN site, click Edit in the desired VPN site’s row.
Adding and Editing VPN Sites using Safe@Office 110 and 225 The Safe@Office VPN Site Wizard opens, with the Welcome to the VPN Site Wizard dialog box displayed. 3. Do one of the following: • Select Remote Access VPN to establish remote access from your Remote Access VPN Client to a Remote Access VPN Server. • Select Site to Site VPN to create a permanent bi-directional connection to another Site-to-Site VPN Gateway. • Select PPPoE to create a non-encrypted connection to a PPPoE server. 4. Click Next.
Adding and Editing VPN Sites using Safe@Office 110 and 225 Configuring a Remote Access VPN Site If you selected Remote Access VPN, the VPN Gateway Address dialog box appears. 1. Enter the IP address of the Remote Access VPN Server to which you want to connect, as given to you by the network administrator. 2. Click Next. The VPN Network Configuration dialog box appears. 3. Specify how you want to obtain the VPN network configuration. Refer to VPN Network Configuration Fields on page 215. 4. Click Next.
Adding and Editing VPN Sites using Safe@Office 110 and 225 • If you chose Specify Configuration, a second VPN Network Configuration dialog box appears. Complete the fields using the information in VPN Network Configuration Fields on page 215 and click Next. • The Authentication Method dialog box appears. 5. Complete the fields using the information in Authentication Methods Fields on page 216. 6. Click Next.
Adding and Editing VPN Sites using Safe@Office 110 and 225 Username and Password Authentication Method If you selected Username and Password, the VPN Login dialog box appears. 1. Complete the fields using the information in VPN Login Fields on page 217. 2. Click Next. • If you selected Automatic Login, the Connect dialog box appears. Do the following: 1) To try to connect to the Remote Access VPN Server, select the Try to Connect to the VPN Gateway check box. This allows you to test the VPN connection.
Adding and Editing VPN Sites using Safe@Office 110 and 225 Warning: If you try to connect to the VPN site before completing the wizard, all existing tunnels will be terminated. 2) Click Next. If you selected Try to Connect to the VPN Gateway, the Connecting… screen appears, and then the Contacting VPN Site screen appears. • The Site Name dialog box appears. 3. Enter a name for the VPN site. You may choose any name. 4. Click Next. The VPN Site Created screen appears.
Adding and Editing VPN Sites using Safe@Office 110 and 225 5. Click Finish. The VPN Sites page reappears. If you added a VPN site, the new site appears in the VPN Sites list. If you edited a VPN site, the modifications are reflected in the VPN Sites list. Certificate Authentication Method If you selected Certificate, the Connect dialog box appears. 1. To try to connect to the Remote Access VPN Server, select the Try to Connect to the VPN Gateway check box. This allows you to test the VPN connection.
Adding and Editing VPN Sites using Safe@Office 110 and 225 The Site Name dialog box appears. 3. Enter a name for the VPN site. You may choose any name. 4. Click Next. The VPN Site Created screen appears. 5. Click Finish. The VPN Sites page reappears. If you added a VPN site, the new site appears in the VPN Sites list. If you edited a VPN site, the modifications are reflected in the VPN Sites list.
Adding and Editing VPN Sites using Safe@Office 110 and 225 RSA SecurID Authentication Method If you selected RSA SecurID, the Site Name dialog box appears. 1. Enter a name for the VPN site. You may choose any name. 2. Click Next. The VPN Site Created screen appears. 3. Click Finish. The VPN Sites page reappears. If you added a VPN site, the new site appears in the VPN Sites list. If you edited a VPN site, the modifications are reflected in the VPN Sites list.
Adding and Editing VPN Sites using Safe@Office 110 and 225 Table 29: VPN Network Configuration Fields In this field… Do this… Download Click this option to obtain the network configuration by Configuration downloading it from the VPN site. This option will automatically configure your VPN settings, by downloading the network topology definition from the Remote Access VPN Server.
Adding and Editing VPN Sites using Safe@Office 110 and 225 In this field… Do this… Subnet mask Select the subnet masks for the destination network addresses. Note: Obtain the destination networks and subnet masks from the VPN site’s system administrator. Backup Gateway Type the name of the VPN site to use if the primary VPN site fails. Table 30: Authentication Methods Fields In this field… Do this… Username and Select this option to use a user name and password Password for VPN authentication.
Adding and Editing VPN Sites using Safe@Office 110 and 225 In this field… Do this… RSA SecurID Select this option to use an RSA SecurID token for Token VPN authentication. When authenticating to the VPN site, you must enter a four-digit PIN code and the SecurID passcode shown in your SecurID token's display. The RSA SecurID token generates a new passcode every minute. SecurID is only supported in Remote Access manual login mode.
Adding and Editing VPN Sites using Safe@Office 110 and 225 In this field… Do this… Automatic Login Click this option to enable the Safe@Office appliance to log on to the VPN site automatically. You must then fill in the Username and Password fields. Automatic Login provides all the computers on your internal network with constant access to the VPN site. For further information on Automatic and Manual Login, see Logging on to a VPN Site on page 233.
Adding and Editing VPN Sites using Safe@Office 110 and 225 Configuring a Site-to-Site VPN Gateway If you selected Site to Site VPN, the VPN Gateway Address dialog box appears. 1. Complete the fields using the information in VPN Gateway Address Fields on page 226. 2. Click Next. The VPN Network Configuration dialog box appears. 3. Specify how you want to obtain the VPN network configuration. Refer to VPN Network Configuration Fields on page 215. 4. Click Next.
Adding and Editing VPN Sites using Safe@Office 110 and 225 • If you chose Specify Configuration, a second VPN Network Configuration dialog box appears. Complete the fields using the information in VPN Network Configuration Fields on page 215, and then click Next. • The Authentication Method dialog box appears. 5. Complete the fields using the information in Authentication Methods Fields on page 227. 6. Click Next.
Adding and Editing VPN Sites using Safe@Office 110 and 225 Shared Secret Authentication Method If you selected Shared Secret, the Authentication dialog box appears. If you chose Download Configuration, the dialog box contains additional fields. 1. Complete the fields using the information in VPN Authentication Fields on page 228 and click Next.
Adding and Editing VPN Sites using Safe@Office 110 and 225 The Connect dialog box appears. 2. To try to connect to the Remote Access VPN Server, select the Try to Connect to the VPN Gateway check box. This allows you to test the VPN connection. Warning: If you try to connect to the VPN site before completing the wizard, all existing tunnels will be terminated. 3. Click Next.
Adding and Editing VPN Sites using Safe@Office 110 and 225 4. Enter a name for the VPN site. You may choose any name. 5. To keep the tunnel to the VPN site alive even if there is no network traffic between the Safe@Office appliance and the VPN site, select Keep this site alive. 6. Click Next. • If you selected Keep this site alive, and previously you chose Download Configuration, the "Keep Alive" Configuration dialog box appears.
Adding and Editing VPN Sites using Safe@Office 110 and 225 Certificate Authentication Method If you selected Certificate, the following things happen: • If you chose Download Configuration, the Authentication dialog box appears. Complete the fields using the information in VPN Authentication Fields on page 228 and click Next. • The Connect dialog box appears. 1. To try to connect to the Remote Access VPN Server, select the Try to Connect to the VPN Gateway check box.
Adding and Editing VPN Sites using Safe@Office 110 and 225 Warning: If you try to connect to the VPN site before completing the wizard, all existing tunnels will be terminated. 2. Click Next. • If you selected Try to Connect to the VPN Gateway, the following things happen: The Connecting… screen appears. • The Contacting VPN Site screen appears. • The Site Name dialog box appears. 3. Enter a name for the VPN site. You may choose any name. 4.
Adding and Editing VPN Sites using Safe@Office 110 and 225 • If you selected Keep this site alive, and previously you chose Download Configuration, the "Keep Alive" Configuration dialog box appears. Do the following: 1) Type up to three IP addresses which the Safe@Office appliance should ping in order to keep the tunnel to the VPN site alive. 2) Click Next. • The VPN Site Created screen appears. 6. Click Finish. The VPN Sites page reappears.
Adding and Editing VPN Sites using Safe@Office 110 and 225 In this field… Do this… Bypass NAT Select this option to allow the VPN site to bypass NAT when connecting to your internal network. Bypass the FW Select this option to allow the VPN site to bypass the firewall and access your internal network without restriction. Table 33: Authentication Methods Fields In this field… Do this… Shared Secret Select this option to use a shared secret for VPN authentication.
Adding and Editing VPN Sites using Safe@Office 110 and 225 Table 34: VPN Authentication Fields In this field… Do this… Topology User Type the topology user’s user name. Topology Type the topology user’s password. Password Use Shared Type the shared secret to use for secure Secret communications with the VPN site. This shared secret is a string used to identify the VPN sites to each other. The secret can contain spaces and special characters.
Adding and Editing VPN Sites using Safe@Office 110 and 225 The PPPoE Login page appears. 3. Complete the fields using the information in the table below. 4. Click Next. The Connect dialog box appears. 5. If you don’t want to try to connect to the VPN site, clear the Try to Connect to the VPN Gateway check box. This allows you to test the VPN connection. Warning: If you try to connect to the VPN site before completing the wizard, all existing tunnels will be terminated. 6. Click Next.
Adding and Editing VPN Sites using Safe@Office 110 and 225 If you selected Try to Connect to the VPN Gateway, the Connecting… screen appears, and then the Contacting VPN Site screen appears. The Site Name dialog box appears. 7. Enter a name for the VPN site. You may choose any name. 8. Click Next. The VPN Site Created screen appears. 9. Click Finish. The VPN Sites page reappears. If you added a VPN site, the new site appears in the VPN Sites list.
Deleting a VPN Site Table 35: PPPoE Login Fields In this field… Do this… User The PPPoE username. Password The PPPoE password. Service The service name configured in the PPPoE server. You only need to fill in this field if there is more than one PPPoE server in the WAN network. Note: If you do not fill in this field, the first PPPoE server found is used. Deleting a VPN Site To delete a VPN site 1. Click VPN in the main menu, and click the VPN Sites tab.
Enabling/Disabling a VPN Site Enabling/Disabling a VPN Site You can only connect to VPN sites that are enabled. To enable/disable a VPN site 1. Click VPN in the main menu, and click the VPN Sites tab. The VPN Sites page appears, with a list of VPN sites. 2. To enable a VPN site, do the following: a. Click the icon in the desired VPN site’s row. A confirmation message appears. b. Click OK. The icon changes to , and the VPN site is enabled. 3.
Logging on to a VPN Site Logging on to a VPN Site You need to manually log on to Remote Access VPN Servers configured for Manual Login. You do not need to manually log on to a Remote Access VPN Server configured for Automatic Login or a Site-to-Site VPN Gateway: all the computers on your network have constant access to it. Manual Login can be done through either the Safe@Office Portal or the my.vpn page. When you log on and traffic is sent to the VPN site, a VPN tunnel is established.
Logging on to a VPN Site The VPN Login page appears. 2. From the Site Name list, select the site to which you want to log on. Note: Disabled VPN sites will not appear in the Site list. 3. Enter your user name and password in the appropriate fields. 4. Click Login. • If the Safe@Office appliance is configured to automatically download the network configuration, the Safe@Office appliance downloads the network configuration.
Logging on to a VPN Site • The VPN Login Status box remains open until you manually log off the VPN site. Logging on through the my.vpn page Note: You don’t need to know the my.firewall page administrator’s password in order to use the my.vpn page. To manually log on to a VPN site through the my.vpn page 1. Direct your web browser to http://my.vpn The VPN Login screen appears. 2. In the Site Name list, select the site to which you want to log on. 3.
Logging off a VPN Site • If when adding the VPN site you specified a network configuration, the Safe@Office appliance attempts to create a tunnel to the VPN site. • The VPN Login Status box appears. The Status field tracks the connection’s progress. • Once the Safe@Office appliance has finished connecting, the Status field changes to “Connected”. • The VPN Login Status box remains open until you manually log off of the VPN site.
Installing a Certificate Installing a Certificate A digital certificate is a secure means of authenticating the Safe@Office appliance to other Site-to-Site VPN Gateways. The certificate is issued by the Certificate Authority (CA) to entities such as gateways, users, or computers. The entity then uses the certificate to identify itself and provide verifiable information.
Installing a Certificate The Certificate page appears, with instructions on how to install the certificate. 2. Click Install Certificate. A Certificate page requests you to specify a certificate file for upload. 3. Click Browse to open a file browser from which to locate and select the file. The filename that you selected is displayed. 4. Click Upload.
Installing a Certificate You are requested to enter the pass-phrase. 5. Type the pass-phrase you received from the network security administrator. 6. Click OK. The certificate is installed. A success message appears. 7. Click OK. The name of the CA that issued the certificate and the name of the gateway to which this certificate was issued appear.
Uninstalling a Certificate Uninstalling a Certificate You cannot uninstall the certificate if there is a VPN site currently defined to use certificate authentication. When a certificate is currently installed, the Certificate page presents two options: • Install Certificate: Allows you to install a new certificate. The current certificate will be replaced. • Uninstall Certificate: Allows you to uninstall the current certificate.
Viewing VPN Tunnels Viewing VPN Tunnels You can view a list of currently established VPN tunnels. VPN tunnels are created and closed as follows: • Remote Access VPN sites configured for Automatic Login, Site-toSite VPN Gateways and PPPoE tunnels A tunnel is created whenever your computer attempts any kind of communication with a computer at the VPN site. The tunnel is closed when not in use for a period of time.
Viewing VPN Tunnels To view VPN tunnels • Click Reports in the main menu, and click the VPN Tunnels tab. The VPN Tunnels page appears with a table of open tunnels to VPN sites. The VPN Tunnels page includes the information described in the table below. You can refresh the table by clicking Refresh. Table 36: VPN Tunnels Page Fields This field… Displays… The Safe@Office appliance Internet IP address.
Viewing VPN Tunnels This field… Displays… The security protocol (IPSec), the type of encryption used to secure the connection, and the type of Message Authentication Code (MAC) used to verify the integrity of the message. This information is presented in the following format: Security protocol: Encryption type/Authentication type Note: All VPN settings are automatically negotiated between the two sites.
Viewing VPN Tunnels 244 Check Point Safe@Office User Guide
Changing Your Password Chapter 11 Managing Users This chapter describes how to manage Safe@Office appliance users. In Safe@Office 105, there is a single user called "admin", whose password can be changed; in Safe@Office 110 and 225, you can define multiple users and assign them various permissions. This chapter includes the following topics: Changing Your Password ................................................................... 245 Adding Users...........................................................
Changing Your Password The Password page appears. 2. Edit the Password and Confirm password fields. Note: Use 5 to 25 characters (letters or numbers) for the new password. 3. Click Apply. Your changes are saved. Using Safe@Office 110 and 225 To change your password 1. Click Users in the main menu, and click the Internal Users tab.
Changing Your Password The Internal Users page appears. 2. In the row of your username, click Edit. The Edit User page appears. 3. Edit the Password and Confirm password fields. Note: Use 5 to 25 characters (letters or numbers) for the new password. 4. Click Apply. Your changes are saved.
Adding Users Adding Users To add a user 1. Click Users in the main menu, and click the Internal Users tab. The Internal Users page appears. 2. Click New User. The Edit User page appears. The options that appear on the page are dependant on the software and services you are using. 3. Complete the fields using the information in Edit User Page Fields on page 249. 4. Click Apply. The new user is saved. Viewing and Editing Users To view or edit users 1.
Viewing and Editing Users a. Edit the fields using Edit User Page Fields on page 249. b. Click Apply. The changes are saved. 4. To return to the Users page without making any changes, click Cancel. Table 37: Edit User Page Fields In this field… Do this… Username Enter a username for the user. Password Enter a password for the user. Use five to 25 characters (letters or numbers) for the new password. Confirm Password Re-enter the user’s password.
Viewing and Editing Users In this field… Do this… Administrator Level Select the user’s level of access to the Safe@Office Portal. The levels are: • No Access: The user cannot access the Safe@Office Portal. • Read/Write: The user can log on to the Safe@Office Portal and modify system settings. • Read Only: The user can log on to the Safe@Office Portal, but cannot modify system settings or export the appliance configuration via the Setup>Tools page.
Deleting Users In this field… Do this… Web Filtering Select this option to allow the user to override Override Web Filtering. This option only appears if the Web Filtering service is defined. This option cannot be changed for the “admin” user. Deleting Users Note: The “admin” user cannot be deleted. To delete a user 1. Click Users in the main menu, and click the Internal Users tab. The Internal Users page appears. 2. In the desired user’s row, click the Delete icon.
Setting Up Remote VPN Access for Users Setting Up Remote VPN Access for Users If you are using your Safe@Office appliance as a Remote Access VPN Server, you can allow users to access it remotely through their Remote Access VPN Clients (a Check Point SecureClient, Check Point SecuRemote, or another Embedded NG appliance). To set up remote VPN access for a user 1. Enable your Remote Access VPN Server, using the procedure Setting Up Your Safe@Office Appliance as a Remote Access VPN Server on page 204. 2.
Using RADIUS Authentication To use RADIUS authentication 1. Click Users in the main menu, and click the RADIUS tab. The RADIUS page appears. 2. Complete the fields using the table below. 3. Click Apply. Table 38: RADIUS Page Fields In this field… Do this… Address Type the IP address of the computer that will run the RADIUS service (one of your network computers) or click the corresponding This Computer button to allow your computer to host the service. To clear the text box, click Clear.
Using RADIUS Authentication In this field… Do this… Port Type the port number on the RADIUS server’s host computer. To reset this field to the default (port 1812), click Default. Shared Secret Type the shared secret to use for secure communication with the RADIUS server. Administrator Level Select the level of access to the Safe@Office Portal to assign to all users authenticated by the RADIUS server.
Viewing Firmware Status Chapter 12 Maintenance This chapter describes the tasks required for maintenance and diagnosis of your Safe@Office appliance. This chapter includes the following topics: Viewing Firmware Status ................................................................... 255 Updating the Firmware....................................................................... 257 Upgrading Your Software Product .....................................................
Viewing Firmware Status To view the firmware status • Click Setup in the main menu, and click the Firmware tab. The Firmware page appears. The Firmware page displays the following information: Table 39: Firmware Status Fields This field… Displays… For example… Firmware Version The current version of the 4.
Updating the Firmware This field… Displays… For example… Installed Product The licensed software and Safe@Office 225 the number of allowed unlimited nodes nodes Uptime The time that elapsed from 01:21:15 the moment the unit was turned on Updating the Firmware If you are subscribed to Software Updates, firmware updates are performed automatically. These updates include new product features and protection against new security threats.
Upgrading Your Software Product The Firmware Update page appears. 3. Click Browse. A browse window appears. 4. Select the image file and click Open. The Firmware Update page reappears. The path to the firmware update image file appears in the Browse text box. 5. Click Upload. Your Safe@Office appliance firmware is updated. This may take a few minutes. At the end of the process the Safe@Office appliance restarts automatically.
Upgrading Your Software Product on your existing Safe@Office appliance. Likewise, you can upgrade from Safe@Office 225 to 225U without changing your hardware. Note: You can only upgrade within the same appliance hardware type. Note: To purchase an upgrade, contact your Safe@Office appliance provider. To upgrade your product, you must install the new Product Key. To install a Product Key 1. Click Setup in the main menu, and click the Firmware tab. The Firmware page appears. 2. Click Upgrade Product.
Upgrading Your Software Product The Installed New Product Key dialog box appears. 6. Click Next. The first Registration dialog box appears. 7.
Upgrading Your Software Product • To register your Safe@Office appliance later on, clear the I want to register my product check box and then click Next. • To register your Safe@Office appliance now, do the following: 1) Click Next. A second Registration dialog box appears. 2) Enter your contact information in the appropriate fields. 3) To receive email notifications regarding new firmware versions and services, select the check box. 4) Click Next. The Registration… screen appears.
Registering Your Safe@Office Appliance The third Registration dialog box appears. 8. Click Finish. Your Safe@Office appliance is restarted and the Welcome page appears. Registering Your Safe@Office Appliance If you want to activate your warranty and optionally receive notifications of new firmware versions and services, you must register your Safe@Office appliance. Privacy Statement: Check Point is committed to protecting your privacy.
Configuring Syslog Logging The Safe@Office Licensing Wizard opens, with the Install Product Key dialog box displayed. 3. Select Keep these settings. 4. Click Next. The first Registration dialog box appears. 5. Verify that the I want to register my product check box is selected. 6. Click Next. A second Registration dialog box appears. 7. Enter your contact information in the appropriate fields. 8. To receive email notifications regarding new firmware versions and services, select the check box. 9.
Configuring Syslog Logging hundreds of logs, a Syslog server can store an unlimited number of logs. Furthermore, Syslog servers can provide useful tools for managing your logs. Note: Kiwi Syslog Daemon is freeware and can be downloaded from http://www.kiwisyslog.com. For technical support, contact Kiwi Enterprises. To configure Syslog logging 1. Click Setup in the main menu, and click the Logging tab. The Logging page appears. 2. Complete the fields using the information in the table below. 3.
Configuring HTTPS In this field… Do this… Clear Click to clear the Syslog Server field. Syslog Port Type the port number of the Syslog server. Default Click to reset the Syslog Port field to the default (port 514 UDP). Configuring HTTPS You can enable Safe@Office appliance users to access the Safe@Office Portal from the Internet. To do so, you must first configure HTTPS. To configure HTTPS 1. Click Setup in the main menu, and click the Management tab. The Management page appears.
Configuring HTTPS 2. Specify from where HTTPS access to the Safe@Office Portal should be granted. See HTTPS Access Options on page 267 for information. Warning: If remote HTTPS is enabled, your Safe@Office appliance settings can be changed remotely, so make sure all Safe@Office appliance users’ passwords are unguessable. If you selected IP Address Range, additional fields appear. 3. If you selected IP Address Range, enter the desired IP address range in the fields provided. 4. Click Apply.
Setting the Time on the Appliance Table 41: HTTPS Access Options Select this option… Internal Network To allow HTTPS access from… The internal network only. This disables remote HTTPS capability. Note: You can use HTTPS to access the Safe@Office Portal from your internal network, by surfing to https://my.firewall. Internal Network and The internal network and your VPN. VPN IP Address Range A particular range of IP addresses.
Setting the Time on the Appliance Note: The Safe@Office 100 series takes the time from your local computer and you do not have to manually set the time. To set the time 1. Click Setup in the main menu, and click the Tools tab. The Tools page appears. If you are using Safe@Office 105 or 110, the page appears without the Set Time button. 2. Click Set Time.
Setting the Time on the Appliance The Safe@Office Set Time Wizard opens displaying the Set the Safe@Office time dialog box. 3. Complete the fields using the information in the table below. 4. Click Next. The following things happen in the order below: • If you selected Specify date and time, the Specify Date and Time dialog box appears. Set the date, time, and time zone in the fields provided, then click Next.
Setting the Time on the Appliance • The Date and Time Updated window appears. 5. Click Finish. Table 42: Set Time Wizard Fields Select this To allow HTTPS access from… option… Your computer's Set the appliance time to your computer’s clock system time. Your computer’s system time is displayed to the right of this option. Keep the current time Do not change the appliance’s time. The current appliance time is displayed to the right of this option.
Controlling the Appliance via the Command Line Controlling the Appliance via the Command Line The Safe@Office Portal enables you to control your appliance via the command line interface. To control the appliance via the command line 1. Click Setup in the main menu, and click the Tools tab. The Tools page appears. 2. Click Command. The Command Line page appears. 3. In the upper field, type a command. You can view a list of supported commands using the command help.
Using Diagnostic Tools The command is implemented. Using Diagnostic Tools The Safe@Office appliance is equipped with a set of diagnostic tools that are useful for troubleshooting Internet connectivity. Table 43: Diagnostic Tools Use this tool… To do this… Ping Check that a specific IP address or DNS name can be reached via the Internet. Traceroute Display a list of all routers used to connect from the Safe@Office appliance to a specific IP address or DNS name.
Using Diagnostic Tools 4. Click Go. • If you selected Ping, the following things happen: The Safe@Office appliance sends packets to the specified the IP address or DNS name. The IP Tools window opens and displays the percentage of packet loss and the amount of time it each packet took to reach the specified host and return (round-trip) in milliseconds. • If you selected Traceroute, the following things happen: The Safe@Office appliance connects to the specified IP address or DNS name.
Backing Up the Safe@Office Appliance Configuration • If you selected WHOIS, the following things happen: The Safe@Office appliance queries the Internet WHOIS server. A window displays the name of the entity to whom the IP address or DNS name is registered and their contact information. Backing Up the Safe@Office Appliance Configuration You can export the Safe@Office appliance configuration to a *.cfg file, and use this file to backup and restore Safe@Office appliance settings, as needed.
Backing Up the Safe@Office Appliance Configuration To export the Safe@Office appliance configuration 1. Click Setup in the main menu, and click the Tools tab. The Tools page appears. 2. Click Export. A standard File Download dialog box appears. 3. Click Save. The Save As dialog box appears. 4. Browse to a destination directory of your choice. 5. Type a name for the configuration file and click Save. The *.cfg configuration file is created and saved to the specified directory.
Backing Up the Safe@Office Appliance Configuration Importing the Safe@Office Appliance Configuration In order to restore your Safe@Office appliance’s configuration from a configuration file, you must import the file. To import the Safe@Office appliance configuration 1. Click Setup in the main menu, and click the Tools tab. The Tools page appears. 2. Click Import. The Import Settings page appears. 3. Do one of the following: • In the Import Settings field, type the full path to the configuration file.
Resetting the Safe@Office Appliance to Defaults A confirmation message appears. 5. Click OK. The Safe@Office appliance settings are imported. The Import Settings page displays the configuration file's content and the result of implementing each configuration command. Resetting the Safe@Office Appliance to Defaults You can reset the Safe@Office appliance to its default settings. When you reset your Safe@Office appliance, it reverts to the state it was originally in when you purchased it.
Resetting the Safe@Office Appliance to Defaults You can reset the Safe@Office appliance to defaults via the Web management interface (software) or by manually pressing the Reset button (hardware) located at the back of the Safe@Office appliance. To reset the Safe@Office appliance to factory defaults via the Web interface 1. Click Setup in the main menu, and click the Tools tab. The Tools page appears. 2. Click Factory Settings. A confirmation message appears. 3.
Running Diagnostics • The Safe@Office appliance is restarted (the PWR/SEC LED flashes quickly). This may take a few minutes. • The Login page appears. To reset the Safe@Office appliance to factory defaults using the Reset button 1. Make sure the Safe@Office appliance is powered on. 2. Using a pointed object, press the RESET button on the back of the Safe@Office appliance steadily for seven seconds and then release it. 3.
Rebooting the Safe@Office Appliance To run diagnostics 1. Click Setup in the main menu, and click the Tools tab. The Tools page appears. 2. Click Diagnostics. Technical information about your Safe@Office appliance appears in a new window. 3. To refresh the contents of the window, click Refresh. The contents are refreshed. 4. To close the window, click Close. Rebooting the Safe@Office Appliance If your Safe@Office appliance is not functioning properly, rebooting it may solve the problem.
Rebooting the Safe@Office Appliance • The Safe@Office appliance is restarted (the PWR/SEC LED flashes quickly). This may take a few minutes. • The Login page appears.
Connectivity Chapter 13 Troubleshooting This chapter provides solutions to common problems you may encounter while using the Safe@Office appliance. This chapter includes the following topics: Connectivity ....................................................................................... 283 Service Center and Upgrades ............................................................. 288 Other Problems...................................................................................
Connectivity • Check if you have defined firewall rules which block your Internet connectivity. • Check with your ISP for possible service outage. • Check whether you are exceeding the maximum number of computers allowed by your license, by following the procedure Viewing Computers on page 144. I cannot access my DSL broadband connection. What should I do? DSL equipment comes in two flavors: bridges (commonly known as DSL modems) and routers. Some DSL equipment can be configured to work both ways.
Connectivity I cannot access my Cable broadband connection. What should I do? • Some cable ISPs require you to register the MAC address of the device behind the cable modem. You may need to clone your Ethernet adapter MAC address onto the Safe@Office appliance. For instructions, see Configuring the Internet Connection on page 57. • Some cable ISPs require using a hostname for the connection. Try reconfiguring your Internet connection and specifying a hostname.
Connectivity My network seems extremely slow. What should I do? • The Ethernet cables may be faulty. For proper operation, the Safe@Office appliance requires STP CAT5 (Shielded Twisted Pair Category 5) Ethernet cables. Make sure that this specification is printed on your cables. • Your Ethernet card may be faulty or incorrectly configured. Try replacing your Ethernet card. • There may be an IP address conflict in your network.
Connectivity • Consider whether you really need the router. The Safe@Office appliance can be used as a replacement for your router, unless you need it for some additional functionality that it provides, such as Wireless access. • If possible, disable NAT in the router. Refer to the router’s documentation for instructions on how to do this. • If the router has a “DMZ Computer” or “Exposed Host” option, set it to the Safe@Office appliance’s external IP address.
Service Center and Upgrades Service Center and Upgrades I purchased Safe@Office 110, but I only have Safe@Office 105 functionality. What should I do? Your have not installed your product key. For further information, see Upgrading Your Software Product on page 258. I have exceeded my node limit. What does this mean? What should I do? Your Product Key specifies a maximum number of nodes that you may connect to the Safe@Office appliance.
Other Problems Why are the date and time displayed incorrectly? In the Safe@Office 100 series, when a computer on the LAN connects to the Safe@Office Portal, the Safe@Office appliance adjusts its date and time to match that of the computer. If the date and time displayed in the Safe@Office Portal are incorrect, it probably means that the date and time on the computer connected to the Safe@Office Portal are incorrect. In the Safe@Office 200 series, you can adjust the time on the Setup page's Tools tab.
Technical Specifications Chapter 14 Specifications This chapter includes the following topics: Technical Specifications.....................................................................291 CE Declaration of Conformity............................................................295 Federal Communications Commission Radio Frequency Interference Statement ..................................................................................................
Technical Specifications Attribute Safe@Office 105/110/ Safe@Office 300 255/225U Supply 110VAC voltage (90 to 132 VAC) Safe@Office 300W 100 ~ 240 VAC 100 to 240VAC 50/60 Hz 50/60 Hz 100VAC 230VAC (200 to 265 VAC) Line voltage 50/60 Hz frequency, AC (47 to 63 Hz) Max. Power 13.5W MAX 5.75W MAX 8W Consumption (100series)/7.5W (MAX 1.15A) (MAX1.
Technical Specifications Attribute Safe@Office 105/110/ 255/225U Temperature: Safe@Office 300 Safe@Office 300W - 20°C to +70°C - 5°C to +70°C - 5°C to +70°C + 5°C to +45°C - 5°C ~ 50°C - 5°C ~ 50°C Humidity: 5% to 90% at 0% ~ 90% 0% ~ 90% Storage/Oper 25°C ation (no CNS1219 C6343 Storage/Trans port Temperature: Operation condensation) Applicable Standards Shock & ETSI 300 019-2-3 CNS1219 Vibration CLASS 3.
Technical Specifications Attribute Safe@Office 105/110/ Safe@Office 300 255/225U Quality ISO9001 Safe@Office 300W ISO9001:2000 ISO9001:2000 TL9000-HW TL9000-HW R3.0 R3.
CE Declaration of Conformity CE Declaration of Conformity SofaWare Technologies Ltd., 3 Hilazon St., Ramat-Gan Israel, hereby declares that this equipment is in conformity with the essential requirements specified in Article 3.1 (a) and 3.
CE Declaration of Conformity Safe@Office 105/110/ 255/225U EN 61000-3-3: 1995 Safe@Office 300 Safe@Office 300W IEC 61000-4-3: EN 61000-4-2:1995+ 2002+A1:2002 A1:1998+A2:2001 IEC 61000-4-4:1995+A1: EN 61000-4-3:1996+A1: 2002+A2:2001 1998+A2: 2001 IEC 61000-4-5:2001 EN 61000-4-4:1995+A1: EN 61000-4-2:1995 EN 61000-4-3:1996/ A2:2001 EN 61000-4-4:1995 2001+A2: 2001 IEC 61000-4-6:2001 EN 61000-4-5:1995 EN 61000-4-5:1995+A1: IEC 61000-4-8:2001 EN 61000-4-6:1996 IEC 61000-4-11:2001 EN 61000-4-7:
Federal Communications Commission Radio Frequency Interference Statement The product has been tested in a typical configuration. For a copy of the Original Signed Declaration (in full conformance with EN45014), please contact SofaWare at the above address. Federal Communications Commission Radio Frequency Interference Statement This equipment complies with the limits for a Class B digital device, pursuant to Part 15 of the FCC Rules.
ADSL Modem Glossary of Terms A ADSL Modem A device connecting a computer to the Internet via an existing phone line. ADSL (Asymmetric Digital Subscriber Line) modems offer a high-speed 'always-on' connection. C CA The Certificate Authority (CA) issues certificates to entities such as gateways, users, or computers. The entity later uses the certificate to identify itself and provide verifiable information.
DHCP sensitive data can be stolen without anyone knowing about it. Sometimes, tiny programs are 'planted' on the computer that are designed to watch out for, seize and then transmit to another computer, specific types of data. An example of a Domain Name is 'www.sofaware.com'. Domain Name System Domain Name System. The Domain Name System (DNS) refers to the Internet domain names, or easy-to-remember "handles", that are translated into IP addresses.
Hacking H Hub A device with multiple ports, connecting several PCs or network devices on a network. Hacking An activity in which someone breaks into someone else's computer system, bypasses passwords or licenses in computer programs; or in other ways intentionally breaches computer security. The end result is that whatever resides on the computer can be viewed and sensitive data can be stolen without anyone knowing about it.
IPSEC be masquerading as a local packet with the source IP address of an internal host. The firewall can protect against IP spoofing attacks by limiting network access based on the gateway interface from which data is being received. IPSEC IPSEC is the leading Virtual Private Networking (VPN) standard. IPSEC enables individuals or offices to establish secure communication channels ('tunnels') over the Internet.
NetBIOS used to map several internal IP addresses to a single IP address, thereby sharing a single IP address assigned by the ISP among several PCs. Check Point FireWall-1's Stateful Inspection Network Address Translation (NAT) implementation supports hundreds of pre-defined applications, services, and protocols, more than any other firewall vendor. NetBIOS NetBIOS is the networking protocol used by DOS and Windows machines.
Server S T Server TCP A server is a program (or host) that awaits and requests from client programs across the network. For example, a Web server is the computer program, running on a specific host, that serves requested HTML pages or files. Your browser is the client program, in this case. Stateful Inspection Stateful Inspection was invented by Check Point to provide the highest level of security by examining every layer within a packet, unlike other systems of inspection.
TCP/IP TCP/IP TCP/IP (Transmission Control Protocol/Internet Protocol) is the underlying communication protocol of the Internet. U UDP UDP (User Datagram Protocol) is a communications protocol that offers a limited amount of service when messages are exchanged between computers in a network that uses the Internet Protocol (IP). UDP is an alternative to the Transmission Control Protocol (TCP) and, together with IP, is sometimes referred to as UDP/IP.
A Index A account, configuring • 171 active computers, viewing • 144 active connections, viewing • 147 Allow and Forward rules, explained • 157 Allow rules, explained • 157 antivirus checking compliancy • 189 installing • 184 Automatic login • 233 B backup connection • 91 Block rules, explained • 157 C explained • 299 cable type • 40 certificate explained • 237 installing • 237 uninstalling • 240 command line interface controlling the appliance via • 271 D DHCP configuring • 94 explained • 300 DHCP Server
E F dialup connection • 77, 92 firewall levels • 149 modem • 84 rule types • 155 dialup modem, setting up • 84 setting security level • 149 DMZ configuring • 102 firmware configuring High Availability for • 117 explained • 255, 300 explained • 102, 300 viewing status • 255 DNS • 91, 272, 300 updating manually • 257 front panel • 15, 19 Dynamic DNS • 10, 169 G E gateways Email Antivirus backup • 117 enabling/disabling • 176 default • 102, 117, 137 selecting protocols for • 177 explaine
I high availability Internet Setup • 66 configuring • 117 Internet Wizard • 58 explained • 117 IP address HTTPS changing • 100 configuring • 265 explained • 301 explained • 301 hiding • 101 using • 49 hub • 13, 17, 40, 91, 117, 283, 301 I IPSEC • 2 VPN mode • 8, 302 ISP, explained • 302 L initial login • 45 installation cable type • 40 LAN cable • 40 network • 40 configuring High Availability for • 117 SecureDesk • 184 connection • 58, 60, 68 Internet connection configuring • 57 configu
N Manual Login • 233 MTU, explained • 79, 302 N P packet • 88, 137, 272, 301, 303 password NetBIOS, explained • 303 changing • 245 network changing internal range of • 100 configuring • 93 setting up • 45 Ping • 272 PPPoE connection • 63, 71 configuring a DMZ • 102 configuring high availability • 117 enabling DHCP Server on • 94 explained • 303 tunnels • 206 PPPoE tunnels, creating • 206 PPTP enabling Hide NAT • 101 connection • 64, 73 explained • 303 installation on • 40 managing • 93 Product K
R assigning services to • 154 event log • 141 built-in • 128 SecureDesk • 196 deleting • 127 viewing • 141 explained • 120 restoring defaults • 128 R RADIUS explained • 252 using • 252 rear panel • 14, 17 rebooting • 280 registering • 262 node limit • 144 routers • 91, 117, 272, 283, 303 rules adding and editing • 157 deleting • 163 types • 157 using • 154 S Safe@Office 100 series Remote Access VPN Clients, explained • 199 front panel • 15, 19 Remote Access VPN Servers • 2 Safe@Office 105 • 2
S about • 1 remotely accessing • 49 backing up • 274 using • 50 changing internal IP address of • 100 SecureDesk checking antivirus compliancy • 189 configuring Internet connection • 57 enabling/disabling • 129, 183 exporting configuration • 274 installing McAfee VirusScan • 184 features • 4 overriding • 195 importing configuration • 276 installing • 25, 40 setting security level • 186 maintenance • 255 status messages • 191 models • 2 viewing reports • 196 network requirements • 13 secu
T Remote Access VPN • 2, 199, 204 Stateful Inspection • 1, 302, 304 Web • 129, 152, 283 Static NAT Service Center connecting to • 165 disconnecting from • 172 refreshing a connection to • 171 services Email Antivirus • 175 SecureDesk • 183 software updates • 179 Web Filtering • 172 Setup Wizard • 45, 58 Site-to-Site VPN gateways • 206 explained • 199 installing a certificate • 237 PPPoE tunnels • 206 software updates checking for manually • 179 explained • 179 explained • 129 using • 130 static routes
U adding • 248 TCP/IP explained • 304 deleting • 251 setting up for MAC OS • 37 managing • 245 setting up remote VPN access for • 252 setting up for Windows 95/98 • 31 viewing and editing • 248 setting up for Windows XP/2000 • 26 technical support • 24 Telstra • 75 V VPN explained • 199, 305 time, setting • 267 Remote Access • 203, 206 Traceroute • 272 Traffic Shaper enabling • 66, 120 sites • 199, 231, 232, 233, 236 explained • 120 Site-to-Site • 201, 206 restoring defaults • 128 tunnnels
W VPN tunnels creation and closing of • 241 establishing • 233 explained • 199, 305 viewing • 241 W WAN cable • 40 connections • 154 ports • 4, 14, 17, 40, 91 Web Filtering enabling/disabling • 173 selecting categories for • 174 snoozing • 174 temporarily disabling • 174 WHOIS • 272 WLAN configuring • 104 defined • 305 Index 315