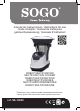
manual de instrucciones / instructions for use mode d’emploi / manual de instruçoes gebrauchsanweisung / manuale d’instruzioni ROBOT MULTIFUNCION MULTIFUNCTION COOKER ROBOT MULTIFONCTION ROBÔ MULTIFUNÇÕES MULTIFUNKTIONSROBOTER ROBOT MULTIFUNZIONE Precaución: lea y conserve estas importantes instrucciones Caution: please read and preserve these important instructions ref.
MEDIDAS DE SEGURIDAD IMPORTANTES: 1. Este manual de instrucciones también se puede descargar desde nuestra página web www.sogo.es 2. Antes de usar el aparato, lea atentamente estas instrucciones e ilustraciones. 3. Guarde estas instrucciones para usarlas como referencia futura. 4. Compruebe si la tensión indicada en el aparato corresponde a la tensión de la red local antes de conectar el aparato. 5. Nunca utilice accesorios o piezas de otros fabricantes.
13. Apague el aparato antes de desmontar e instalar cualquier accesorio. 14. Espere hasta que las partes móviles hayan dejado de funcionar antes de retirar las partes del aparato. 15. Nunca sumerja el aparato principal en agua ni en ningún otro líquido, ni lo enjuague bajo el grifo. Utilice únicamente un paño húmedo para limpiar el aparato. 16. Desenchufe el aparato inmediatamente después de usarlo. 17.
la taza de medición ni presione el botón de pulso. 23. Asegúrese de colocar el aparato sobre una superficie limpia, sólida, uniforme y que no se pueda calentar, especialmente cuando use la herramienta de vapor. 24. Protección contra ebullición en seco. 25. Si el cable de suministro está dañado, debe ser sustituido por el fabricante, su agente o servicio por personas cualificadas con el fin de evitar peligro. 26.
que el motor se detenga por completo antes de sacar el frasco. 33. Tenga cuidado si se vierte líquido caliente en el procesador de alimentos o en la licuadora, ya que se puede expulsar del aparato debido a un vapor repentino. 34. Tenga cuidado al entregar las cuchillas afiladas, al vaciar el recipiente y durante la limpieza. 35. Este aparato está diseñado para ser utilizado en aplicaciones domésticas y similares. 36.
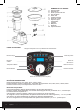
A. B. C. D. E. F. G. H. I. J. K. L. M.
aparato se detenga automáticamente. Cuando solo se configura la velocidad, el tiempo se limita en 5 minutos. Botón de velocidad El botón de velocidad en el sentido de las agujas del reloj es “+”, el control de rotación es “-”. Rango de velocidad: 1,2,3,4,5,6, P (“P” es la función de pulso) La función de pulso es una operación manual.
CÓMO MONTAR LA CUCHILLA 1. Coloque el bloqueo de la hoja en la base inferior del tazón y gírelo en el sentido de las agujas del reloj para bloquear la hoja en el recipiente dentro. (Ver la figura de arriba) Precaución: 1. La cuchilla es muy afilada. Manéjelo con cuidado. ¡Solo sujeta la parte superior de la cuchilla! Los alimentos que se van a picar o cocinar pueden derramarse y dañar el aparato.
Coloque el recipiente 1. Coloque el recipiente en el zócalo del recipiente. Asegúrese de que el pico del recipiente esté en la parte posterior de la máquina. 2. Gire la tapa del recipiente hacia la derecha para bloquear el recipiente. Asegúrese de que la tapa se haya bloqueado en la posición correcta y que toque el interruptor del recipiente. 3. Montar el vaso medidor. ¡ADVERTENCIA! El aparato está equipado con un cierre de seguridad entre el recipiente y la unidad principal.
MODO 3-CALEFACCIÓN + MEZCLA El aparato es ideal para preparar algunos alimentos, como cocinar alimentos para bebés, risotto, mermelada, sopa de verduras y sopa de carne, etc. Por favor, siga los pasos: 1. Montar el bol al aparato principal. 2. Luego cubra la tapa del recipiente. Enchufar 3. Establezca el tiempo que necesita. Ajustar la temperatura. Seleccione la velocidad.
E03 1. La tapa del bol no se instala. 2.o la tapa del recipiente se instaló incorrectamente Apague la máquina, instale el recipiente o cubra la tapa, o saque la tapa del recipiente y vuelva a instalarla correctamente de acuerdo con el manual de instrucciones, y reinicie la máquina. E04 El motor tiene protección contra sobrecalentamiento después de un largo tiempo de trabajo de carga Detenga la máquina y enfríe el motor durante 10-30 minutos, luego reinicie la máquina.
Sopa P2 No hay velocidad durante la cocción a 80 ºC, luego calentar durante 4 segundos y detenerse 20 segundos, luego continuar calentando a 100ºC, seguido de la velocidad 6 durante 2 minutos después de la cocción. 30 min (15 min a 1h) 100ºC 45 min Crema de calabacín Sopa P3 Sin velocidad durante la cocción a 80 ºC, luego 4 velocidades trabajando 20 segundos, luego una velocidad 4 durante 15 segundos después de la cocción.
e n a/ o RECETAS PROPIAS: PARA LA MASA 1) Hacer pasta (instalar la cuchilla de masa) Ingredientes: 200g harina 100g blanco Método: Taza Velocidad Temp (ºC) Tiempo 1. Inserte la cuchilla de la masa. Poner el blanco y la harina en el bol para mezclar. instalar 2 0 2min PARA EL ACCESORIO DE AGITACIÓN (MARIPOSA) 1) Hacer crema (instalar mariposa) Ingredientes: Max :150g nata montada Min: 100g nata montada de e Método: Taza Velocidad 1. Inserte la mariposa.
IMPORTANT SAFEGUARDS: 1. This instruction manual can also be downloaded from our web page www.sogo.es 2. Before using the appliance, Read these instructions and illustrations carefully. 3. Keep these instructions for use for future reference. 4. Check if the voltage indicated on the appliance corresponds to the local mains voltage before you connect the appliance. 5. Never use any accessories of parts from other manufactures. Your guarantee will become invalid if such accessories or parts have been used. 6.
14. Wait until moving parts have stopped running before you remove the parts of the appliance. 15. Never immerse the main appliance in water or any other liquid, nor rinse it under the tap. Use only a moist cloth to clean the appliance. 16. Unplug the appliance immediately after use. 17. Switch off the appliance and disconnected from supply before changing accessories or approaching parts which move in use. 18.
25. If the supply cord is damaged, it must be replaced by manufacturer, its service agent or similarly qualified persons in order to avoid a hazard. 26. Pls be warned of potential injury to user of this appliance due to any misuse. 27. Pls be warned that the heating element surface is subject to residual heat after use. 28. It is not allowed to operate the machine without any material such as water, ice or fruit as this will cause the knife blades to break, and shorten the machine life. 29.
36. Always disconnect appliance from the power supply if it is left unattended before assembling, disassembling or cleaning. When this symbol is used on the product it means CAUTION: HOT SURFACE! It means pls take extra care and precautions to avoid touching such heated parts.
A. B. C. D. E. F. G. H. I. J. K. L. M. CONTROL PANEL PARTS NAME: Measuring cup Bowl lid Air proof ring Bowl handle SS Bowl Main unit Control panel Steamer lid Steamer Blade Butterfly Spatula Dough blade Temperature Rang with heating indicator light Soup Button Dessert Button Increase Button Decrease Button Temperature Button Slow cook Button ON/OFF Button Dough Button Speed Knob (Pulse function) TEMPERATURE BUTTON Temperature range: 37ºC,80ºC,90ºC, 100ºC,120ºC.
SPEED KNOB Knob speed button clockwise rotation is “+”, control rotate is “–“. Speed range: 1,2,3,4,5,6 ,P (‘P” is Pulse function) Pulse function is Manual operation. Speed range 1 2 3 4 5 P RPM r/min) 66 500 1000 1500 2500 3300 When bowl of inside temperature reach to 60ºC, Pulse function no work. When the actual temperature >=60ºC and set the speed >=3 level, appliance will arrive the target speed slowly,and stop heating.
HOW TO ASSEMBLE THE BLADE 1. Put the Blade lock on bowl bottom base and clockwise rotating to locked the blade on the bowl inside. (See above figure) Caution: 1. The blade is very sharp. Handle it with care. Only hold the upper part of the blade! The food to be chopped or cooked may leak out and damage the appliance. While remove the blade from the bowl, please hold the upper part of the blade and anticlockwise rotating to release the blade from bowl. The blade is very sharp.
Place the bowl 1. Place the bowl onto the bowl socket. Be sure to the spout of the bowl on the back of machine. 2. Rotate the bowl lid clockwise to lock bowl. Be sure the Lid had lock correct position and touch the switch of bowl. 3. Assembly the measure cup. WARNING! The appliance is fitted with a safety lock between the bowl and the main unit. The appliance will not work unless the lid has been closed properly. Danger of the burns from the projection of food, never try and force open the lid of the bowl.
3. Set the time you need. Set the temperature. Select the speed. Press the ON/OFF button the appliance starts to working and the heating indicator light, appliance will keep warm in the set temperature (If first set speed =>3 level and set Temp =>60ºC;when bowl inside Temp had reach to 60ºC, the heating will be stop and keep blending) 4. Sound “Beep” will be heard 10 times when the working automatically stopped. 5. Turn the main appliance off. Remove the bowl lid. 6.
CLEANING 1. Before you clean the appliance,turn off the appliance and remove the plug from the socket. 2. While cleaning, don’t immerse the bowl in water. 3. After the bowl cool down, remove the blade from the bowl. Clean the inside and outside of the bowl. Always keep the contact pins at the bottom of the bowl clean and dry. Only Wipe the contact pins with a wet cloth! 4. Unscrew the screw ring and remove all parts of the attachment. Don’t clean the metal bowl in the dishwasher! 5.
Dessert P4 None, then slow and intermittently during cooking 15 min (5min to 1h) 100ºC NO Apple compote Slow cook P1 Slow 20 min (5min to 30 min) 120ºC NO Onion rings Slow cook P2 Slow and intermittently, then continuously 20 min (20 min to 99 min) 80ºC 45 min Tomato sauce Slow cook P3 Slow and intermittently 30 min (20 min to 99 min) 100ºC 45 min Risotto Slow cook P4 None 45 min 100ºC 45 min Stewed fish with saffron Dough P1 Speed 1 working 30 sec, then speed 2 working.
2) Beating Egg Whites (install butterfly) Ingredients : Max :150g egg whites Min: 60g egg whites Method: Cup Speed 1. Insert Butterfly. Place egg white into the bowl to beat until stiff. install 2 Temp(ºC) 0 Time 4min Tip: the bowl must be clean and dry.
MESURES DE SÉCURITÉ IMPORTANTES: 1. Ce manuel d’instructions peut également être téléchargé à partir de notre page Web www.sogo.es 2. Avant d’utiliser l’appareil, lisez attentivement ces instructions et illustrations. 3. Conservez ces instructions pour pouvoir les utiliser ultérieurement. 4. Vérifiez que la tension indiquée sur l’appareil correspond à la tension secteur locale avant de brancher l’appareil. 5. N’utilisez jamais d’accessoires ou de pièces d’autres fabricants.
surveillance. 13. Éteignez l’appareil avant de détacher et d’installer un accessoire. 14. Attendez que les pièces mobiles se soient arrêtées avant de retirer les pièces de l’appareil. 15. Ne plongez jamais l’appareil dans de l’eau ou dans tout autre liquide, et ne le rincez pas sous le robinet. Utilisez uniquement un chiffon humide pour nettoyer l’appareil. 16. Débranchez l’appareil immédiatement après utilisation. 17.
l’appareil. 21. Ne jamais augmenter brusquement la vitesse lorsque la température ou la température de chauffage est supérieure à 60 °C. 22. Lorsque vous traitez des aliments chauds (pour une température supérieure à 60), ne touchez pas le gobelet à mesurer ni le bouton du pouls. 23. Assurez-vous de placer l’appareil sur une surface propre, solide, plane et non chauffable, en particulier lorsque vous utilisez l’outil à vapeur. 24. Protection contre l’ébullition à sec. 25.
son cordon d’alimentation. 31. Ce produit appartient à la classe 1, veuillez utiliser une fiche et une prise bien reliées à la terre pendant le fonctionnement. 32. Assurez-vous que la machine est à l’état «OFF» avant de placer le pot sur le corps de la machine. Attendez que le moteur s’arrête complètement avant de sortir le pot. 33. Faites attention si du liquide chaud est versé dans le robot culinaire ou le mixeur, car il peut être éjecté de l’appareil à la suite d’une vapeur soudaine. 34.
A. B. C. D. E. F. G. H. I. J. K. L. M.
Lorsque vous ne définissez que la vitesse, le temps est limité à 5 minutes. Bouton de vitesse La rotation du bouton de vitesse du bouton dans le sens des aiguilles d’une montre est “+”, la rotation du contrôle est “-“. Plage de vitesse: 1,2,3,4,5,6, P («P» est la fonction Pulse) La fonction Pulse est en mode manuel. Plage de vitesse 1 2 3 4 5 P RPM (r/min) 66 500 1000 1500 2500 3300 Lorsque la température intérieure du bol atteint 60, la fonction de pouls ne fonctionne pas.
COMMENT ASSEMBLER LA LAME 1. Placez le verrou de lame sur la base inférieure du bol et faites-le pivoter dans le sens des aiguilles d’une montre pour verrouiller la lame sur le bol à l’intérieur. (Voir la figure ci-dessus) Mise en garde: 1. La lame est très coupante. Manipulez-le avec soin. Ne tenez que la partie supérieure de la lame! Les aliments à hacher ou à cuire peuvent couler et endommager l’appareil.
Placez le bol 1. Placez le bol sur la douille. Assurez-vous que le bec du bol se trouve à l’arrière de la machine. 2. Faites pivoter le couvercle du bol dans le sens des aiguilles d’une montre pour verrouiller le bol. Assurez-vous que le couvercle est bien verrouillé et qu’il touche l’interrupteur du bol. 3. Assemblez la tasse à mesurer. ATTENTION! L’appareil est équipé d’un verrou de sécurité entre la cuvette et l’unité principale.
1. 2. 3. 4. 5. 6. 1. 2. 6. 7. 8. MODE 3: CHAUFFAGE + MÉLANGE L’appareil convient parfaitement à la préparation de certains aliments, tels que la cuisson d’aliments pour bébés, le risotto, la marmelade, la soupe aux légumes et à la viande, etc. S’il vous plaît suivez les étapes: Assemblez le bol à l’appareil principal. Couvrez ensuite le couvercle du bol. Brancher Définissez l’heure dont vous avez besoin. Réglez la température. Sélectionnez la vitesse.
E03 1.Le couvercle du bol ne s'installe pas 2. ou le couvercle du bol n'a pas été installé correctement Éteignez la machine, installez le bol ou couvrez le couvercle, ou retirez le couvercle du bol et réinstallez-le correctement conformément au manuel d'instructions, réinitialisez la machine. E04 Le moteur a une protection contre la surchauffe après un chargement de longue durée Arrêtez la machine et laissez refroidir le moteur pendant 10-30 minutes, puis redémarrez la machine.
Soupe P2 Pas de vitesse pendant la cuisson à 80ºC, puis chauffez pendant 4 secondes et arrêtez 20 secondes, puis maintenez le chauffage à 100ºC, suivi de la vitesse 6 pendant 2 min après la cuisson. 35 min (15 min à 1 h) 100ºC 45 min Velouté de courgettes Soupe P3 Pas de vitesse pendant la cuisson à 80ºC, puis 4 vitesse de travail de 20 secondes, puis une vitesse de 4 pour 15 secondes après la cuisson.
e s u ng de u PROPRES RECETTES: POUR LA PÂTE 1) Faire de la pâte (Installer la lame de pâte) Ingrédients: 200g farine 100g blanc Méthode: Gobelet Vitesse Temp(ºC) Temps 1. Insérez la lame de pâte. Mettez le blanc et la farine dans le bol pour mélanger. installer 2 0 2min POUR LE ATTACHE EN REMUANT (PAPILLON) 1) Faire de la crème (installer un papillon) Ingrédients: Max :150g crème à fouetter Min: 100g crème à fouetter Méthode: Gobelet Vitesse 1. Insérez le papillon.
IMPORTANTES SALVAGUARDAS: 1. Este manual de instruções também pode ser baixado da nossa página web www.sogo.es 2. Antes de usar o aparelho, leia atentamente estas instruções e ilustrações. 3. Guarde estas instruções para usá-las para referência futura. 4. Verifique se a voltagem indicada no aparelho corresponde à voltagem da rede local antes de ligar o aparelho. 5. Nunca use acessórios ou peças de outros fabricantes. Sua garantia será invalidada se tais acessórios ou peças tiverem sido usados. 6.
14. Aguarde até que as peças móveis parem de funcionar antes de remover as peças do aparelho. 15. Nunca mergulhe o aparelho principal em água ou outro líquido, nem o enxagúe à torneira. Use apenas um pano úmido para limpar o aparelho. 16. Desligue o aparelho imediatamente após o uso. 17. Desligue o aparelho e desconecte-o da alimentação antes de trocar acessórios ou de se aproximar de peças que se movimentam em uso. 18.
medidor nem pressione o botão de pulso. 23. Certifique-se de colocar o aparelho em uma superfície limpa, sólida, plana e não aquecida, especialmente ao usar a ferramenta a vapor. 24. Protecção de ebulição seco... 25. Se o cabo de alimentação estiver danificado, ele deve ser substituído pelo fabricante, seu agente de serviço ou pessoas com qualificações semelhantes, a fim de evitar riscos. 26. Por favor, esteja avisado sobre possíveis danos ao usuário deste aparelho devido a qualquer uso indevido. 27.
processador de alimentos ou liquidificador, pois ele pode ser ejetado para fora do aparelho devido a uma súbita vaporização. 34. Tenha cuidado ao manusear as lâminas de corte afiadas, esvaziar a taça e durante a limpeza. 35. Este aparelho destina-se a ser utilizado em aplicações domésticas e similares. 36. Sempre desconecte o aparelho da fonte de alimentação se não for usado antes de montar, desmontar ou limpar.
NOME DAS PARTES: A. Copo de medição B. Tampa da taça C. Anel à prova de ar D. Manípulo da taça E. SS Bowl F. Unidade principal G. Painel de controle H. Tampa do vaporizador I. Vaporizador J. Lâmina K. Borboleta L. Espátula M.
Botão de velocidade O botão de rotação do botão giratório no sentido horário é “+”, a rotação do controle é “-“. Faixa de velocidade: 1,2,3,4,5,6, P (‘P’ é função de pulso) A função de pulso é a operação manual. Faixa de velocidade 1 2 3 4 5 P RPM (r/min) 66 500 1000 1500 2500 3300 Quando a temperatura interna da cuba atinge 60 ºC, a função de pulso não funciona.
COMO MONTAR A LÂMINA Coloque a trava da lâmina na base inferior da tigela e gire no sentido horário para travar a lâmina na tigela. (Veja a figura acima) Cuidado: 1. A lâmina é muito afiada. Manuseie com cuidado. Apenas segure a parte superior da lâmina! O alimento a ser picado ou cozido pode vazar e danificar o aparelho. Enquanto retire a lâmina da tigela, por favor, segure a parte superior da lâmina e gire no sentido antihorário para liberar a lâmina da tigela. A lâmina é muito afiada.
Coloque a tigela 1. Coloque a tigela no soquete da tigela. Certifique-se de que o bico da taça esteja na parte de trás da máquina. 2. Gire a tampa da tigela no sentido horário para travar a tigela. Certifique-se de que a tampa esteja travada na posição correta e toque o interruptor da tigela. 3. Monte o copo de medição. AVISO! O aparelho está equipado com uma trava de segurança entre a cuba e a unidade principal. O aparelho não funcionará a menos que a tampa tenha sido fechada corretamente.
3. Defina o tempo que você precisa. Defina a temperatura. Selecione a velocidade. Prima o botão ON/OFF, o aparelho começa a funcionar e o indicador de aquecimento acende, o aparelho mantém-se aquecido na temperatura definida (se primeiro definir velocidade => nível 3 e definir Temp => 60 ºC; quando a taça dentro de Temp atingir 60 ºC , o aquecimento irá parar e manter a mistura) 4. O som “Beep” será ouvido 10 vezes quando o trabalho parar automaticamente. 5. Desligue o aparelho principal.
E05 Proteção contra queima a seco (quando a temperatura interna da cuba sobe até 140 ºC, o trabalho de aquecimento é interrompido e o código E05 aparece) Desligue a máquina e deixe o aparelho arrefecer e, em seguida, reinicie-o. Nota: se, após todas as soluções, ainda não estiver funcionando, devolva ao vendedor e ao departamento de manutenção LIMPEZA 1. Antes de limpar o aparelho, desligue o aparelho e retire a ficha da tomada. 2. Ao limpar, não mergulhe a tigela na água. 3.
Sopa P3 Sem velocidade durante o cozimento até 80 ºC, depois 4 velocidades trabalhando 20 segundos, depois uma velocidade 4 por 15 segundos após o cozimento.
RECEITAS PRÓPRIAS: PARA MASSA 1) Fazendo pasta (Instale a lâmina de massa) Ingredientes: 200g farinha 100g branco Método: xícara Velocidade Temp (ºC) Tempo 1. Insira a lâmina de massa. Coloque o branco e a farinha na tigela para misturar. instale 2 0 2min PARA O ACESSÓRIO DE AGITAÇÃO (BORBOLETA) 1) Fazendo creme (instale borboleta) Ingredientes: Max :150g creme de leite Min: 100g creme de leite Método: xícara Velocidade 1. Insira a borboleta.
WICHTIGE SICHERHEITSMASSNAHMEN: 1. Diese Bedienungsanleitung kann auch von unserer Webseite www.sogo.es heruntergeladen warden 2. Lesen Sie diese Anweisungen und Abbildungen sorgfältig durch, bevor Sie das Gerät verwenden. 3. Bewahren Sie diese Anweisungen für späteres Nachschlagen auf. 4. Prüfen Sie, ob die auf dem Gerät angegebene Spannung der örtlichen Netzspannung entspricht, bevor Sie das Gerät anschließen. 5. Verwenden Sie niemals Zubehör oder Teile von anderen Herstellern.
bel außerhalb der Reichweite von Kindern auf. 12. Lassen Sie das Gerät niemals unbeaufsichtigt laufen. 13. Schalten Sie das Gerät aus, bevor Sie Zubehör abnehmen und installieren. 14. Warten Sie, bis die beweglichen Teile nicht mehr laufen, bevor Sie die Teile des Geräts entfernen. 15. Tauchen Sie das Hauptgerät niemals in Wasser oder andere Flüssigkeiten und spülen Sie es auch nicht unter fließendem Wasser ab. Verwenden Sie nur ein feuchtes Tuch, um das Gerät zu reinigen. 16.
20. Kinder dürfen nicht mit dem Gerät spielen. 21. Erhöhen Sie die Geschwindigkeit niemals abrupt, wenn die Temperatur oder die Erwärmungstemperatur mehr als 60 °C beträgt. 22. Berühren Sie bei der Verarbeitung heißer Speisen (für Temperaturen über 60 °C) nicht den Messbecher oder drücken Sie die Impulstaste. 23. Stellen Sie sicher, dass das Gerät auf einer sauberen, festen, ebenen und nicht beheizbaren Oberfläche steht, insbesondere wenn Sie das Dampfwerkzeug verwenden. 24. Trockener Kochschutz. 25.
31. Dieses Produkt gehört zu einem Gerät der Klasse 1. Verwenden Sie während des Betriebs einen gut geerdeten Stecker und eine gut geerdete Steckdose. 32. Vergewissern Sie sich, dass die Maschine ausgeschaltet ist, bevor Sie das Gefäß auf den Körper der Maschine stellen. Warten Sie, bis der Motor vollständig zum Stillstand gekommen ist, bevor Sie das Glas herausnehmen. 33.
A. B. C. D. E. F. G. H. I. J. K. L. M. TEILE NAME: Messbecher Schüsseldeckel Luftdichter Ring Schüsselgriff SS Bowl Hauptgerät Bedienfeld Dämpferdeckel Dampfer Klinge Schmetterling Spatel Teigklinge SYSTEMSTEUERUNG Temperaturbereich mit Heizungsanzeigelampe Bouton de dessert Suppentaste Erhöhungs-Taste Bouton diminuer Temperaturtaste Bouton de cuisson An / aus Schalter Bouton de pâte Geschwindigkeitsknopf (Impulsfunktion) Temperaturtaste Temperaturbereich: 37 °C, 80 °C, 90 °C, 100 °C, 120 °C.
Geschwindigkeitsknopf Die Geschwindigkeit drehknopfdrehung im Uhrzeigersinn ist „+“, die Steuerungsdrehung ist „-“. Geschwindigkeitsbereich: 1,2,3,4,5,6, P (“P” ist Impulsfunktion) Impulsfunktion ist Handbetrieb. Geschwindigkeitsbereich 1 2 3 4 5 P RPM (r/min) 66 500 1000 1500 2500 3300 Wenn die Innentemperatur der Schüssel 60 ° C erreicht, funktioniert die Impulsfunktion nicht.
WIE WERDEN DIE KLINGE MONTIERT 1. Setzen Sie die Klingenarretierung auf den Boden der Schüssel und drehen Sie sie im Uhrzeigersinn, um die Klinge im Inneren der Schüssel zu arretieren. (Siehe obige Abbildung) Vorsicht: 1. Die Klinge ist sehr scharf. Gehen Sie vorsichtig damit um. Halten Sie nur den oberen Teil der Klinge! Das zu hackende oder gar zu kochende Lebensmittel kann auslaufen und das Gerät beschädigen.
Platzieren Sie die Schüssel 1. Setzen Sie die Schüssel auf die Schüsselpfanne. Stellen Sie sicher, dass sich der Auslauf der Schüssel auf der Rückseite der Maschine befindet. 2. Drehen Sie den Schüsseldeckel im Uhrzeigersinn, um die Schüssel zu verriegeln. Vergewissern Sie sich, dass der Deckel in der richtigen Position eingerastet ist und den Schalter der Schüssel berührt. 3. Montieren Sie den Messbecher.
1. 2. 3. 4. 5. 6. 1. 2. 6. 7. 8. MODUS 3-HEIZUNG + MISCHEN Das Gerät eignet sich hervorragend zum Zubereiten von Speisen, z. B. zum Kochen von Babynahrung, Risotto, Marmelade, Gemüsesuppe und Fleischsuppe usw. Bitte folgen Sie den Schritten: Montieren Sie die Schüssel am Hauptgerät. Decken Sie dann den Schüsseldeckel ab. Einstecken Stellen Sie die benötigte Zeit ein. Stellen Sie die Temperatur ein. Wählen Sie die Geschwindigkeit.
t e E03 1. Der Schüsseldeckel lässt sich nicht installieren 2. oder der Schüsseldeckel wurde falsch installiert Schalten Sie die Maschine aus, bringen Sie die Schüssel an oder decken Sie den Deckel ab, oder nehmen Sie den Schüsseldeckel heraus und setzen Sie ihn gemäß der Bedienungsanleitung wieder korrekt ein. Setzen Sie die Maschine zurück. E04 Der Motor hat nach längerem Laden einen Überhitzungsschutz. Stoppen Sie die Maschine und lassen Sie den Motor 10 bis 30 Minuten lang abkühlen.
Suppe P2 Keine Geschwindigkeit 35 min (15 während des Kochens min bis 1 h) bei 80 °C, dann 4 Sek. Erhitzen und 20 Sek. Anhalten, dann bei 100 °C erhitzen, danach Geschwindigkeit 6 für 2 Minuten nach dem Garen. 100ºC Suppe P3 Keine Geschwindigkeit 40 min (15 während des Kochens min bis 1 h) auf 80 °C, dann 20 Sekunden bei 4 Gängen und dann 15 Sekunden nach dem Garen auf Geschwindigkeit 4.
EIGENE REZEPTE: Für den Teig 1) Paste herstellen (Teigklinge einbauen) Zutaten: 200g Mehl 100 g weiß Methode: Tasse Geschwindigkeit Temp (ºC) Zeit 1. Setzen Sie die Teigklinge ein. Geben Sie das Weiß und das Mehl in die Schüssel, um es zu mischen. einbauen 2 0 2min Temp (ºC) Zeit FÜR DEN RÜHRAUFSATZ (SCHMETTERLING ) 1) Sahne herstellen (Schmetterling installieren) Zutaten: Max :150g Schlagsahne Min: 100g Schlagsahne Methode: Tasse Geschwindigkeit 1. Schmetterling einsetzen.
MISURE DE SICUREZZA IMPORTANTI: 1. Questo manuale di istruzioni può anche essere scaricato dalla nostra pagina web www.sogo.es 2. Prima di utilizzare l’apparecchio, leggere attentamente queste istruzioni e illustrazioni. 3. Conservare queste istruzioni per usarle per riferimento futuro. 4. Verificare che la tensione indicata sull’apparecchio corrisponda alla tensione di rete locale prima di collegare l’apparecchio. 5. Non utilizzare mai accessori o parti di altri produttori.
13. Spegnere l’apparecchio prima di staccare e installare qualsiasi accessorio. 14. Attendere che le parti mobili si siano fermate prima di rimuovere le parti dell’apparecchio. 15. Non immergere mai l’apparecchio principale in acqua o altri liquidi, né risciacquarlo sotto il rubinetto. Utilizzare solo un panno umido per pulire l’apparecchio. 16. Scollegare l’apparecchio immediatamente dopo l’uso. 17.
23. Assicurarsi di posizionare l’apparecchio su una superficie pulita, solida, uniforme e non riscaldabile, in particolare quando si utilizza lo strumento vapore. 24. Protezione bollire a secco. 25. Se il cavo di alimentazione è danneggiato, deve essere sostituito dal produttore, dal suo agente di assistenza o da personale qualificato per evitare rischi. 26. Si prega di essere avvertiti di potenziali lesioni all’utente di questo apparecchio a causa di un uso improprio. 27.
completamente prima di estrarre il barattolo. 33. Fare attenzione se il liquido caldo viene versato nel robot da cucina o nel frullatore in quanto può essere espulso dall’apparecchio a causa di un improvviso vapore. 34. Prestare attenzione quando si maneggiano le lame affilate, lo svuotamento della ciotola e durante la pulizia. 35. Questo apparecchio è destinato all’uso in applicazioni domestiche e simili. 36.
A. B. C. D. E. F. G. H. I. J. K. L. M.
Manopola della velocità La rotazione in senso orario del pulsante della manopola è “+”, il controllo della rotazione è “-”. Intervallo di velocità: 1,2,3,4,5,6, P (‘P’ è funzione Pulse) La funzione a impulsi è manuale. Intervallo di velocità 1 2 3 4 5 P RPM (r/min) 66 500 1000 1500 2500 3300 Quando la temperatura interna della tazza raggiunge i 60 °C, la funzione pulsazioni non funziona.
COME ASSEMBLARE LA LAMA 1. Coloque a trava da lâmina na base inferior da tigela e gire no sentido horário para travar a lâmina na tigela. (Veja a figura acima) Cuidado: 1. A lâmina é muito afiada. Manuseie com cuidado. Apenas segure a parte superior da lâmina! O alimento a ser picado ou cozido pode vazar e danificar o aparelho. Ao remover a lâmina da tigela, por favor, segure a parte superior da lâmina e gire no sentido antihorário para liberar a lâmina da tigela. A lâmina é muito afiada.
Posizionare la ciotola 1. Posizionare la ciotola sul portalampada. Assicurarsi che il beccuccio della tazza si trovi sul retro della macchina. 2. Ruotare il coperchio della ciotola in senso orario per bloccare la ciotola. Assicurarsi che il coperchio sia bloccato nella posizione corretta e che tocchi l’interruttore della tazza. 3. Assemblare il misurino. AVVERTIMENTO! L’apparecchio è dotato di un blocco di sicurezza tra la tazza e l’unità principale.
il riscaldamento si fermerà e continuerà a miscelare) 4. Il suono “Beep” si sentirà 10 volte quando il funzionamento si interrompe automaticamente. 5. Spegnere l’apparecchio principale. Rimuovere il coperchio della vasca. 6. Estrarre il cibo preparato dalla ciotola. Attenzione: 1. Non toccare la parte metallica della ciotola o la lama quando è molto calda! 2. Tenga la maniglia della ciotola solo per spostare la ciotola! 3. Non scaldare mai la ciotola quando è vuota! 4.
E05 Protezione da bruciatura a secco (quando la temperatura della vasca scende fino a 140 ºC, il lavoro di riscaldamento si interrompe e viene visualizzato il codice E05) Spegnere la macchina e lasciare raffreddare l'apparecchio, quindi riavviarlo. Nota: se dopo tutte le soluzioni non funziona ancora, si prega di restituire al venditore e la riparazione del reparto di manutenzione. PULIZIA 1. Prima di pulire l’apparecchio, spegnere l’apparecchio e rimuovere la spina dalla presa. 2.
Zuppa P3 Nessuna velocità durante la cottura a 80 ºC, quindi 4 velocità di lavoro per 20 secondi, quindi una velocità 4 per 15 secondi dopo la cottura.
RICETTE PERSONALI: PER LA PASTA 1) Fare pasta (Installare la lama di pasta) Ingredienti : 200g farina 100 g bianco Metodo: Tazza Velocità Temp (ºC) Tempo 1. Inserire la lama per la pasta. Mettere la bianca e la farina nella ciotola per mescolare. installare 2 0 2min PER IL ATTACCO DI MESCOLATURA (FARFALLA) 1) Preparare la crema (installare la farfalla) Ingredienti : Max :150g panna montata Min: 100g panna montata Metodo: Tazza Velocità 1. Inserisci farfalla.
DECLARACIÓN DE CONFORMIDAD DECLARAÇÃO DE CONFORMIDADE Este dispositivo cumple con la Directiva de baja tensión 2014/35/CE, la Directiva de Compatibilidad Electromagnética 2014/30/UE, la Directiva 2011/65 UE sobre restricciones a la utilización de determinadas sustancias peligrosas en aparatos eléctricos y electrónicos y la Directiva 2009/125 CE en los requisitos de diseño ecológico aplicables a los productos relacionados con la energía.
Este símbolo significa que, si desea deshacerse del producto, una vez transcurrida la vida del mismo, debe depositarlo por los medios adecuados a manos de un gestor de residuos autorizado para la recogida selectiva de Residuos de Aparatos Eléctricos y Electrónicos (RAEE).
ref.