Get It Done USER MANUAL An in-depth guide to getting the most out of your business October 2012 1 SohoOS User Manual, version 7.
Table of Contents Creating an Account with SohoOS ............................................................................................... 4 Personalizing Your SohoOS Account .......................................................................................... 5 Sharing—Invite Friends .......................................................................................................................... 5 General Settings ........................................................................
Personal Contacts ................................................................................................................................ 26 Vendors ............................................................................................................................................... 26 The Invoice Cycle ......................................................................................................................... 27 Estimates .....................................................
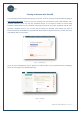
Creating an Account with SohoOS Your SohoOS experience begins with opening an account. To do so, please go to the SohoOS homepage at http://www.sohoos.com. To sign up, you can manually enter your business name, email address, and a preferred password, or you can use your Facebook account. If you choose to create an account using Facebook, SohoOS will use your Facebook email and password for your login credentials and will autogenerate a business name for you.
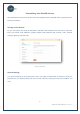
Personalizing Your SohoOS Account Click My Account (located on the top bar) and choose Settings from the dropdown menu to personalize your business information. Sharing—Invite Friends Do you know people who might be interested in SohoOS? Send invitations from the Invite a Friend tab. Enter your friends' email addresses (separate multiple email addresses with commas), add a personal message (optional), and click Invite.
Invoice Templates Get some attention! Your customers will sit up and take notice of the invoices you send with these invoice templates that we specially designed to make your business look good. Now you don’t need any graphic design experience to create an eye-catching invoice—just choose one of our templates. Not sure which template you like best? Changing templates is so easy, you can try them all.
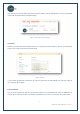
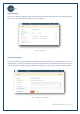
After you fill in the invoice details and click Save at the bottom, click the PDF button to view your completed invoice with the selected invoice template design. Image 5 – Making a PDF to view invoice design Currencies SohoOS uses US Dollars as the default currency. To change your default currency, click the Currencies tab. Choose your currency from the list and click Save.
Click Save and you are ready to go. Image 7 – Changing Tax Calculation Time Tracker Time Tracker lets you keep track of all your billable hours and easily convert timesheets to invoices. Under the Time Tracker tab in Settings, you'll see a dropdown menu that allows you to calculate your time in increments of 5, 6, 10, 15, 20, or 30 minutes, or 1 hour. Choose your preferred increment and click Save. Image 8 – Setting time increment preferences 8 SohoOS User Manual, version 7.
Note: Hours will be rounded according to the setting you choose. Rounding will not show up in Time Tracker entries; hours/billing calculations are only rounded when you attach time entries to an invoice. For instructions on using Time Tracker to create invoices, please see page 29. Change Your Password To change your password, go to the Change Password tab. Enter your old password, then enter and confirm your new password and click Save Changes.
Payment History Any time you purchase additional features from the Soho Shop, they will appear under the Payment History tab. To learn more about the Soho Shop, please see page 33. Image 10 – Payment History Terms and Conditions Terms and conditions will be attached as the footer on all the documents you send. Under the Terms and Conditions tab, you will see the default message we have entered on your behalf. Make sure you change it to fit your business needs by clicking the Edit button.
Purchased Items This tab features a list of additional items that you can purchase to improve the way you do business. Click each item to learn more about it and find a direct link to the Soho Shop. Once you have purchased a feature, you can access it and edit your settings here.
Business Info The Business Info page includes basic information about your business that will appear on every feature in the system, including your invoices, purchase orders, and estimates, as well as on your myPage. Go to My Account and click Business Info to view and edit your settings.
Change Your Email To change your email address, click the link beneath your current email address that says Change email. You will be prompted to enter and confirm your new email address, as well as your current password. When you are done, click Change Email. All of your SohoOS business documents will reflect the change, and you will use the new email address to log in to your account. Image 14 – Changing your email address 13 SohoOS User Manual, version 7.
myPage myPage is a public listing on the SohoOS Business Directory. Click myPage under the My Account menu to add content and links to websites pertaining to your business that you want to display on your myPage. Under myPage, you will see five tabs: Settings, Contact Info, Me on the Web, Description, and Portfolio. Settings On the Settings tab, you can decide whether or not you want to publish your myPage on the SohoOS Business Directory.
Contact Info On the Contact Info tab, you can choose which contact information you want to display on your myPage. The contact information shown is taken directly from your Business Info. Uncheck Show on Page for whichever contact information you do not want to be shown. When you are done, click Save. Image 16 – myPage—Contact Information 15 SohoOS User Manual, version 7.
Me on the Web On the Me on the Web tab, you can add links to all your online profiles, such as your business website, catalogs and portfolios, Facebook, Twitter, LinkedIn, Google+, and YouTube. Just copy the URL into the appropriate section and, when you are done, click Save. Image 17 – myPage—Me on the Web 16 SohoOS User Manual, version 7.
Description Write about your business and the things you do on the Description tab. You can change the title of your page, explain what you do in a nutshell, choose the industry you work in, and write a description of your business practices. When you are done, click Save. Image 18 – myPage—Description Portfolio This section is coming soon. Stay tuned! SohoOS Business Directory SohoOS provides each business with a page, called myPage, on the SohoOS Business Directory.
When you created an account with SohoOS, you were asked to fill in your company information. This information is represented on all your business documents (e.g. invoices, sales orders and estimates) as well as on your Businss Directory listing (myPage). You can edit the information that appears on your myPage on the Business Info and myPage tabs under the My Account menu. Your myPage comes equipped with a contact form. Anyone who fills in this form will be added as a lead to your contacts.
Using Your SohoOS Account After you finish setting up your Business Profile and myPage, click the SohoOS logo on the left side of the top bar go to the My Business page. This acts as the hub of your account and allows you to access the vast majority of your business tools. The very first time you see this page, you can view video tutorials by clicking on the button, which will bring up a window with numerous tutorials that explain the different features of the SohoOS platform.
Navigating My Business View Click to see a full overview of your account and all your activities. Image 21 – My Business View Your homepage shows your activity feed. Whenever you create an invoice, add a contact, or make any other action, it will appear under Notes & Recent Activities. Use this as an overview of your account and click any item to access it. You can write notes and reminders, and they will appear on your activities feed.
The toolbar on the right of your homepage screen allows you to navigate through your business tools. Click an icon to see all related items. The number attached to each icon indicates the number of related items that have been created in the applicable category. Estimates An estimate is a nonbinding document offering basic information regarding a product or service you wish to supply (also called a "sales quote").
Time Tracker Time Tracker makes it easy to keep track of billable hours. Create timesheets for all of your projects and automatically convert them to invoices. For more information on this feature, see page 29. SohoDir Browse the SohoOS Business Directory to find thousands of small businesses in dozens of categories. Just click the SohoDir icon to get started.
Details This is essentially the profile of your contact, containing the contact information, recent activities feed and other relevant information. All changes made to each contact will show up chronologically under Recent Activities along with any item, invoice, etc. related to the contact that you create or update. Image 24 – Details page The red buttons on the top bar give you several actions you can perform. Invite your contact to join SohoOS, click Invite.
Notes While viewing a contact, you can click Notes to access a page where you can write records, reminders or history related to this contact. These notes will only be viewable from the specific contact’s Notes page, and will not be visible to the contact. Image 25 – Notes page Contact Management Your contacts can be found on the left menu of your homepage.
You can also create a new contact by clicking the icon on the top bar. You will be asked to choose between a Client, Lead, Personal Contact or Vendor. Choose the applicable option and you will be taken to the contact creation screen. Fill out the details and click Save to add the new contact to your list. To invite your new contact to SohoOS, check the Invite to SohoOS box. Direct communication within the system is coming soon.
You can create a new client from the dropdown menu. You can also create a new client while you're creating a new estimate or invoice. Just click in the box under Contact and select + Add New Contact from the dropdown menu. In the pop-up window, click Show more details to fully fill in all information about the new client. Click Save, and you'll be returned to the estimate or invoice you were working on. Leads Leads are potential clients you might work with in the future.
The Invoice Cycle SohoOS makes invoicing a breeze. From getting clients to getting paid, the system tracks the status of all your transactions for you. Just check the news feed on your homepage to see the status of estimates and invoices. Estimates An estimate is a document offering basic information regarding the products or services you plan to supply and the costs. Make sure to update your inventory prior to starting work with estimates; it will make the whole process much easier.
Invoices An invoice is the last stage in a client’s cycle. Your client already received an initial estimate and approved it, the work was completed, and now it’s time for you to get paid. You can generate an invoice directly from an estimate, you can generate an invoice from your Time Tracker entries (see next page), or you can generate an invoice from scratch by clicking Invoices on the menu on the right side of the page.
Invoices from Time Tracker Need to keep track of billable hours for multiple projects and clients? Time Tracker was made for you. Without having to leave the SohoOS system, you can easily create timesheets for all of your clients, convert them to invoices, and request payment from your clients. Using the intuitive interface, you can link each time entry to the relevant client, choose the service you completed, and record the hours and minutes you spent on the project.
Items Items are all of your products and services. Essentially, this category covers anything you can attach a price tag to. In this section, you can manage prices, inventory and more. Start by clicking Items on the menu on the right side of the page. This option is only available while in My Business View. Image 32 – Adding a new item To create a new item, click the icon on the top of the Items page, or the dropdown menu, followed by Items.
Click the icon from the P.O. screen, or click the dropdown menu and then click P.O. Be sure to enter all relevant data. The Price field indicates the price you charge clients for the item. The Cost Price field indicates the amount you pay to the vendor. Image 33 – New purchase order Once the purchase order is created, you can download it in PDF format by clicking PDF, or email it directly from within the system by clicking Send. Docs View and edit all of your uploaded documents from this tab.
Click Browse to choose a file. Then give your new document a title, choose which folder you want to store it in, and click Save. By clicking on the title of the document you uploaded, you will have the option to Edit, Delete, or Download the document. All these commands are located on the top bar. Image 35 – Uploading a document You get 20 MB of storage space for free when you sign up for SohoOS.
Soho Shop Introducing the Soho Shop Enhance your SohoOS experience with these carefully selected premium features that are not available with the basic SohoOS system. Each item is custom-designed to optimize how your business operates and to give you an extra edge. Click the Upgrade button located on the top bar of any screen to access the Soho Shop. Image 36 – How to access the Soho Shop You will be taken to a page where you can read all about the premium features.
After you choose the tools or bundle you want, you will be directed to a secure page where you can fill in your billing information. Image 38 – Soho Shop billing page Simply fill in your details and click Place Order to confirm your order and gain access to your new business tools. Soho Shop Features You can access your new features any time. Just go to My Account and click Settings. Your features will be under Purchased Items on the left menu.
Super-Sized Storage The Docs feature (lower right-hand corner of the SohoOS web application) is much more useful and powerful: 2GB of total storage, unlimited files, and 100 folders (instead of just 20MB and 5 folders in the regular account). Now you can really keep all your business documents in one place. In order to access your stored documents, go to your homepage, click Docs, select the document you want and click Download to begin downloading the document to your computer.
The Leads Widget is, in essence, a portable contact form. To start using it, simply click Leads Widget to open an easy-to-use wizard that generates the required code. Image 40 – Grabbing the Leads Widget from SohoOS Choose a theme for your contact form by clicking the desired background color. A piece of code will appear in the text box on the right. Simply copy the code (highlight it with your mouse and click Copy), go to your website or blog editor, choose the desired location and click Paste.
myPage Themes Spice up your myPage by adding one of our myPage Themes! You can gain access to this feature by buying a bundle or by buying the myPage Themes tool separately. In order to purchase this feature, click Upgrade to enter our Soho Shop, select myPage Themes, and then choose Buy now! By default, Google AdSense ads are displayed on all Business Directory listings. When you purchase myPage themes, the ads will be automatically removed from your myPage.
Personalized Backups Each week you get your entire history of aggregated data emailed to you. These data backups are in CSV format, which can be opened in any spreadsheet (e.g. Microsoft Excel or Google Spreadsheets). Use these backups to further analyze your business, pass them on to your bookkeeper/accountant, or keep them as an extra layer of security to recover information you may have mistakenly deleted. You can turn the email feature off and back on at any time.
To access the feature, click Business Documents on the Settings page. You can either type the name of the document you are seeking into the search box or choose a related category. To see a preview of the document you requested, click Preview. To download the document, click Download. You can download as many documents and templates as you want.
SohoOS Support Clicking the tab will redirect you to the SohoOS support portal (http://support.sohoos.com). You can browse through our knowledge base of the most frequently asked questions, watch our video tutorials and more. SohoOS is here for you 24/7! Live Support Click the button to have a live chat conversation with one of our customer support representatives. We will guide you through and answer your questions in real time.
Walkthrough On the bottom right side of the screen when you log in, there is a fantastic feature called Walkthrough. It provides you with a step-by-step guide to using the website, including information on how to: 1. Upload logo and information 2. Create a new invoice 3. Publish a business mini-site 4. Set default currency 5. Set tax calculations 6. Request payment w/ PayPal 7. Create a new client 8. Create a new PO 9. Create a new estimate 10. Upgrade to PRO 11. Manage client history 12.
SohoOS Get It Done 42 SohoOS User Manual, version 7.