
8K Install Guide and Owner Manual
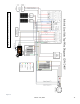
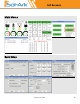
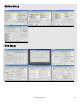
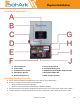
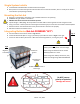
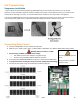
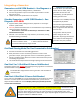
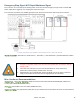
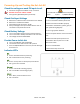
Table Of Contents
- Upon Receiving Shipment
- Spec Sheet
- Wiring Diagrams
- GUI Screens
- Physical Installation
- Inverter Components
- Deciding Backup Circuits
- Single System Installs
- Mounting the Sol-Ark
- Integrating Batteries (Sol-Ark POWERED "OFF")
- E.M.P Systems Only
- Connecting Solar Panels
- Integrating a Generator
- Integrating Sensors and Accessory Placement
- Battery Temperature Sensor
- Limiter Sensors (CT Sensors)
- GEN Start Signal (Two-Wire)
- CANbus & RS485
- Wi-Fi Antenna (Dongle)
- Emergency Stop Signal & PV Rapid Shutdown Signal
- Misc. Hardware Recommendations
- Check the voltage on each PV input circuit
- Check Grid Input Voltage
- Check Battery Voltage
- Provide Power to Sol-Ark
- Indicator LED's
- Power Cycle Sequence
- Wi-Fi / Internet Connection
- Programming Guide
- Install Tips
- Batteries
- Troubleshooting Guide
- LCD is not powering on
- Panels are connected, but DC Light is not on
- Panels are not producing
- Panels are not producing much power
- The system does not keep batteries charged
- Auto Gen-Start not working
- Normal LED isn't on
- The alarm light is on
- Grid HM value is negative when it should be positive (only applies in limited home mode)
- AC Overload Fault or Bus Unbalance Fault
- The system connects to grid and quickly disconnects
- DC Overload Fault
- System is beeping
- Battery cable sparks when connected
- Battery symbol on the home screen is red
- Battery symbol on the home screen is yellow
- Grid symbol on the home screen is yellow
- System has restarted
- Batteries were connected backward
- Why is the LCD screen still on when the power button is off?
- The Batt % meter is not reaching 100%
- Generator setup is reading 0Hz
- Color Touchscreen is Frozen
- Troubleshooting Phasing Issues
- Sol-Ark 8K Error Codes
- Install Verification Checklist
- Sol-Ark 8K Limited Warranty

March 14
th
, 2022 15
Single System Installs
A. Install Double Pole 60A breaker in Main Panel for Grid In/Out
B. Best practice to install at the opposite end of the bus bar from the main breaker, which is usually at the bottom
of the breaker panel (see figure above)
Mounting the Sol-Ark
A. Keeping in mind Sol-Ark's dimensions, find a suitable location for the system (s)
B. NEMA 3R rating for Outdoor installations
C. PROTECT the LCD screen from excessive UV exposure
D. System weight = 78lbs (35kg). Securely attach to the wall. Affix a mounting board to studs using 6-8 screws
E. Using 2-3 screws + washers (choose screw length and surface type) to mount the French Cleat to the board/wall
F. Mount Sol-Ark on the installed French Cleat / Ensure Sol-Ark is level and sits properly
G. Add two screws for the bottom mount
Integrating Batteries (Sol-Ark POWERED "OFF")
A. Connect batteries to Sol-Ark as shown in Fig. B below
B. Install included toroids (Part e. on pg. 4) on battery input cables as shown in Fig. A to the right
C. Ensure the built-in battery disconnect is OFF while connecting batteries, or arcing may occur
Fig. A
Positive to
Sol-Ark
Negative
to Sol-Ark
Sol-Ark 8K is a 48V system. Do NOT wire the
battery bank to any other nominal voltage.
When using 12V batteries do not exceed
FOUR (4) batteries in series.
When using other battery chemistries, stay
within the voltage range: MIN 43V-MAX 63V
Do NOT stack more than 2
banks high
PCC batts are
stackable
Fig. B
Do NOT reverse
polarity of batteries!
Damage will occur!