
8K Install Guide and Owner Manual
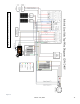
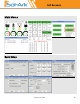
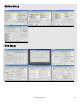
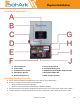
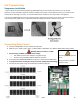
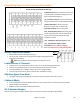
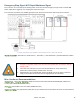
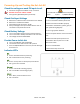
Table Of Contents
- Upon Receiving Shipment
- Spec Sheet
- Wiring Diagrams
- GUI Screens
- Physical Installation
- Inverter Components
- Deciding Backup Circuits
- Single System Installs
- Mounting the Sol-Ark
- Integrating Batteries (Sol-Ark POWERED "OFF")
- E.M.P Systems Only
- Connecting Solar Panels
- Integrating a Generator
- Integrating Sensors and Accessory Placement
- Battery Temperature Sensor
- Limiter Sensors (CT Sensors)
- GEN Start Signal (Two-Wire)
- CANbus & RS485
- Wi-Fi Antenna (Dongle)
- Emergency Stop Signal & PV Rapid Shutdown Signal
- Misc. Hardware Recommendations
- Check the voltage on each PV input circuit
- Check Grid Input Voltage
- Check Battery Voltage
- Provide Power to Sol-Ark
- Indicator LED's
- Power Cycle Sequence
- Wi-Fi / Internet Connection
- Programming Guide
- Install Tips
- Batteries
- Troubleshooting Guide
- LCD is not powering on
- Panels are connected, but DC Light is not on
- Panels are not producing
- Panels are not producing much power
- The system does not keep batteries charged
- Auto Gen-Start not working
- Normal LED isn't on
- The alarm light is on
- Grid HM value is negative when it should be positive (only applies in limited home mode)
- AC Overload Fault or Bus Unbalance Fault
- The system connects to grid and quickly disconnects
- DC Overload Fault
- System is beeping
- Battery cable sparks when connected
- Battery symbol on the home screen is red
- Battery symbol on the home screen is yellow
- Grid symbol on the home screen is yellow
- System has restarted
- Batteries were connected backward
- Why is the LCD screen still on when the power button is off?
- The Batt % meter is not reaching 100%
- Generator setup is reading 0Hz
- Color Touchscreen is Frozen
- Troubleshooting Phasing Issues
- Sol-Ark 8K Error Codes
- Install Verification Checklist
- Sol-Ark 8K Limited Warranty

March 14
th
, 2022 20
Powering-Up and Testing the Sol-Ark 8K
Check the voltage on each PV input circuit
A. Should be no higher than 500Voc Temp. corrected
B. DO NOT connect PV+ OR PV- to GND
C. Verify polarity (backward polarity shows 0V)
Check Grid Input Voltage
A. Measure L1 to Neutral and L2 to Neutral. Ensure 120Vac
B. Measure L1 and L2Ensure 240Vac
C. Check Neutral and Ground are ~0V AC
D. Verify L1 voltage on AC in/out is 0Vac with the main L1
connection in the panel Same for L2
Check Battery Voltage
A. Turn on the battery switch (if using a Lithium battery)
B. Turn on the built-in battery disconnect in the user area
C. The voltage should be 45Vdc-60Vdc
Provide Power to Sol-Ark
A. Turn on Grid Breaker and Load Breaker
B. Turn PV disconnect switch to the "ON" position
C. Press the ON/OFF Button on the front, and the blue light
should turn on
Indicator LED's
DC
A. Green = DC Solar Panels are producing
B. Off = Solar Panels are not producing
AC
A. Green = Grid (or Gen or AC Coupled) is Connected
B. Off = grid is not Connected
Normal
A. Green = Sol-Ark 8K is working properly
B. Off = Sol-Ark 8K is not working properly
Alarm
A. Red = Alarm, check the alarms menu
B. Off = No alarms
Turn ON with one of three sources of power:
1) PV 2) Grid 3) ON/OFF Battery
Power Cycle Sequence
1. Turn on the Built-In battery disconnect
2. Make sure that Sol-Ark 8K is properly
connected to the batteries, panels, grid, etc.
(see system wiring diagram).
3. Turn on grid power breakers.
4. Press the power button on the front of the
unit.
5. Make sure Solar panel inputs are not
connected to Ground, then Turn on DC
disconnect switch.
6. Turn on load breakers.
7. Reverse the steps to turn off