
Battery Communications Integration Guide


01 JUNE 2022 V 2.6 15
NuEnergy Lithium
No additional hardware is needed to establish communications with NuEnergy Lithium batteries.
• A custom cable is required to establish communications with the NuEnergy Lithium
battery.
Communications Installation and Setup Instructions
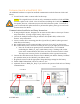
1. Create a custom cable that connects pins 2, 3, and 4 ONLY (solid orange, white-green,
and solid blue) to the battery.
2. Pin two (2) (solid orange) should connect to pin six (6) on the inverter.
3. Pin three (3) (white green) should connect to pin five (5) on the inverter. Pin four (4)
(solid blue) should connect to pin four (4) on the inverter.
a. On indoor units, leave pin two (2) (solid orange) connected to pin two (2) on the
inverter instead of pin six (6).
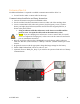
4. Connect the cable to the “CAN” port on the NuEnergy cabinet and the “Battery CAN
Bus” port (or the “CAN” port for indoor-only units) on the Sol-Ark.
a. The cable is NOT reversible; therefore, keep track of which end of the custom
cable connects to the battery and the Sol-Ark.
5. Turn on the battery. Start by flipping the “ON” switch for every battery. Then, press the
circular button at the top of the inside of the unit.
6. Program the inverter with the appropriate charge/discharge settings for this battery.
7. Enable “BMS Lithium Batt” and set its value to “00.”
8. (Optional) Turn on “BMS_Err_Stop” if you wish for the system to fault on loss of battery
communications.
9.
Inverter Port