
Battery Communications Integration Guide

01 JUNE 2022 V 2.6 9
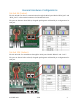
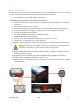
Blue Ion/eGauge
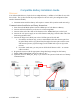
The Sol-Ark will need an eGauge monitoring device, an eGauge USB-485 converter, and a wired
internet connection to establish communications with the Blue Ion battery.
• You will need a custom RJ45 cable for this setup.
Communications Installation and Setup Instructions
1. Connect the Blue Ion to your wired internet connection using the RJ45 port on the back
of the unit.
2. Connect the eGauge to a power source.
3. Connect the eGauge to your wired internet connection using the RJ45 port on the unit.
4. Follow instructions from eGauge to set up the device with your Blue Ion battery.
5. Connect the USB-485 to the eGauge.
6. Set up the USB-485 using eGauge’s online instructions.
7. Enable Modbus RTU on the eGauge.
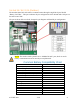
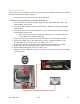
8. Connect “D+” on the USB-485 to either pin two (2) or pin seven (7).
9. Connect “D-” to either pin one (1) or pin eight (8).
10. GND to either pin three (3) (indoor units only) or pin six (6) (indoor and outdoor units).
NOTE: eGauge needs to configure your device specifically for use with the Sol-
Ark. Please verify this by getting in touch with eGauge support.
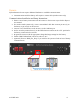
11. Plug the RJ45 cable into the “RS-485” (indoor models) or “Battery CAN Bus” (outdoor
models) port on the inverter.
12. Program the inverter with the appropriate charge/discharge settings for this battery.
13. Enable “BMS Lithium Batt” and set its value to “03.”
14. (Optional) Turn on “BMS_Err_Stop” if you wish for the system to fault on loss of battery
communications
Inverter Port
Local Network