
Instructions


Construction!
X
X
Soldering - The Essentials:
The most important skill needed to successfully construct your device
is soldering. Soldering is melting a special metal (called, um...,
“solder”) between two components to make an electrical connection.
We can also use solder like glue, to build things out of metals. Please
note: You must make sure to use electrical solder, and not plumbers
solder, which is used for piping and really isn’t good for electronics.
Much like you, solder likes to go where it’s the warmest (this is why
Florida is so popular). The trick to successful soldering is to make the
parts hot, and the melting solder will run there. If you don’t heat up
the parts first, the solder will find the hottest thing around - your
soldering iron, and not your parts! Do not melt solder to the tip of
your iron and try to smear it onto the parts, as it just won’t work.
You’re an electronics hobbyist, not a painter!
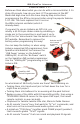
X
Solder
Soldering Iron
PCB Solder Pad
PCB
Component Leg
Bad
No flow from leg to pad
Good
Flows from leg to pad
Bad
Solder “bridge” across
pads
Bad
No flow from leg to pad
Bad & Good Solder Joints
1) Wipe the hot tip of the soldering iron on a sponge so the tip
is clean and shiny.
2) Jam the soldering iron into the hole where the component
leg comes through the soldering pad.
3) Count to 5 (which lets the soldering iron make the pad and
component leg nice and hot).
4) From opposite the iron, push solder into the corner between
the leg and pad, melting the solder until there’s enough to
make the solder joint look like a tiny volcano.
Successful soldering is a 4 step process:
SB-FireFly Manual
4