
Instructions


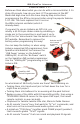

Step 2 - Mode Button: Install the push button just above the DIP carrier. It’s
designed to snap into place with a little force, so push it in, and solder it
down.
Now that you know how to solder and you’ve inventoried all the parts, it’s
time to put this little blinky bug together!
Step 1 - DIP Socket: The DIP socket is just a carrier for the microcontroller
that makes it easy to remove than desoldering every pin. Install it with the
half-moon notch matching the one printed on the PCB.
Note notches
should match!
Flip it over, and bend a few
pins over with your
thumbnail so the DIP socket
stays put while you finish
soldering it in from the back.
Competed
steps 1 & 2!
SB-FireFly Manual
Construction!
5