
Instructions


Step 6 - The Battery Holder: If you manage to get this wrong, we’ll
be impressed. Not amazed, but impressed. Just install it on the
backside so it matches the outline, and solder it in from the top side.
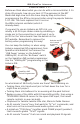
Step 7 - LEDs: Blinky parts! First thing to do is figure out which is
which, and how to install them. LEDs don’t work in reverse, so pay
attention to the flat spot on the side of the clear lens, and install it
so it matches the flat spot printed on the circuit board.
We’re going to put the green LEDs in positions ‘LED1’ and ‘LED3’,
and the blue in ‘LED2’. Not sure which LED is which? Use the coin
cell to test the LEDs by wedging it in between the LED leads. If it
doesn’t light up, flip the coin cell around.
Note
flat spots!
1. Test for LED color with the coin cell
blue installs at ‘LED2’
2. Make sure you match the flat
spot on the LED to the PCB
3. Install green to ‘LED1’ & ‘LED3’.
Install blue to ‘LED2’
Green Green
Blue
SB-FireFly Manual
Construction!
7