
Instructions


Step 8 - Installing the IC: Braaains... Yes, we’re using a fairly
powerful tiny microcontroller to blink lights (but we’ll leverage that
into more cool applications later!).
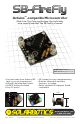
See the dot on the corner of the ATtiny85? Match
it with the one semi-hidden under the DIP carrier
- it’s on the same side as the half-moon notch.
Pinch the pins in a bit, and insert the ATtiny into
the DIP carrier. Done!
Insert IC, dot-side
nearest half-moon
notch
See the dot? Dots are
important. Dots keep you
from putting the IC in
backwards. We like dots...
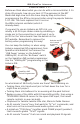
Step 9 - The Battery: Remember that coin-cell battery you used to
test the LEDs? Yup, we’re using that again. Snap it into the battery
holder, and the LEDs should start doing their thing.
Press the push button to cycle through
the different modes and speeds. When
they turn off, the SB-Firefly is in sleep/off
mode.
Battery installed. Make
sure it snaps in!
Fully-functional
SB-FireFly!
SB-FireFly Manual
Construction!
8