
Install Manual

SolarEdge
Home Network
OK
OFF
AC
OFF
ENET-HBNP-01
ENET-HBRP-01
ENET-HBCL-01
1 2 3 4
5
6
5MIN
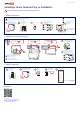
1. Install the Antenna
Turn off the inverter
ON/OFF/P switch and DC
safety switch (if applicable).
SolarEdge Home Network Plug-in Installation
1
2
1
1
2
2
2. Install and Connect the Plug-in
4
`
3
To avoid electric shock, refer to safety instructions in the inverter
installation guide before removing the inverter cover.
Turn off AC to the
inverter on the main
service panel.
Wait five minutes.
Open the inverter cover and
Connection Unit cover
(if applicable).
Clip the antenna
(supplied) to
a heatsink fin.
Pass the antenna cable
through a communication
gland.
1
Connect the SolarEdge Home Network
plug-in to the dedicated socket on the
communication board.
2
Connect the antenna to the
SolarEdge Home Network plug-in.
Tie the antenna cable to the
communication board bracket
with a plastic tie (supplied).
Mount the inverter cover and
Connection Unit cover (if
applicable). Tighten the screws to
8.4 Nm/74 lbin.
Requires a SolarEdge Home Network-ready
LCD communication board
SetApp
3. Verify Connection
3
Run
SetApp
4
Scan the QR code
on the inverter.
5
Verify connection.
Commissioning
Status
Communication
ON
21
Turn on the inverter
ON/OFF/P switch and DC
safety switch (if applicable).
Turn on AC to the
inverter on the main
service panel.
ON
AC
The installation of the SolarEdge Home Network Plug-in must be performed by a qualified installer only.
Make sure to follow all safety and handling instructions specified in the inverter installation guide.
Datasheet
Scan the QR code:
Or follow the link:
https://www.solaredge.com/sites/default/files/
se-energy-net-plug-in-datasheet.pdf
Version 1.2, June 2022