
Installation Guide Manual
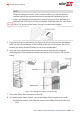

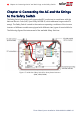
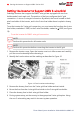


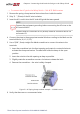
Table Of Contents
- Disclaimers
- Support and Contact Information
- Revision History
- Contents
- HANDLING AND SAFETY INSTRUCTIONS
- IMPORTANT SAFETY INSTRUCTIONS
- Chapter 1: Introducing the SolarEdge Power Harvesting System
- Chapter 2: Installing the Power Optimizers
- Chapter 3: Installing the Inverter
- Chapter 4: Connecting the AC and the Strings to the Safety Switch
- Chapter 5: Commissioning the Installation
- Chapter 6: User Interface
- Chapter 7: Setting Up Communication
- Appendix A: Errors and Troubleshooting
- Appendix B: Mechanical Specifications
- Appendix C: External Fan Maintenance and Replacement
- Appendix D: Replacing and Adding System Components
- Appendix E: Determining the Circuit Breaker Size
- Technical Specifications - Single Phase Inverters (North America)
- Technical Specifications - Three Phase Inverters (North America)

To connect the AC grid to the Safety Switch – 9kW, 10kW, 20kW:
1. Strip 05⁄16'' (8mm) of the AC wire insulation.
2.
Insert the AC conduit into the AC-side drill guide that was opened.
NOTE
Connect the equipment grounding before connecting the AC wires to the
AC.
Veillez à relier le conducteur de PE (la terre) avant de connecter les fils CA
au bornier CA.
3.
Connect the wires as follows:
1. Use a standard flat-blade screwdriver to connect the wires to the spring-clamp
terminals (See
Figure 22
).
2. The screwdriver blade should fit freely in the terminal opening. Too large a blade
can crack the plastic housing.
3. Insert the screwdriver, press the release mechanism and open the clamp.
4.
Insert the wire into the round opening and remove the screwdriver – the wire is
automatically clamped.
Figure 22: AC Spring-clamp terminal – 9kW, 10kW, 20kW inverter
-Three Phase System Installation Guide MAN-01-00002-4.3
48 Connecting the AC Grid to the Safety Switch