
Install Manual

SolarEdge P-5 Series Power Optimizers Grounding Using a Grounding
Plate
When the power optimizer is mounted on a
grounded
structure, equipment grounding is usually done using the star washer
supplied with the optimizers (refer to the
SolarEdge Installation Guide
).
For selected mounting systems
with sliding nut fasteners
, use the SolarEdge grounding plate (part number SE-GNDPLATE-100)
instead of the supplied star washer as described below. The SolarEdge grounding plate penetrates the galvanized or anodized
coating of the structure to ensure a low-resistance connection (per UL1741 certification). For information about grounding
mounting systems using the SolarEdge grounding methods, refer to the
Grounding SolarEdge Power Optimizers application note
available on the SolarEdge website at: http://www.solaredge.com/files/pdfs/grounding_se_power_optimizers.pdf
To establish equipment grounding:
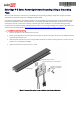
1. Slide the nut fastener in the desired location in the rail.
2. Attach a grounding plate to the power optimizer (see Figure 1): Insert the two plate tubs into the two designated holes in
the power optimizer back cover.
3. Install the power optimizer onto the rail using hardware suitable for the specific mounting structure ( screws, nuts, bolts,
washers, etc. not supplied by SolarEdge).
4. Tighten the screw with a torque of 9.5 N*m / 7 lb*ft.
Figure 1: Example of grounding a power optimizer using the grounding plate
Rail with sliding nut fastener
Insert the plate tabs into the indicated holes
Grounding plate
Mounting structure specific
hardware (not supplied by
SolarEdge)