
Rapid Shutdown Kit Manual

Rapid Shutdown Kit - Installation and Configuration (Single Phase Inverters)
Rapid Shutdown Kit Installation - MAN-01-00186-1.6
3
Inverter Software Compatibility Check and Upgrade
Perform this procedure after activating the inverter [Step 1 in Chapter 5: Commissioning the Installation of the SolarEdge
Installation Guide], and before pairing (Step 2 in Chapter 5 of the SolarEdge Installation Guide).
To use the rapid shutdown feature, the inverter communication board firmware (CPU) must be:
Version 2.0700 or higher, if the CPU version is 2.0xxx
Version 3.0700 or higher, if the CPU version is 3.0xxx
► To check the inverter CPU version:
1 Verify that the inverter has been activated using the activation card supplied with the inverter.
2 Press the LCD light button short presses until the screen below is reached.
ID: # # # # # # # # # #
DSP1/ 2 : x . x x x x / x . x x x x
C P U : 0 0 0 2 . 0 7 0 0
C o u n t r y : X X X X X
3 Check the CPU version number. If lower than 2.0700, upgrade the inverter software as described below; otherwise proceed
to “Power Optimizer Pairing”.
► To upgrade the inverter software:
1
2
3
4
5
6
7
Verify that the AC breaker connected to the inverter is OFF.
Open the inverter cover’s six Allen screws and carefully pull the cover horizontally before lowering it, as described in its
manual.
Insert the card into the card slot on the communication board. If the communication board has an SD card slot, use the
supplied SD card adapter. If there is a micro-SD card slot, remove the micro-SD card from the adaptor and insert it.
Close the inverter cover and turn the AC on. If upgrade is required (as described above), it starts automatically.
Wait for the message "Done" to be displayed on the LCD.
Verify the correct version as described above.
Remove the card from the inverter and keep it for additional kit installations.
Power Optimizer Pairing
Pairing at this stage will reprogram the power optimizers to perform rapid shutdown.
1 Verify that the ON/OFF switch at the bottom of the inverter is OFF.
2 Turn ON the AC breaker and the Safety Switch.
3 Perform Pairing as described in Step 2: Pairing, of Chapter 5: Commissioning of the SolarEdge Installation Guide.
Enabling Rapid Shutdown
There is an option in setup mode to enable the functionality of rapid shutdown.
1 Verify that the ON/OFF switch at the bottom of the inverter is ON.
2 Enter Setup mode by pressing and holding the LCD light button.
3 Select Maintenance Optimizer Conf. Set Rapid Shutdown.
NOTE:
Whenever replacing, removing or adding a component in the string, perform Pairing and rapid shutdown setting.
Troubleshooting
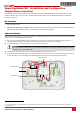
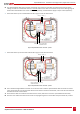
If the inverter does not enter production mode and the LCD displays Night Mode, the connection order of the rapid shutdown
cables may be incorrect. Recheck the cables and make sure that the rapid shutdown cables connected to the bottom of the
switch are reversed relative to the cables connected at the top of the switch (see Figure 2 and Figure 3).
Certain very old inverters may require a firmware upgrade to work with the Rapid Shutdown Kit. If your need one or are
unsure, please speak to your Wholesale Solar technician. Once you receive the firmware upgrade SD card, insert it (with
adapter, if necessary) into the slot labeled on your inverter.