
Installation Manual


Step 1: Mounting and Grounding the Power
Optimizers
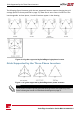
1. Determinethepoweroptimizermountinglocationandusethepoweroptimizermounting
bracketstoattachthepoweroptimizertothesupportstructure(SeeFigure4).For
optimizerssuppliedwithmoduleframe-specificbrackets,attachthepoweroptimizerto
themoduleframefollowingtheinstructionsincludedwiththeoptimizers.
2. Ifrequired,markthemountingholelocationsanddrillthehole.
CAUTION!
Do not drill through the power optimizer or through the mounting holes. The drilling
vibrations can damage the power optimizer and will void the warranty.
Ne pas percer à travers la optimiseur de puissance ou ses trous de fixation. Les vibrations
qui en résulteraient peuvent endommager la optimiseur de puissance.
3. AttacheachpoweroptimizertotherackusingtheM6(1/4'')stainlesssteelbolts,nuts
andwashers.Applytorqueof9.5N*m/7lb*ft.For3NAseriespoweroptimizes,
SolarEdgerecommendsmountingthepoweroptimizeronarailwiththesmoothside
facingout,sothatthepoweroptimizerbodywillpreventitsrotation.
4. Usethefollowingmethodstogroundthepoweroptimizer
1
:
WARNING!
The metallic enclosure of the power optimizer must be grounded in accordance with the
requirements of the local and national codes.
L'enceinte métallique de l’optimiseur de puissance doit être mise à la terre en accord avec
les régulations locales et nationales.
l For mounting on a grounded metal rail:Usetheprovided5/16''stainlesssteel
groundingstarwasherbetweentherailingandtheflatsideofthemounting
bracket.Thegroundingwashershouldbreakthroughtheanodizecoatingofthe
railingtoensurelowresistiveconnection.Applytorqueof9.5N*m/7lb*ft.
1
For a list of racking models and their appropriate grounding method, refer to
http://www.solaredge.us/files/pdfs/grounding_se_power_optimizers.pdf.
SolarEdge-Installation Guide MAN-01-00002-4.0
18
Step 1: Mounting and Grounding the Power Optimizers