
Solar Edge Single Phase Inverter Installation Guide
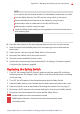


Table Of Contents
- Disclaimers
- Revision History
- HANDLING AND SAFETY INSTRUCTIONS
- IMPORTANT SAFETY INSTRUCTIONS
- Chapter 1: Introducing the SolarEdge Power Harvesting System
- Chapter 2: Installing the Power Optimizers
- Chapter 3: Installing the Inverter
- Chapter 4: Connecting the AC and the Strings to the Safety Switch
- Chapter 5: Activating, Commissioning and Configuring the System
- Chapter 6: Setting Up Communication to the Monitoring Platform
- Appendix A: Errors and Troubleshooting
- Appendix B: Mechanical Specifications
- Appendix C: Replacing and Adding System Components
- Technical Specifications - Single Phase Inverters with HD-Wave Technology (No...
- Support Contact Information

7.
Open the Safety Switch bracket screws.
Figure 35: Safety Switch bracket
8.
Disconnect the Safety Switch from the inverter by opening the two clips securing
the Safety Switch to the inverter: Carefully place a screwdriver between the clip
and the enclosure and pull the clip.
9. Detach the Safety Switch from the inverter.
10. Place the new Safety Switch and secure it to the inverter using the clips.
11. Insert the wires from the inverter into the openings in the Safety Switch and the
ferrite bead.
12. Reconnect the cables: Follow the instructions of
Installing the Inverter
on page 26.
13. Close the inverter cover.
14. Fasten the Safety Switch bracket using a standard bolt.
15. Perform the commissioning steps as described in
Activating, Commissioning and
Configuring the System
on page 40.
Adding, Removing, or Replacing Power Optimizers
1. Turn OFF the inverter ON/OFF/P switch, and wait until the green LED is blinking ,
indicating that the DC voltage is safe (<50V), or wait five minutes before continuing
to the next step.
2. Disconnect the AC to the inverter by turning OFF the circuit breakers on the
distribution panel.
3. Turn OFF the Safety Switch .
4. Disconnect and connect the necessary power optimizers.
5. Perform pairing and other procedures described in
Activating, Commissioning and
Configuring the System
on page 40 on all inverters to which power optimizers were
added or from which power optimizers were removed.
Single Phase Inverter with HD-Wave Technology Installation MAN-01-00541-1.4
71 Adding, Removing, or Replacing Power Optimizers