Models GM-WAC-10ESE-C GM-WAC-12ESE-C Electronic Window Air Conditioner Operating Instructions
Thank you for choosing a Soleus Air powered by Gree Air Conditioner. This owner’s manual will provide you with valuable information necessary for the proper care and maintenance of your new product. Please take a few moments to thoroughly read the instructions and familiarize yourself with all the operational aspects of your new air conditioner. For your own records, please attach a copy of your sales receipt to this manual.
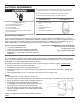
ELECTRICAL REQUIREMENTS The electrical ratings for your air conditioner are listed on the model and serial number label located on the front left side of the unit (when facing the front). Specific electrical requirements are listed in the chart below. Follow the requirements below for the type of plug on the power supply cord. Wiring Requirements Electrical Shock Hazard Plug into a grounded 3 prong outlet. Do not remove the ground prong. Do not use an adapter Do not use an extension cord.
PACKING LIST Packing List: • • • • • • • Window Air Conditioner Remote Control AAA Batteries (2) Top Mounting Rail Top Mounting Rail Seal Strip Lock Frame (2) Accordion Panels (Left & Right) • • • • • Sash Lock (1) Window Sash Seal 3/4” Screw for Window Locking Bracket & Accordion Panels, and sash lock (6) Foam Top Window Gasket Owner’s Manual 4
SPECIFICATIONS • Noise level is measured at a distance of 3.28 ft away from the front of the unit in cooling mode. • Power consumption is measured when the fan runs at the highest speed setting. • These specifications are for reference only. For actual data, please refer to the rating label on the back of the unit. Model GM-WAC-10ESE-C GM-WAC-12ESE-C 1/115/60 1/115/60 10,000 12,000 Cooling Power Input (Watts) 930 1110 Rated Current Cooling (Amperage) 8.6 10.3 EER/C.O.P 10.8 10.
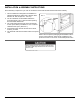
INSTALLATION & ASSEMBLY INSTRUCTIONS Some assembly is required for your new air conditioner. Please read and follow these instructions carefully. 1. This air conditioner is designed to be installed in a standard double-hung window with a window width between 22” and 36” (559 mm - 914 mm). 2. The air conditioner can be installed without the accordion panels to fit in a narrow window opening. See the window dimensions. 3. The Lower Sash (the lower part of the window that moves up and down) must allow for 15.
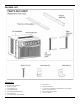
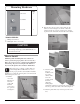
Mounting Hardware Qty. 3/4"screws 6 lock frame 2 FIG. 3A sash lock 1 B. Slide the free end (“I”section) of the panel into the cabinet as shown in Figures 3A, 3B & 4. Slide the panel down. Be sure to leave enough space to slip the top and bottom of the frame into the rails on the cabinet. FIG. 3B TOOLS NEEDED: Phillips Screw Driver Drill (If pilot holes are needed) CAUTION When handling unit, be careful to avoid cuts from sharp metal edges and aluminum fins on front and rear coils. FIG.
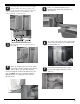
Keep a firm grip on the air conditioner, carefully place the unit into the window opening so the bottom of the air conditioner frame is against the window sill (FIG. 6 & FIG. 6A). Carefully close the window behind the top rail of the unit. 2 5 Drive 3/4” (19mm) locking screws through frame holes into window sash (FIG. 10/11). FIG. 10 FIG. 6 FIG. 11 FIG. 6A 3 Extend the side panels out against the window frame (FIG. 7). 6 FIG. 12 FIG.
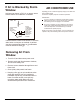
If AC is Blocked by Storm Window Add wood as shown in FIG. 14, or remove storm window before air conditioner is installed. Operating your air conditioner properly helps you to obtain the best possible results. This section explains proper air conditioner operation. IMPORTANT: If you turn off the air conditioner, wait at least 3 minutes before turning it back on. This prevents the air conditioner from blowing a fuse or tripping a circuit breaker. FIG.
USING YOUR AIR CONDITIONER Electronic Control Panel & Remote Control NOTE: This display always shows the room temperature in Fan Mode except when setting the Set temperature or the Timer. When the light is on the unit is in temperature or timer set mode. 3. Temperature Set: Use these buttons on the control panel and remote to increase or decrease the Set Temperature (the desired room temperature) in cooling,energy saver and dry mode. The SET light will light up when setting the temperature 4.
OPERATING YOUR AIR CONDITIONER REMOTE CONTROL 1. ON/OFF - Press the ON/OFF button to turn the A/C on or off. When the unit is turned off, the Timer and sleep functions will be cancelled. The set temperature will be saved. 2. MODE - Press the MODE button to change the operating mode. You can choose AUTO, COOL, SAVE (energy saver), FAN only, or Dry (Dehumidifier). The temperature will not be displayed when AUTO mode is selected. 3. “—”- Press the “-” button to decrease the temperature when the unit is on.
OPERATING YOUR AIR CONDITIONER REMOTE CONTROL 9. LOCK/UNLOCK- Press the “+” and “—” buttons simultaneously to lock and unlock the remote control. When the remote is locked, none of the functions or setting can be changed using the remote. 10. F° or C° - To switch between the F° or C° settings, press the MODE and “—” buttons a the same time. 11. DISPLAY LIGHTS- Hold the “+” and FAN buttons to turn the light s on the display ON or OFF. This can be done when the unit is on or off. 12.
USING YOUR AIR CONDITIONER (Cont.) • Freezing Conditions: This is a cooling only air • conditioner. It is not designed for freezing outdoor conditions. It must not be used in freezing outdoor conditions. • Remote Control: To ensure proper operation when using the remote control, aim the remote directly at the signal receiver on the air conditioner. • The remote control has a signal range up to 20 feet. NOTE: Auto Fan Speed cannot be used in Fan Only mode.
CARE AND CLEANING Clean your air conditioner to keep it looking new and to minimize dust build up. Cabinet Cleaning To clean the air conditioner cabinet: • Air Filter Cleaning The air filter should be checked at least once every month to see if it needs cleaning. Trapped particles and dust can build up in the filter and may decrease airflow as well as cause the cooling coils to accumulate frost. To clean the air • filter: 1.
TROUBLESHOOTING PROBLEM POSSIBLE CAUSES SOLUTIONS The Air Conditioner will not start The air conditioner is unplugged • Make sure the air conditioner is plug is pushed completely into the outlet The fuse is blown/circuit breaker is tripped. • Check the house fuse/circuit breaker box and replace the fuse or reset the breaker. Power Failure • The unit will automatically re-start when power is restored. There is a protective time delay (approx.
TROUBLESHOOTING (CONT.) PROBLEM POSSIBLE CAUSES SOLUTIONS Water is dripping outside Hot and Humid weather. • This is normal Water is dripping inside the room The air conditioner is not correctly tilted outside. • For proper water drainage, make sure the air conditioner is slightly tilted downward from the front of the unit to the rear. Water collects in the base pan Moisture removed from the air is draining into the base pan.
Warranty Soleus International Inc. warrants the accompanying Soleus Air Air Conditioner to be free of defects in material and workmanship for the applications specified in its operation instruction for the period of parts specified below. 5 YEARS FOR COMPRESSOR 1 YEAR FOR OTHER COMPONENTS This warranty shall not apply to broken or marred cabinets, accessories, knobs, filters or routine maintenance.
66129908032