8 INCHES, OSCILLATING STAND FAN OWNER’S MANUAL Model No.
18 IN. OSCILLATING STAND FAN Thank you for choosing a Soleus Air fan. This owner’s manual will provide you with valuable information necessary for the proper care and maintenance of your new product. Please take a few moments to thoroughly read the instructions and familiarize yourself with all the operational aspects of your new fan. For your own records, please attach a copy of your sales receipt to this manual.
11) Unplug the fan before moving, cleaning or making repairs. NOTE: If for any reason this unit requires service, return appliance to manufacturer or a similarly qualified service agent to ensure safety. 12) To reduce the risk of fire or electric shock, do not use this fan with any solid-state speed control device. 13) To disconnect, grip plug and pull from wall outlet. Never pull on the cord to unplug. 14) For indoor use only.
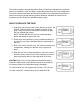
This product employs overload protection (fuse). A blown fuse indicates an overload or short-circuit situation. If the fuse blows, unplug the product from the outlet. Replace the fuse per the instructions below and check the product. If the replacement fuse blows, a short-circuit may be present and the product should be discarded or returned to an authorized service facility for examination and/or repair. HOW TO REPLACE THE FUSE 1. Unplug the fan from the outlet. Place the plug on a firm, flat surface.
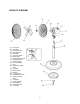
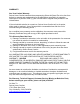
PRODUCT DIAGRAM A) B) C) D) E) F) G) H) I) J) K) L) M) N) O) P) Q) R) S) T) U) V) W) X) Front Grill Fan Blade Securing Screw Mounting Nut Back Grill Carrying Handle Motor Shaft Speed Control Knob Oscillation Knob Motor Housing Fan Head Neck Pole Adjustable Height Knob Fan Base Black Weight Washer Locking Lever Adjustable Tilt Knob Range of Motion Screw Connector Securing Knob Carriage Bolt Securing Screw Tube Plug 5
ASSEMBLY INSTRUCTIONS Tools required: Phillips screwdriver (not included) 1) Remove the fan and packaging materials from the box. Base Assembly: 1) Unscrew the locking lever from the bottom of the pole. 2) Turn the pole upside down and slide the opening in the center of the fan base over the pole. Place the black weight onto the base followed by the washer. 3) Insert the threaded end of the locking lever into the hole of the washer and through the base into the bottom of the stand.
OPERATING INSTRUCTIONS 1) Set the fan on a stable, level surface. 2) Confirm that the Speed Control Knob is set to “O” (off). Plug the cord into a standard 120V A/C outlet. 3) Adjust to the desired speed setting: O: Off I: Low Speed II: Medium Speed III: High Speed 4) The fan can operate in oscillation or stationary mode. Press the Oscillation Knob down to activate the oscillating mode. To stop oscillation, pull knob up. 5) Unplug the fan when not in use.
3) Reassemble the fan after the parts have dried completely. To do so, replace the fan blade, tighten the securing screw, and secure the front grill. Do not plug the fan into an electrical outlet until it is fully reassembled. STORAGE When not in use, store the fan in a cool, dry location. To prevent dust and dirt build-up, use the old packaging to repack the unit.
WARRANTY One Year Limited Warranty Soleus Home Comfort warrants the accompanying Soleus Air Stand Fan to be free from defects in material and workmanship for the applications specified in its operation instruction for a period of ONE (1) year from the date of original retail purchase in the United States.