1,000 BTU Portable Air Conditioner with dehumidifier & Fan PE4-11R-03 Operating Instructions Model No.
Thank you for choosing a Soleus Air Portable Air Conditioner. This owner’s manual will provide you with valuable information necessary for the proper care and maintenance of your new product. Please take a few moments to thoroughly read the instructions and familiarize yourself with all the operational aspects of your new Soleus Air Portable Air Conditioner. For your own records, please attach a copy of your sales receipt to this manual.
PACKAGE CONTENTS Portable Air Conditioner Exhaust Hoses (1) Hose Adapters (1) Window Kit Adapter (1) Remote Control AAA Batteries (2) Window Kit - 3 Sliding Panels (1 single hose panel, 2 extension panels) Owner’s Manual Wall Cover (1) — the cap covers the whole on the wall or window. SPECIFICATIONS • The cooling capacity is measured at an ambient temperature of DB 86 °F, WB 78 °F. • Noise level is measured at a distance of 3.28 ft away from the front of the unit, when the unit is in cooling mode.
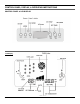
PRODUCT DIAGRAM FRONT BACK 4
INSTALLATION SELECTING THE LOCATION Place the unit on a flat surface in an area where the outlets are not obstructed. Place the unit at least 20” away from all adjacent walls. MOUNTING THE EXHAUST HOSE Slide the square front end of the exhaust duct over the hot air outlet on the back of the unit. The exhaust hose should be kept as short and straight as possible. Prevent any sharp bends in the exhaust hose, as this will trap hot exhaust air and cause the unit to run less efficiently.
LCDI POWER CORD AND PLUG This air conditioner is equipped with an LCDI (Leakage Current Detection and Interruption) power cord and plug as required by US National Electric Code 440.65. This cord consists of a length of shielded flexible cord with no termination on the load side and a LCDI attachment plug on the line side.
WINDOW KIT INSTALLATION 7
CONTROL PANEL, DISPLAY, & OPERATING INSTRUCTIONS CONTROL PANEL & LCD DISPLAY LCD Display 8
OPERATING INSTRUCTIONS CONTROL PANEL BUTTONS (Refer to the images on page 9) 1) Power On and Off - Press the ON/OFF button once to manually turn the unit on. Press the ON/OFF button once more to turn the unit off. 2) Mode Selection - Press the MODE Button repeatedly to cycle between the different modes: Auto mode, Air Conditioner, Dehumidifier, and Fan. 3) Fan Speed Control - Press the FAN SPEED Button to cycle through the different fan speeds: High, Medium, and low.
OPERATING THE UNIT USING THE CONTROL PANEL Air Conditioner Mode 1) Install the exhaust hose and window kit properly (see pages 7 & 8). 2) Plug the Power Cord into an electrical outlet. 3) Turn on the unit by pressing the ON/OFF button on the control panel. 4) Press the Mode button until the “COOL” icon appears on the LCD display 5) Press the ▲ or ▼ buttons until the desired room temperature appears on the control panel ° ° ° ° display. The temperature ranges from 61 F - 86 F (16 C - 31 C).
Auto Mode 1) Install the exhaust hoses and window kit properly (see pages 7 & 8). 2) Plug the Power Cord into an electrical outlet. 3) Turn on the unit by pressing the ON/OFF button on the control panel. 4) Press the MODE button until the “AUTO” icon appears on the control panel display. Select the fan speed by pressing the FAN button. NOTE: During AUTO mode, the unit operates in Dehumidifier mode when the room temperature is between ° ° ° 68 F to 80 F.
OPERATING THE UNIT USING THE REMOTE CONTROL REMOTE CONTROL LCD Display shows all settings FAN SPEED DRY MODE TIMER BUTTON MODE BUTTON TEMP SET BUTTONS TIMER SET BUTTONS SLEEP MODE F F On/Off ON/OFF BUTTON REMOTE CONTROL OPERATING INSTRUCTIONS 1) Power On and Off - Press the I/O button on the remote to turn the unit on or off. 2) Send - Press this button to transmit the chosen operation. This button must be pressed after every operation change using the remote.
REMOTE CONTROL OPERATING INSTRUCTIONS (CONT.) 7) Sleep Mode - See “SLEEP MODE” on page 9. 8) Timer - To program the timer, press the TIMER button on the remote control to select the SET TIMER MODE. To program the unit to automatically turn on, make sure the unit is on, then press the Hr/Min buttons to select the desired time between 1-18 hours. Once you have chosen the auto-on time, press the SEND button to transmit the time.
CARE & MAINTENANCE Prior to all cleaning and maintenance, please unplug the air conditioner from the outlet. Cleaning the air filter 1. Press down on the two latches (hooks) on top of the filter and remove the air intake grill from the air conditioner 2. Remove the filter from the air intake grill 3. Wash the filter with a mild soap. You may spray off the unit, or immerse in water. 4. Dry off this filter with a cloth or let it dry in the shade. NOTE: Do not use hot water when cleaning the filter.
TROUBLESHOOTING Problem The Air Conditioner Does Not Start Possible Cause • • • The LCD display the number for the timer • but it does not work The unit is set to COOLING mode, but the airflow from the air conditioner is not cool • • Solution The Power Supply is not Connected to • an outlet The Power plug is not inserted tightly • to an outlet • There is a malfunction with the power plug or electrical outlet and/or fuse.
WARRANTY One Year Limited Warranty Soleus International Inc. warrants the accompanying Soleus Air PE4-11R-03 Portable Air Conditioner to be free of defects in material and workmanship for the applications specified in its operation instruction for a period of ONE (1) year from the date of original retail purchase in the United States. If the unit exhibits a defect in normal use, Soleus International Inc.