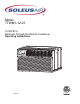
Model TTWM1-12-01 12,000 BTU Electronic Through the Wall Air Conditioner Operating Instructions V170213 3058080
Thank you for choosing a Soleus Air Air Conditioner. This owner’s manual will provide you with valuable information necessary for the proper care and maintenance of your new product. Please take a few moments to thoroughly read the instructions and familiarize yourself with all the operational aspects of your new air conditioner. For your own records, please attach a copy of your sales receipt to this manual.
IMPORTANT SAFETY INSTRUCTIONS Read all instructions before using this air conditioner FOR YOUR SAFETY Do not store or use gasoline or other flammable vapors and liquids in the vicinity of this or any other appliance. Read product labels for flammability and other warnings.
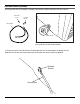
LCDI POWER CORD AND PLUG This air conditioner is equipped with an LCDI (Leakage Current Detection and Interruption) power cord and plug as required by US National Electric Code 440.65. This cord consists of a length of shielded flexible cord with no termination on the load side and a LCDI attachment plug on the line side.
SPECIFICATIONS Noise level is measured at a distance of 3.28 ft away from the front of the unit in cooling mode. Power consumption is measured when the fan runs at the highest speed setting. These specifications are for reference only. For actual data, please refer to the rating label on the back of the unit. Model TTWM1-12-01 Power Supply (Ph/V/Hz) 1/115V/60Hz 78.
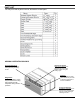
PART LIST You may not need all parts in the list, discard the unused parts. NORMAL OPERATING SOUNDS Sound of Rushing Air You may hear the sound of rushing air being moved by the fan High Pitched Chatter Today’s high efficient compressors may have a high pitched chatter during the cooling cycle. Vibration Unit may vibrate or make noise because of poor wall or window construction or incorrect installation.
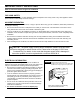
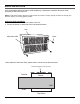
GRILLE INSTALLATION Once a compatible Solues Air sleeve (sold separately) is assembled, install the Aluminum Grille (included) on the back of the unit. NOTE: The Aluminum Grille is designed to help achieve the maximum cooling capacity for Soleus Air Through The Wall unit, replace your existing grille is a MUST. Aluminum Grille Installation 1. Match the Aluminum Grille on the back of the unit. 2.
Optional Plastic Grille Installation An optional Plastic Grille is also included in the package, however, it is highly suggested to use Aluminum Grille for better air circulation. 1. Match the Plastic Grille on the back of the unit. 2. Secure the Screw and Washer on each side of the unit shown as below: Unit Screw Plastic Grille Washer SLIDE UNIT INTO SLEEVE INSTRUCTIONS Follow below steps to properly install the unit into the sleeve. NOTE: Sleeve assembly instruction is not included in this manual.
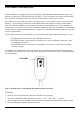
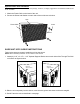
GROUND WIRE (Optional) Use the ground wire kit (included) to install the Ground Wire before sliding the unit into a sleeve. Grounding Screw Toothed Washer Ground Wire Plastic Washer 1. Locate the screw on the side of the unit. Unscrew the screw and remove the Plastic Washer. 2. Secure the screw, Ground Wire and Toothed Washer, the Toothed Washer is against the unit. Slide the unit into the sleeve and make sure the Ground Wire does not become tangled.
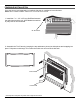
FINISHING INSTALLATION Once the sleeve (sold separately) is installed, slide the air conditioner into wall sleeve. NOTE: Sleeve & Grille installation instruction is not included in this manual. 1. Install the 1” x 1 1/2” x 84” long Stuff-Seal between the wall-sleeve and the unit. A flat-bladed screwdriver or putty knife is recommended. 84" Stuff-Seal 2. Assemble the Trim Frame by inserting the top and bottom pieces into side pieces and snapping into place.
OPERATING YOUR AIR CONDITIONER Before you start using your air conditioner, please familiarize yourself with the control panel and remote control functions. This air conditioner can be controlled by the control panel (touch pad) CONTROL PANEL 10 1) Power On and Off - Press the POWER to turn the unit ON and OFF. 2) Digital Display - Displays the set temperature in Auto, Cool, Dry modes, and current room temperature in Fan mode. It also displays the set time for the Delay Timer function.
OPERATING YOUR AIR CONDITIONER -Auto Mode : Press Mode button repeatedly to cycle to Auto mode. The unit will automatically run between Cool and Fan based on current room temperature. 7) Auto-on Delay Timer - To program the Auto-on timer, press the DELAY TIMER button when the unit is powered off. Press the ▲ or ▼ buttons to set the desired time (1-24 hours) for the unit to automatically turn on. Auto-off Delay Timer - To program the Auto-off Timer , press the DELAY TIMER button when the unit is powered on.
REMOTE CONTROL OPERATING INSTRUCTIONS Using the Remote Control LCD Display MODE SLEEP FAN HIGH ENERGY SAVER FAN MED TIMER FAN LOW C/ F CHILD LOCK MYTEMP MODE Battery Size: AAA - NOTE: Do not mix old and new batteries or different types of AAA batteries.
REMOTE CONTROL OPERATING INSTRUCTIONS 1. ON/OFF - Press the button to turn the A/C on or off. When the unit is turned off, the Timer function will be cancelled. The set temperature will be saved. 2. MODE SELECTION - Press the MODE button repeatedly to cycle between the different modes: Auto, Cool, Dry (Dehumidifier), and Fan. 3. TEMPERATURE SETTING - Press the ▼ button to decrease the temperature when the unit is on. Stop pressing the button when the desired temperature is displayed.
OPERATING YOUR AIR CONDITIONER AIR CONDITIONER FEATURES There is a 3 minute delay when cooling mode is engaged or disengaged. This delay prevents the compressor from overheating and possible tripping of the circuit breaker. The fan will continue to run during this time. 4-WAY DIRECTIONAL LOUVERS Direct air up, down, left, or right throughout the room with the 4-way directional louvers.
TAKING CARE OF YOUR AIR CONDITIONER CARE AND CLEANING Clean your air conditioner to keep it looking new and to minimize dust build up. Cabinet Cleaning To clean the air conditioner cabinet: Air Filter Cleaning The air filter should be checked at least once every month to see if it needs cleaning. Trapped particles and dust can build up in the filter and may decrease airflow as well as cause the cooling coils to accumulate frost. To clean the air filter: 1.
TROUBLESHOOTING PROBLEM POSSIBLE CAUSES SOLUTIONS The Air Conditioner will not start The air conditioner is unplugged Make sure the air conditioner plug is pushed completely into the outlet. The fuse is blown/circuit breaker is tripped. Check the house fuse/circuit breaker box and replace the fuse or reset the breaker. Power Failure The unit will automatically restart when power is restored. There is a protective time delay (approx.
TROUBLESHOOTING (CONT.) PROBLEM POSSIBLE CAUSES SOLUTIONS Water is dripping outside Hot and Humid weather. This is normal Water is dripping inside the room The air conditioner is not correctly tilted outside. For proper water drainage, make sure the air conditioner is slightly tilted downward from the front of the unit to the rear. Water collects in the base pan Moisture removed from the air is draining into the base pan.
FOR OTHER COMPONENTS Warranty Soleus N.A warrants the accompanying Soleus Air Air Conditioner to be free of defects in material and workmanship for the applications specified in its operation instruction for the period of parts specified below. 5 YEARS FOR COMPRESSOR 2 YEARS FOR OTHER COMPONENTS This warranty shall not apply to broken or marred cabinets, accessories, knobs, filters or routine maintenance.