
Use and Care Manual

SOLO STOVE FIRE PITS
2.0
Instructions & Other Information
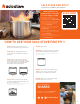
HOW TO USE YOUR SOLO STOVE FIRE PIT
2.0
Step 1 Unwrap your Solo Stove fire pit.
Remove the nested flame ring and set it aside.
Step 2 Remove all packaging and items
inside the fire pit, including the ash pan and
base plate.
Must read before use.
Failure to do so can result
in serious injury or death.
Vor Gebrauch unbedingt lesen.
Andernfalls sind schwere Verletzungen
oder Todesfälle möglich. HIER SCANNEN.
À lire absolument avant toute utilisation.
Le non-respect de cette consigne peut
entraîner des blessures graves, voire
mortelles. SCANNER ICI.
Leer antes de usar. El no hacerlo puede
resultar en lesiones graves o muerte.
ESCANEE AQUÍ.
Lezen voor gebruik. Het nalaten hiervan
kan leiden tot serieuze verwondingen of
de dood. SCAN HIER.
Da leggere prima dell’uso. In caso
contrario, possono verificarsi lesioni gravi o
morte. SCANSIONA QUI.
SCAN HERE
Step 3 First, position the ash pan in the
bottom center of the fire pit (A). Then, place
the base plate in the center of the fire pit until
it nests above the ash pan. Install the base
plate with the dome pointed up (B).
(A) (B)
Step 4 Start to build your fire by placing
your tinder, kindling, and small wood pieces in
the center of the fire pit.
For best results, do not overfill with wood that covers
or extends above the upper vent holes.
Step 5 Light your fire.
Step 7 As your ember bed gets hotter, start
adding in 1-3 pieces of wood. As those catch,
add enough wood to fill the burn chamber.
Step 8 When you’re ready to call it a night,
let the fire pit burn out on its own.
Step 6 Place the flame ring back on top of the
fire pit with the angled edges pointing upward.
This will provide protection from the wind and enhance
the look of the flames.
good moments,
SHARED
Follow us on social media @solostove
and tag us in your good moments!
v1.0
#solofirstburn