416 Gebrauchsanweisung Originalbetriebsanleitung Akku-Druckspritze de Instruction manual Original instructions Backpack sprayer with rechargeable battery Instructions d'emploi Notice original Pulvérisateur à batterie Manual de instrucciones Manual original Rociador a presión con batería Istruzioni per l'uso Istruzioni originali Spruzzatore a batteria Gebruiksaanwijzing Oorspronkelijke gebruiksaanwijzing Accu-sproeier en fr es Achtung! Lesen Sie vor der ersten Inbetriebnahme diese Gebrauchsanw
- DEUTSCH - Akku-Druckspritze 416 Symbole und Typenschild Gebrauchsanweisung Originalbetriebsanleitung Folgende Symbole werden am Gerät und in dieser Gebrauchsanweisung verwendet: Achtung! Lesen Sie vor der ersten Inbetriebnahme diese Gebrauchsanweisung gründlich durch und beachten Sie unbedingt die Sicherheitsvorschriften! Um die Funktion und die Leistungsfähigkeit dieses Gerätes über lange Zeit zu erhalten, sollten Sie die Betriebs- und Wartungsanweisungen genau beachten.
Inhaltsverzeichnis Seite 1. Sicherheitsvorschriften ........................................................................................................................ 4 1.1 Bestimmungsgemäßer Gebrauch 4 1.2 Allgemeine Sicherheitshinweise 4 1.3 Der sichere Umgang mit Pflanzenschutz-Spritzmittel 5 1.4 Sicherer Umgang mit dem Akku und dem Ladegerät 5 1.5 Arbeitskleidung 6 1.6 Beim Gerätetransport 6 1.7 Vor und bei der Arbeit 6 1.8 Bei Wartung und Reparatur 6 2. Technische Daten / Sonderzubehör ..........
Sicherheitsvorschriften 1. Sicherheitsvorschriften 1.1 Bestimmungsgemäßer Gebrauch Diese Druckspritze darf ausschließlich zum Ausbringen von zugelassenen, flüssigen Pflanzenschutz-, Schädlingsbekämpfungs- und Unkrautvernichtungsmitteln, sowie Flüssigdünger, die im autorisierten Fachhandel erhältlich sind benützt werden. Die Hinweise der Pflanzenschutzmittelhersteller sind unbedingt zu beachten. Andere Mittel dürfen mit dieser Druckspritze nicht ausgebracht werden.
Sicherheitsvorschriften 1.3 Der sichere Umgang mit Pflanzenschutz-Spritzmittel Pflanzenschutzmittel dürfen auf keinen Fall - auch nicht durch Rücksog beim Befüllen - der öffentlichen Kanalisation zugeführt, auf Ödlandflächen ausgebracht, natürlichen Gewässern zugeführt oder dem Hausmüll beigegeben werden. Pflanzenschutzmittel bzw. die Reste von Pflanzenschutzmitteln immer in einem geeigneten Behälter auffangen und bei den Sammelstellen für Haushaltschemikalien abgeben.
Sicherheitsvorschriften 1.5 Arbeitskleidung Zweckentsprechende, vorschriftsmäßige Schutzkleidung, die alle Körperteile vor den Kontakt mit Pflanzenschutzmittel und vor hoch geschleuderte Gegenstände schützt, ist zu tragen Schutzhandschuhe, Gesichtsschutz (z.B. Schutzbrille), Fußschutz, Körperschutz – z. B. Gummischürze, ggf. Atemschutz. Die Kleidung soll zweckmäßig, d.h. enganliegend, aber nicht hinderlich sein.
Technische Daten / Sonderzubehör 2. Technische Daten / Sonderzubehör Brühebehälter Nennvolumen l Maschenweite Einfüllsieb Restmenge, die das Gerät nicht mehr ordnungsgemäß ausbringt Arbeitsdruck mit Standarddüse Stellung I Stellung II Spritzmittel Ausbringwerte mit Standarddüse Stellung I Stellung II Spritzrohr Spritzschlauch mm 0,55 ml < 50 bar bar ca. 1,4 ca. 2,8 l/min l/min 0,44 0,56 Material Länge mm PVC 500 Länge mm 1500 Standard Spritzdüse Sonderzubehör Düsensatz mit 8 versch.
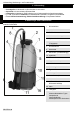
Lieferumfang; Bedienungs- und Funktionsteile 3. Lieferumfang Grundgerät mit Handventil am Druckschlauch vormontiert Spritzrohr mit vormontiertem Düsenaufsatz Ladegerät mit Netzkabel / EURO-Stecker und 3 länderspezifische Steckdosenadapter je 1 Stk. symbolischer Aufkleber für Behälterinhalt: Herbizide, Fungizide und Insektizide. Diese Gebrauchsanweisung, EG Konformitätserklärung auf separatem Beiblatt 4. Bedienungs- und Funktionsteile Ansicht: linke Seite 1. Brühebehälter 2.
Bedienungs- und Funktionsteile Ansicht: oben, Brühebehälter geöffnet Ansicht: rechte Seite, unterer Bereich Ansicht: Schutzgehäuse geöffnet Ladegerät mit unterschiedlichen Netzkabeln DEUTSCH 9
Arbeitsvorbereitung 5. Arbeitsvorbereitung 5.1 Zusammenbau Aus Versandgründen ist die Akku-Druckspritze noch nicht komplett montiert. Das Gerät darf nur in komplett zusammengebautem Zustand in Betrieb genommen werden! Den festen Sitz und die korrekte Polung der Kabeldoppelstecker kontrollieren. Schutzgehäuse schließen, Verschlussknöpfe im Uhrzeigersinn wieder auf waagrechte Stellung drehen.
Arbeitsvorbereitung 5.3 Einstellen der Tragegurte Tragegurte beidseitig im Klickverschluss (6) einrasten und die Druckspritze auf den Rücken nehmen. Die Schultergurte sind mit Hilfe von Klemmschiebern auf die erforderliche Länge einstellbar. Den Hüftgurt um den Bauch legen und verschließen, mit den Schiebern die Länge einstellen. 5.4 Vor der Erstinbetriebnahme und nach längerer Stillsetzung Durch Herunterziehen der beiden Gurt-Enden werden die Tragegurte gestrafft.
Spritzmittel ansetzen, Brühebehälter befüllen 6. Spritzmittel ansetzen, Brühebehälter befüllen Beachten Sie beim Umgang mit dem Spritzmittel unbedingt die Sicherheitsvorschriften in dieser Gebrauchsanweisung (insbesondere unter Kap. 1.3 "Der sichere Umgang mit PflanzenschutzSpritzmittel") und die Hinweise des Spritzmittelherstellers.
Spritzmittel ansetzen, Brühebehälter befüllen ; Anwendung der Druckspritze Kennzeichnen des Behälterinhaltes Den jeweiligen Aufkleber für Behälterinhalt Herbizide, Fungizide oder Insektizide am Behälter anbringen. 7. Anwendung der Druckspritze 7.1 Anwendungsbereiche Diese Druckspritze eignet sich zum Ausbringen von zugelassenen, flüssigen Pflanzenschutz-, Schädlingsbekämpfungs- und Unkrautvernichtungsmitteln, sowie Flüssigdünger, die im autorisierten Fachhandel erhältlich sind.
Anwendung der Druckspritze 7.3 Spritzen Beachten Sie bei der Anwendung der Druckspritze die Sicherheitsvorschriften. Das Gerät nicht bei Wind oder Regen einsetzen, um eine großflächige Verteilung des Sprühmittels zu vermeiden. Vor Arbeitsbeginn Windrichtung prüfen. Spritzen Sie am besten in den Morgen- oder Abendstunden, da es eher windstill ist. Das ordnungsgemäß vorbereitete Gerät auf den Rücken tragen. Das Spritzrohr am Handventil in der Hand halten.
Betriebs- und Wartungshinweise 8. Betriebs- und Wartungshinweise 8.1 Allgemeine Betriebs- und Wartungshinweise Nach einer Einlaufzeit von ca. 5 Betriebsstunden müssen alle erreichbaren Schrauben und Muttern auf Festsitz überprüft und evtl. nachgezogen werden. Kontrollieren Sie vor jeden Arbeitsbeginn die gesamte Druckspritze auf betriebssicheren Zustand. 8.
Betriebs- und Wartungshinweise 8.5 Brühebehälter entleeren und reinigen Brühebehälter entleeren Das Einfüllsieb, den Kugelventil-Filter an der Spritzdüse und die Spritzdüse von Zeit zu Zeit mit Wasser und weicher Bürste reinigen. Spritzdüse nicht mit dem Mund ausblasen! Nach dem Reinigen den Brühebehälter im geöffneten Zustand trocknen lassen. Druckspritze gerade auf eine horizontale Ebene abstellen.
Garantie; Verschleißteile 9. Garantie Der Hersteller garantiert eine einwandfreie Qualität und übernimmt die Kosten für eine Nachbesserung durch Auswechseln der schadhaften Teile im Falle von Material- oder Herstellungsfehlern, die innerhalb der Garantiezeit nach dem Verkaufstag auftreten. Bitte beachten Sie, dass in einigen Ländern spezifische Garantiebedingungen gültig sind. Fragen Sie im Zweifelsfall Ihren Verkäufer. Er ist als Verkäufer des Produktes für die Garantie verantwortlich.
- ENGLISH - Backpack sprayer with rechargeable battery Symbols / type plate information Instruction manual Original instructions Caution! Prior to operating the unit, please read the owner’s manual carefully, and most importantly, observe all safety rules. To ensure that your device will continue to work properly and deliver optimum performance for many years to come, ensure that you follow all instructions in this operating and maintenance manual.
Index Page 1. Safety regulations ................................................................................................................................. 4 1.1 Correct use 4 1.2 General safety instructions 4 1.3 Safe handling of spray pesticides 5 1.4 Safe handling of the rechargeable battery and the charger 5 1.5 Work clothing 6 1.6 Transportation of the device 6 1.7 Before and during work 6 1.8 Maintenance and repairs 6 2. Specification / special accessories ......................................
Safety regulations 1. Safety regulations 1.1 Correct use This backpack sprayer must only be used for the purpose of applying approved liquid pesticides, insecticides, weed killer (herbicides) and liquid fertilizers available from authorised specialist dealers. Observe all instructions provided by the pesticide manufacturer. This backpack sprayer must not be used to spray any other media.
Safety regulations 1.3 Safe handling of spray pesticides Pesticides must never be allowed to enter public sewer systems, sprayed onto wastelands, allowed to drain into natural bodies of water or disposed of together with normal domestic waste. This also means that appropriate care must be taken during filling to ensure that none of the pesticide is drawn back into water pipes.
Safety regulations 1.5 Work clothing Always wear suitable protective clothing in accordance with the relevant regulations. The clothing must protect all parts of your body against contact with pesticides and against objects that are kicked up – i.e. protective gloves, face protection (e.g. protective goggles), protective footwear, body protection – e.g. rubber apron, possible breathing protection. Clothing should be appropriate – i.e. tight-fitting, but not obstructive.
Specification / special accessories 2. Specification / special accessories Solution container, nominal volume l Filling strainer mesh aperture Residual volume not properly discharged by the device Operating pressure with standard nozzle Setting I Setting II mm 0.55 ml < 50 bar bar Approx.1.4 Approx.2.
Standard delivery ; Operating / functional components 3. Standard delivery Standard device with hand valve pre-assembled on the high-pressure hose Spray tube with pre-assembled nozzle attachment Charger with mains cable / EURO plug and 3 mains plug adapters for different countries 1x sticker for the solution container for each of the following: Herbicide, Fungicide and Insecticide. These operating instructions, the EC declaration of conformity on a separate piece of paper 4.
Operating / functional components View: top, solution tank opened View: right hand side, lower part View: protective housing opened Charger with different power cables ENGLISH 9
Preparing the equipment for use 5. Preparing the unit for use 5.1 Assembly The backpack sprayer with rechargeable battery is dismantled before it is dispatched. It must be fully reassembled again before it is used. Check that the double plugs are securely connected and that polarity is correct. Close the protective casing and twist the locking buttons back in a clockwise direction until they are horizontal.
Preparing the equipment for use 5.3 Adjusting the carrying straps Clip the carrying straps into the clips (6) on both sides and lift the backpack across your shoulders. Use the sliding clips, adjust the shoulder straps to the right length. Fit the bottom strap around the midriff of the wearer and close the clip, again using the sliding clips to adjust the length of the straps as required. Pull the loose ends of the carrying straps to tighten them.
Mixing solutions and filling the solution tank 6. Mixing solutions and filling the solution tank When handling the substances for spraying, always follow the safety instructions printed at the start of these operating instructions (pay special attention to section 1.3 "Safe handling of spray pesticides") and the information provided by the manufacturer of the particular substance being sprayed.
Mixing solutions and filling the solution tank ; Using the backpack sprayer Identification of the tank contents Attach the relevant sticker to indicate the contents of the tank (i.e. Herbicide, Fungicide or Insecticide). Herbicide pre-mixed Insecticide Fungicide CAUTION: Never fill different spraying agents into the solution tank without first thoroughly cleaning the solution tank and all parts that come into contact with the spraying agent and flushing the system with plenty of water.
Using the backpack sprayer 7.3 Spraying Ensure that you follow all of the safety instructions when using the backpack sprayer. Never use the sprayer under windy conditions or if it is raining, as this would risk widespread drifting of the spraying agent. Check the wind direction before starting work. It is best to perform spraying work in the morning or evening, as it tends to be less windy then. The red clip can be used to secure the hand valve in its rest position to prevent accidental spraying.
Operating and maintenance instructions 8. Operating and maintenance instructions 8.3 Information on using the rechargeable battery 8.1 General operating and maintenance instructions When used properly, the rechargeable battery will remain in good working order for many years. It is important to note that the rechargeable battery should never be fully discharged.
Operating and maintenance instructions 8.5 Draining and cleaning the solution tank Draining the solution tank Clean the filling strainer, the ball valve filter at the spraying nozzle and the spraying nozzle periodically with water using a soft brush. Do not use your mouth to blow through the spray nozzle! After cleaning, leave the solution tank open to dry. Place the backpack sprayer level on a horizontal surface.
Warranty ; Wearing parts 9. Warranty 10. Wearing parts The manufacturer guarantees problem free quality and will cover the cost of replacing parts which are found to be faulty in material or show manufacturing defects within the prescribed guarantee period after the date of purchase. Please note that specific guarantee conditions may differ from country to country. When in doubt, please ask the vendor of the goods. The vendor of the product is responsible for guarantee applications.
- FRANÇAIS - Pulvérisateur à batterie Symboles et plaque signalétique Instructions d'emploi Notice original Attention! Lire attentivement le présent manuel avant la première mise en service et observer absolument les prescriptions de sécurité ! Pour conserver longtemps toutes les fonctions et les performances de cet appareil, vous devriez suivre les conseils d’usage et de maintenance à la lettre Votre revendeur se tient à votre entière disposition pour d’éventuelles autres questions.
Sommaire Page 1. Consignes de sécurité ......................................................................................................................... 4 1.1 Conditions d’utilisation 4 1.2 Conseils de sécurité généraux 4 1.3 Un contact sécurisé avec les produits phytosanitaires 5 1.4 Du bon emploi de la batterie et du chargeur 5 1.5 Vêtements de travail 6 1.6 Du transport de l’appareil 6 1.7 Avant et pendant le travail 6 1.8 De la maintenance et des réparations 6 2.
Consignes de sécurité 1. Consignes de sécurité 1.1 Conditions d’utilisation Ce pulvérisateur ne doit exclusivement servir qu’à la dispersion de produits phytosanitaires, de pesticides, de désherbants et d’engrais liquides, autorisés et disponibles dans le commerce spécialisé. Respecter absolument les prescriptions du fabricant du produit phytosanitaire. Ne pas disperser d’autres produits avec ce pulvérisateur.
Consignes de sécurité 1.3 Un contact sécurisé avec les produits phytosanitaires Les produits phytosanitaires ne doivent en aucun cas – pas même par aspiration au remplissage - être rejetés dans les canalisations publiques, répandus sur les surfaces en jachères, mélangés aux eaux naturelles ou ajoutés aux ordures ménagères. Les produits phytosanitaires (ou leurs déchets) doivent toujours être recueillis dans un réservoir approprié et remis au dépôt des produits chimiques ménagers.
Consignes de sécurité 1.5 Vêtements de travail Le port de vêtements de protection adéquats et conformes aux règlements est obligatoire. Ils doivent protéger toutes les parties du corps d’un contact avec les produits phytosanitaires et des objets violemment projetés – des gants de protection, une protection du visage (par exemple des lunettes de protection), des protections des pieds, des protections corporelles – par exemple un tablier en caoutchouc, et, le cas échéant, un masque respiratoire.
Données techniques / Accessoires spéciaux 2.
Contenu de la livraison ; Liste des pièces et leur fonction 3. Contenu de la livraison Appareil de base avec manette d’air manuelle sur la buse sous-pression montée en usine Tuyau d’aspersion avec tête de gicleur montée en usine Chargeur avec câble secteur / prises européennes et 3 adaptateurs spécifiques 3 autocollants symboliques du contenu du réservoir : Herbicide, Fongicide et Insecticide.
Liste des pièces et leur fonction Aperçu: dessus, réservoir ouvert Aperçu: côté droit, partie inférieure Aperçu: capot de protection ouvert Chargeur et câble secteur FRANÇAIS 9
Préparation 5. Préparation 5.1 Montage Pour des raisons d’emballage, ce pulvérisateur à batterie n’est pas encore complètement monté. L’appareil ne doit être mis en service que complètement assemblé ! Contrôler l’assise et la polarisation des deux prises du câble. Fermer le carter de protection, et remettre les clapets de fermeture en position horizontale en les tournant dans le sens des aiguilles d’une montre.
Préparation 5.3 Réglage du harnais de transport Ouvrir les deux côtés du harnais par les fermetures à cliquet (6) et enfiler le pulvérisateur sur le dos. Les sangles d’épaule sont réglables à la longueur voulue à l’aide de curseurs à serrage. Mettre la sangle de hanche autour du ventre et la boucler, régler la longueur avec les curseurs. 5.4 Avant première mise en service ou après une longue inactivité En tirant les extrémités des deux sangles, le harnais sera tendu.
Introduction du produit à asperger, remplissage du réservoir 6. Introduction du produit à asperger, remplissage du réservoir Pour manipuler des produits d’aspersion, respectez absolument les consignes de sécurité de ce mode d’emploi (particulièrement le chapitre 1.3 "Un contact sécurisé avec les produits phytosanitaires") ainsi que les conseils du fabricant du produit.
Introduction du produit à asperger, remplissage du réservoir ; Utilisation du pulvérisateur à pression Marquage du contenu du réservoir à produit Sur le réservoir à produit, appliquer l’autocollant du contenu correspondant : Herbicide, Fongicide ou Insecticide. 7. Utilisation du pulvérisateur à pression 7.
Utilisation du pulvérisateur à pression 7.3 Démarrage Aspersion En utilisant le pulvérisateur, respectez les consignes de sécurité. Ne pas se servir de l’appareil par grand vent ou sous la pluie, pour éviter un éparpillement du produit vaporisé. Avant de commencer à travailler, vérifiez la direction du vent. Pulvérisez de préférence le matin ou le soir, aux heures plutôt dépourvues de vent. Portez l’appareil correctement préparé, sur le dos. Tenir la lance à la main au niveau de la manette.
Conseils d'usage et de maintenance 8. Conseils d’usage et de maintenance 8.1 Généralités Après une durée d’env. 5 heures de fonctionnement, il faut vérifier le serrage de toutes les vis et écrous accessibles et éventuellement les resserrer. Avant chaque début de travail, contrôlez le bon état de marche du pulvérisateur dans son ensemble. 8.
Conseils d'usage et de maintenance 8.5 Vidange et nettoyage du réservoir à produit Vidange du réservoir Nettoyer de temps en temps le filtre de remplissage, le filtre sphérique du gicleur et le gicleur, avec de l’eau et une brosse douce. Ne pas souffler dans le gicleur avec la bouche ! Après nettoyage, laisser sécher le réservoir de produit en position ouverte. Poser le pulvérisateur à pression debout sur un plan horizontal. Tourner d’env.
Garantie ; Pièces d'usure 9. Garantie 10. Pièces d’usure Le fabricant garantit une qualité irréprochable et prend en charge les frais d’amélioration occasionnés par un remplacement de pièces défectueuses en cas de défaut du matériau ou de la fabrication survenant durant la période de garantie. Notez que certains pays possèdent des conditions de garantie particulières. En cas de doute, interrogez votre revendeur. En tant que vendeur du produit, il est responsable de la garantie.
- ESPAÑOL - Rociador a presión con batería Manual de instrucciones Manual original ¡Atención! Es indispensable leer con mucha atención las instrucciones de manejo antes de utilizarla por primera vez. ¡Preste especial atención a las recomendaciones de seguridad! Para mantener el buen funcionamiento y capacidad de este equipo durante mucho tiempo debe seguir en todo momento estas instrucciones de operación y mantenimiento. Su distribuidor estará encantado de atender cualquier consulta que tenga.
Indice Página 1. Normas de seguridad .................................................................................................................... 4 1.1 Uso según lo previsto 4 1.2 Indicaciones generales de seguridad 4 1.3 Funcionamiento seguro con productos fitosanitarios 5 1.4 Funcionamiento seguro con la batería y el cargador 5 1.5 Ropa de trabajo 6 1.6 Transporte del equipo 6 1.7 Medidas previas al trabajo y posteriores al mismo 6 1.8 Mantenimiento y reparación 6 2.
Normas de seguridad 1. Normas de seguridad 1.1 Uso según lo previsto Este rociador a presión sólo debe utilizarse para rociar con productos fitosanitarios, parasiticidas y herbicidas orgánicos o inorgánicos, así como abonos disponibles en comercios autorizados. Tenga presentes las instrucciones del fabricante de los productos fitosanitarios. No debe utilizar otros productos en este rociador a presión.
Normas de seguridad 1.3 Funcionamiento seguro con productos fitosanitarios Los productos fitosanitarios no deben verterse al sistema de canalización público (tampoco al realizar la carga en caso de derramamiento), ni depositarse en terrenos baldíos, aguas naturales o ser eliminado junto con la basura doméstica. Los productos fitosanitarios o los residuos de los mismos deben depositarse siempre en un depósito adecuado y en los puestos de reciclaje de residuos químicos domésticos.
Normas de seguridad 1.5 Ropa de trabajo Utilice la ropa de protección correspondiente al trabajo que se va a realizar conforme a la normativa vigente para evitar el contacto del cuerpo con líquido fitosanitario y protegerse frente a los objetos que pueden salir despedidos a alta velocidad. Lleve guantes de protección, gafas de protección, botas de trabajo, protección corporal como, p.ej. mandil de goma o mascarilla.
Datos técnicos/Accesorios especiales 2. Datos técnicos/Accesorios especiales Capacidad nominal del depósito de líquido en l 20 Ancho de malla del filtro de carga en mm 0,55 Cantidad residual que el aparato no puede eliminar adecuadamente en ml < 50 bar bar aprox. 1,4 aprox.
Elementos incluidos en el suministro ; Componentes de operación y funcionamiento 3. Elementos incluidos en el suministro Aparato básico con válvula manual premontada en el tubo de aire comprimido Tubo de inyección con boquilla premontada Cargador con cable de alimentación /Euroconector y 3 adaptadores de enchufe específicos para países determinados 1 pegatina con símbolo que indica el contenido del depósito en cada caso: herbicidas, funguicidas e insecticidas.
Componentes de operación y funcionamiento Vista: desde arriba, depósito de líquido abierto Vista: derecha, parte inferior Vista: carcasa de seguridad abierta Cargador y cable de alimentación ESPAÑOL 9
Medidas de preparación del trabajo 5. Medidas de preparación del trabajo 5.1 Ensamblaje Debido a las condiciones de transporte, el rociador a presión con batería no viene completamente montado. El aparato sólo debe ponerse en funcionamiento totalmente montado. Conexión eléctrica de la batería Compruebe que el conector doble del cable esté correctamente conectado y que se haya respetado la correcta polaridad.
Medidas de preparación del trabajo 5.3 Ajuste de la correa de transporte Enclave la correa de transporte en el cierre tipo clip (6) a ambos lados y coloque el inyector de aire comprimido a la espalda. La correa de los hombros pueden ajustarse mediante los ajustadores de corredera hasta la longitud deseada. Ajuste la correa para la cintura alrededor de la barriga y ciérrela. Ajuste el largo mediante los ajustadores de corredera. 5.
Carga del líquido rociador en el depósito de líquido 6. Carga del líquido rociador en el depósito de líquido Al trabajar con líquido de rociado tenga siempre presente la normativa de seguridad en este manual del usuario (en particular en el cap. 1.
Carga del líquido rociador en el depósito de líquido ; Uso del rociador a presión Indicativo del contenido del depósito Pegue la pegatina correspondiente conforme al contenido del depósito, ya contenga herbicidas, funguicidas o insecticidas. 7. Uso del rociador a presión 7.1 Ámbitos de aplicación: Este rociador a presión es apto para rociar con productos fitosanitarios, parasiticidas y herbicidas orgánicos o inorgánicos, así como abonos disponibles en comercios autorizados.
Uso del rociador a presión 7.3 Arranque Inyección Cuando utilice el rociador a presión tenga en cuenta las instrucciones de seguridad. No utilice el aparato si hay viento o lluvia para evitar la distribución del líquido de rociado en grandes superficies. Compruebe la dirección del viento antes de comenzar a trabajar. Se recomienda rociar por la mañana o por la noche, cuando el viento se encuentra más calmado.
Instrucciones de operación y mantenimiento 8. Instrucciones de operación y mantenimiento. 8.1 Instrucciones generales de operación y mantenimiento. Tras un tiempo de inicio de funcionamiento de aprox. 5 horas de trabajo deberá comprobar la correcta fijación de tornillos y tuercas y apretarlos si procede. Siempre antes de comenzar a trabajar revise todo el aparato para comprobar que se encuentra en buen estado de funcionamiento. 8.
Instrucciones de operación y mantenimiento 8.5 Vaciado y limpieza del depósito de líquido Vaciado del depósito de líquido: Limpie el filtro de carga, el filtro de la válvula de bola de la boquilla inyectora y la propia boquilla inyectora periódicamente con agua y un cepillo suave. Nunca intente limpiar la boquilla inyectora soplando con la boca. Coloque el rociador a presión en posición recta y horizontal. Para abrir la carcasa de seguridad gire los dos botones de cierre (17) unos 100° aprox.
Garantía; Piezas de desgaste 9. Garantía El fabricante garantiza la más alta calidad y asume los gastos derivados de mejoras al cambiar las piezas defectuosas en el caso de defectos del material o de fabricación que surjan después del día de adquisición del aparato, durante el período de garantía. Tenga en cuenta que en algunos países rigen condiciones de garantía específicas. En caso de duda, consulte a su vendedor.
- ITALIANO - Spruzzatore a batteria Simboli e targhetta identificativa Istruzioni per l'uso Istruzioni originali Sul prodotto e in questo libretto di istruzioni vengono adottati i seguenti simboli: Attenzione! Prima di accingersi all’uso del decespugliatore, è necessario leggere per intero il manuale d’istruzioni e importante attenersi a tutte le norme di sicurezza indicate.
Indice Pagina 1. Norme di sicurezza ............................................................................................................................... 4 1.1 Uso conforme alla normativa 4 1.2 Istruzioni generali di sicurezza 4 1.3 Come gestire in modo sicuro i fitofarmaci da spruzzare 5 1.4 Utilizzo sicuro della batteria e del carica batteria 5 1.5 Indumenti di lavoro 6 1.6 Per il trasporto dell'attrezzatura 6 1.7 Prima e durante il lavoro 6 1.8 Manutenzione e riparazioni 6 2.
Norme di sicurezza 1. Norme di sicurezza 1.1 Uso conforme alla normativa Questo spruzzatore ad alta pressione è particolarmente indicato alla somministrazione di fitofarmaci liquidi, antiparassitari e diserbanti autorizzati, come pure concimi liquidi che possono essere acquistati in punti di vendita autorizzati. È necessario seguire attentamente le istruzioni del produttore dei fitofarmaci. Non è permesso utilizzare questo spruzzatore ad alta pressione con altre sostanze.
Norme di sicurezza 1.3 Come gestire in modo sicuro i fitofarmaci da spruzzare In nessun caso - anche se per risucchio durante il riempimento - è permesso inserire fitofarmaci negli scarichi pubblici, disperdere su terreni incolti, in corsi d'acqua o nell'immondizia di casa.
Norme di sicurezza 1.5 Indumenti di lavoro Utilizzare indumenti di protezione, a norma e adatti all'uso, che proteggano tutte le parti del corpo dai fitofarmaci spruzzati o nel caso di oggetti sollevati dalla turbolenza - protezione mani, faccia (es. occhiali protettivi), piedi, corpo – ad esempio grembiuli di plastica e in caso di necessità mascherina di protezione delle vie respiratorie. L'abbigliamento deve essere funzionale e non può essere di ostacolo al lavoro.
Dati tecnici / Accessori speciali 2. Dati tecnici / Accessori speciali Volume nominale contenitore miscela l Larghezza maglie filtro riempimento mm Quantità residua, che l'attrezzo non riesce a erogare regolarmente bar bar Valori di rendimento liquido da spruzzare con ugello standard Posizione I l/min Posizione II l/min Flessibile spruzzatore ca. 1,4 ca.
Contenuto della confezione; Parti di comando e funzionamento 3. Contenuto della confezione Attrezzo base con valvola manuale sul flessibile di mandata già montato Tubo spruzzatore con riporto ugello premontato Carica batteria con cavo di rete / Spina EURO e 3 adattatori di presa per 3 paesi 1 pz cad. adesivi con indicazione simbolica del contenuto del contenitore: Erbicida, fungicida e insetticida.
Parti di comando e funzionamento Vista: superiore, contenitore della miscela aperto Vista: lato destro, regione inferiore Vista: Scatola protettiva aperta Carica batteria e cavo di rete ITALIANO 9
Preparazione per il lavoro 5. Preparazione per il lavoro 5.1 Assemblaggio Per motivi di spedizione lo spruzzatore a pressione a batteria non viene fornito completamente montato. L'attrezzo può essere usato solamente quando è completamente montato e integro delle sue parti. Controllare che la polarità della spina doppia del cavo sia corretta e che sia saldamente in posizione. Chiudere il rivestimento protettivo, girare i pulsanti di chiusura in senso orario riportandoli in posizione verticale.
Preparazione per il lavoro 5.3 Regolazione della cinghia di trasporto Agganciare su ambedue i lati le cinghie di trasporto fornite di chiusura a scatto (6) e caricarsi lo spruzzatore sulle spalle. Le cinghie della spalliera possono essere regolate in lunghezza con gli appositi dispositivi di regolazione. Agganciare la cinghia sui fianchi e chiuderla regolando la lunghezza con le chiusure scorrevoli. 5.
Caricare il liquido da spruzzare, Riempire il contenitore della miscela 6. Caricare il liquido da spruzzare, Riempire il contenitore della miscela Quando si lavora con il liquido da spruzzare, seguire assolutamente le norme di sicurezza contenute in queste istruzioni per l'uso (in particolare quelle del Capitolo 1.3 "Lavorare in sicurezza con fitofarmaci da spruzzo") e le istruzioni del produttore del liquido.
Caricare il liquido da spruzzare, Riempire il contenitore della miscela ; Uso dello spruzzatore a pressione Identificare il contenuto del contenitore Apporre al contenitore l'adesivo che identifichi il contenuto del contenitore come erbicida, fungicida o insetticida 7. Uso dello spruzzatore a pressione 7.
Uso dello spruzzatore a pressione 7.3 Spruzzo Quando si spruzza a pressione è necessario osservare le norme di sicurezza Non usare l'attrezzo in condizioni di pioggia o vento per evitare che il liquido spruzzato si sparga su una superficie eccessivamente ampia. Controllare la direzione del vento prima di iniziare a lavorare. Preferire le ore del mattino o della sera per spruzzare, poiché in queste ore il vento si placa. Portare l'attrezzo sulle spalle, preparato secondo la normativa.
Istruzioni di esercizio e manutenzione 8. Istruzioni di esercizio e manutenzione 8.1 Istruzioni generali di esercizio e manutenzione Dopo un rodaggio iniziale di ca. 5 ore di lavoro, tutte le viti visibili e dadi devono essere controllati per assicurarsi che siano ben serrati, se necessario devono essere serrati. Prima di iniziare il lavoro, controllare che l’intero spruzzatore pressione sia in condizioni di sicurezza per l’uso. 8.
Istruzioni di esercizio e manutenzione 8.5 Svuotare e pulire il contenitore della miscela Svuotare il contenitore della miscela Il filtro di riempimento, la valvola a sfera-filtro sull'ugello e l'ugello devono essere puliti regolarmente con acqua e una spazzola. Non soffiare con la bocca dentro l’ugello spruzzatore! Terminata la pulizia, lasciare asciugare il contenitore della miscela lasciandolo aperto.
Garanzia; Parti soggette ad usura 9. Garanzia 10. Parti soggette ad usura SOLO garantisce una qualità a perfetta regola d’arte e si accolla i costi per le riparazioni e icontrolli generali, sostituendo le parti difettose, nel caso in cui vi siano difetti di materiale o di fabbricazione, che si producono entro il periodo di garanzia a partire dal giorno della vendita. Facciamo inoltre notare che in alcuni paesi hanno valore condizioni di garanzia specifiche.
- NEDERLANDS - Accu-sproeier 416 Symbolen en kenplaatje Gebruiksaanwijzing Oorspronkelijke gebruiksaanwijzing Volgende symbolen vindt u in de gebruiksaanwijzing en op het apparaat: Lees deze gebruiksaanwijzing grondig voor u de machine voor het eerst gebruikt en hou altijd rekening met de veiligheidsvoorschriften! Om de functie en de goede prestaties van dit apparaat duurzaam in stand te houden, dient u de bedienings- en onderhoudsaanwijzingen nauwkeurig op te volgen.
Inhoud Blz. 1. Veiligheidsvoorschriften ...................................................................................................................... 4 1.1 Voorgeschreven gebruik 4 1.2 Algemene veiligheidsvoorschriften 4 1.3 Veilig omgaan met pesticiden 5 1.4 Veilig omgaan met de accu en de lader 5 1.5 Werkkledij 6 1.6 Tijdens het transport van het apparaat 6 1.7 Voor en tijdens het werk 6 1.8 Tijdens onderhoud en herstellingen 6 2. Technische gegevens / speciaal toebehoren ........................
Veiligheidsvoorschriften 1. Veiligheidsvoorschriften 1.1 Voorgeschreven gebruik Deze sproeier mag uitsluitend worden gebruikt voor het sproeien van toegelaten, vloeibare pesticiden, insecticiden en onkruidverdelgers, alsook voor vloeibare mest die in de erkende vakhandel verkrijgbaar is. De instructies van de fabrikant van het pesticide moeten absoluut worden opgevolgd. Andere middelen mogen niet met deze sproeier worden verdeeld.
Veiligheidsvoorschriften 1.3 Veilig omgaan met pesticiden Pesticiden mogen nooit – ook niet door terugzuiging tijdens het vullen – in de openbare riolering terechtkomen, worden gespoten op woeste grond, niet in natuurlijke waterlopen terechtkomen of met het huisvuil worden meegegeven. Pesticiden of resten ervan moeten altijd in een geschikt reservoir worden opgevangen en worden ingediend bij de inzamelpunten voor huishoudelijk chemisch afval.
Veiligheidsvoorschriften 1.5 Werkkledij U dient de voorgeschreven beschermkledij te dragen, die afgestemd is op de toepassing en die alle lichaamsdelen beschermt tegen contact met het pesticide en tegen weggeslingerde voorwerpen – veiligheidshandschoenen, gezichtsbescherming (bijv. veiligheidsbril), voetbescherming, lichaamsbescherming – bijv. rubberen schort, evt. bescherming van de ademhalingsorganen. De kleding moet goed aansluiten, maar mag niet hinderlijk zijn.
Technische gegevens / speciaal toebehoren 2. Technische gegevens / speciaal toebehoren Sproeivloeistofreservoir nominaal volume l Maasbreedte vulzeef Restvolume dat niet meer goed kan worden uitgespoten Werkdruk met standaardkop Stand I Stand II Sproeimiddel spuitwaarden met standaardkop Stand I Stand II Sproeilans Sproeislang mm 0,55 ml < 50 bar bar ca. 1,4 ca. 2,8 l/min l/min 0,44 0,56 Materiaal Lengte mm PVC 500 Lengte mm 1500 Standaard sproeikop toebehoren 8 div.
Leveringsomvang; Bedienings- en functie-onderdelen 3. Leveringsomvang Basisapparaat met handventiel op de drukslang voorgemonteerd Sproeilans met voorgemonteerd kopopzetstuk Lader met netkabel / EURO-stekker en 3 nationale stopcontactadapters Telkens 1 symbolische sticker voor reservoirinhoud: herbicide, fungicide en insecticide. Deze gebruiksaanwijzing, de EG-conformiteitsverklaring in een afzonderlijke bijlage maakt deel uit van deze gebruiksaanwijzing 4.
Bedienings- en functie-onderdelen Aanzicht: boven, sproeivloeistofreservoir geopend Aanzicht: rechter zijde, onderste gedeelte Aanzicht: beschermkast geopend Lader en netkabel NEDERLANDS 9
Voorbereiding van het werk 5. Voorbereiding van het werk 5.1 In elkaar zetten Sluit de beschermkast, draai de sluitknoppen rechtsom weer in horizontale stand. Sproeilans monteren Voor de verzending werd de accu-sproeier nog niet volledig gemonteerd. Het apparaat mag uitsluitend in volledig gemonteerde toestand in gebruik worden genomen! Elektrische aansluiting van de accu Ga na of de tuimelschakelaar pomp (12) in de stand “0” staat (pomp is uitgeschakeld).
Voorbereiding van het werk 5.3 Draagriemen instellen Zet de draagriemen aan beide zijden vast in de kliksluiting (6) en plaats de druksproeier op uw rug. De schouderriemen kunnen met behulp van klemschuivers worden ingesteld op de vereiste lengte. Leg de heupgordel rond de buik en sluit hem; stel de lengte in met de schuivers. 5.4 Voor het eerste gebruik en na langdurige stilstand Door de twee riemuiteinden omlaag te trekken, worden de draagriemen aangespannen.
Sproeimiddel aanmaken, sproeivloeistofreservoir vullen 6. Sproeimiddel aanmaken, sproeivloeistofreservoir vullen Wanneer u met het sproeimiddel omgaat, dient u absoluut rekening te houden met de veiligheidsvoorschriften in deze gebruiksaanwijzing (meer bepaald met paragraaf 1.3 “Veilig omgaan met pesticiden”) en de instructies van de fabrikant van het sproeimiddel.
Sproeimiddel aanmaken, sproeivloeistofreservoir vullen ; Gebruik van de sproeier Identificatie van de reservoirinhoud Breng de sticker voor de reservoirinhoud herbicide, fungicide of insecticide aan op het reservoir. 7. Gebruik van de sproeier 7.1 Toepassingsgebieden Deze sproeier is geschikt voor toegelaten, vloeibare pesticiden, insecticiden en onkruidverdelgers, alsook voor vloeibare mest die in de erkende vakhandel verkrijgbaar is.
Gebruik van de sproeier 7.3 Sproeien Hou tijdens het gebruik van de sproeier rekening met de veiligheidsvoorschriften. Gebruik het apparaat niet bij wind of regen, om te vermijden dat het sproeimiddel over een groot oppervlak verdeeld raakt. Voor u begint te werken, dient u de windrichting te controleren. Sproei bij voorkeur ’s morgens of 's avonds, omdat het dan eerder windstil is. Om ongewenst sproeien te voorkomen, kan het handventiel in ruststand worden geblokkeerd met de rode klem.
Gebruiks- en onderhoudsinstructies 8. Gebruiks- en onderhoudsinstructies 8.1 Algemene gebruiks- en onderhoudsinstructies Na een inlooptijd van ca. 5 bedrijfsuren moeten worden nagegaan of alle bereikbare schroeven en moeren goed vastzitten. Indien nodig aanspannen. Controleer telkens voor u begint te werken of de sproeier in perfecte staat verkeert. 8.
Gebruiks- en onderhoudsinstructies 8.5 Sproeivloeistofreservoir leegmaken en reinigen Sproeivloeistofreservoir leegmaken Reinig de vulzeef, de kogelventielfilter op de sproeikop en de sproeikop zelf regelmatig met water en een zachte borstel. Blaas de sproeikop nooit door met de mond! Na het reinigen laat u het sproeivloeistofreservoir in geopende toestand drogen. Zet de sproeier rechtop neer op een horizontale ondergrond.
Garantie; Slijtage-onderdelen 9. Garantie SOLO garandeert een perfecte kwaliteit en neemt de kosten op zich voor verbetering achteraf door het vervangen van defecte onderdelen in het geval van materiaal- of fabricagefouten die binnen de garantieperiode na de dag van de verkoop optreden. Let erop dat in sommige landen specifieke garantievoorwaarden gelden. Informeer bij twijfel bij uw verkoper. Hij is als verkoper van het product verantwoordelijk voor de garantie.
__________________________________________________________________________________________________ __________________________________________________________________________________________________ __________________________________________________________________________________________________ __________________________________________________________________________________________________ __________________________________________________________________________________________________ ____________
__________________________________________________________________________________________________ __________________________________________________________________________________________________ __________________________________________________________________________________________________ __________________________________________________________________________________________________ __________________________________________________________________________________________________ ____________
Made in Germany SOLO Postfach 60 01 52 D 71050 Sindelfingen Tel. 07031-301-0 Fax 07031-301-130 info@solo-germany.com SOLO P.O.Box 60 01 52 D 71050 Sindelfingen Germany Phone+49-7031-301-0 Fax +49-7031-301-149 export@solo-germany.