LemonIDE TM User Guide Ver 1.0c 2008. 05.
LemonIDETM Revision History Date Version Pages Description 2007. 8. 31 1.0 All jhkim 2007. 11. 29 1.0a All shlee 2008. 4. 10 1.0b All LemonIDE for Windows appended 2008.5.10 1.0c 6.
LemonIDETM Table of Contents Table of Contents Chapter 1. Introduction ....................................................................... 1-1 1.1 About this manual ................................................................................1-1 1.2 Who should read this manual? .................................................................1-1 1.3 Contents ...........................................................................................1-2 1.4 LemonIDE Documents.........................
LemonIDETM Table of Contents 5.4.1 Registering Method name and binary file ....................................................... 5-7 5.4.2 Configuring Arguments ............................................................................. 5-7 5.4.3 Configuring Target Agent .......................................................................... 5-7 5.4.4 Configuring Debugger .............................................................................. 5-8 5.4.5 Configuring Common ....................
LemonIDETM Chapter 1. Introduction Chapter 1. Introduction This chapter is an introduction to SystemBase’s Integrated Development Environment, LemonIDE. 1.1 About this manual This manual includes procedures, functions, and usages of LemonIDE, an IDE developed by SystemBase so that programmers can easily write applications and execute them on the target board. 1.2 Who should read this manual? This manual is designed for developers who wish to write applications using LemonIDE.
LemonIDETM Chapter 1. Introduction 1.3 Contents Chapter 1. Introduction is a preface with general information and introductory notices. Chapter 2. Getting Started explains about features and structure of LemonIDE. Chapter 3. Installing LemonIDE Windows provides information on first-time installation of LemonIDE Windows and host configuration. Chapter 4. Installing LemonIDE Linux provides information on first-time installation of LemonIDE Linux and host configuration. Chapter 5.
LemonIDETM Chapter 1. Introduction 1.4 LemonIDE Documents The following table summarizes documents included in the Eddy document set. Table 1-1. LemonIDE Documents Document Description User Guide LemonIDE configuration and management LemonIDE Spec Sheet Technical specifications of LemonIDE To access more information on LemonIDE, please refer to the SystemBase website at http://www.sysbas.com or developer community http://www.embeddedmodule.
LemonIDETM Chapter 2. Getting Started Chapter 2. Getting Started This chapter includes general information, main features, and applications of LemonIDE. 2.1 Overview LemonIDE is an integrated develoment environment (IDE) for embedded software development, based on a worldfamous open source project Eclipse. It includes GUI (Graphical User Interface) environment which helps writing applications or firmware running on a real-time linux Lemonix.
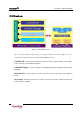
LemonIDETM Chapter 2. Getting Started 2.2 Structure Image 2-1 LemonIDE Structure Users can develop embedded software running on the target system based on Lemonix platform in a more convenient and accelerated manner.
LemonIDETM Chapter 2. Getting Started 2.3 Features Main features of LemonIDE are as follows: Eclipse Eclipse SDK 3.2.2 CDT core 3.1.2 CVS core 3.2.2 Compiler GNU C/C++ 3.4.
LemonIDETM Chapter 3. Installing LemonIDE Windows Chapter 3. Installing LemonIDE Windows This chapter describes how to install LemonIDE on the Windows host system. Refer to “Eddy_DK_Programmer_Guide”for installing instructions on Cywin, Toolchain and DK Sources. 3.1 Install Environment 3.1.1 Windows Host System LemonIDE Windows requires a Windows host system. It has been tested on the following Windows versions.
LemonIDETM Chapter 3. Installing LemonIDE Windows 3.2 Installation This chapter describes how to install LemonIDE on the Windows host system. Cywin and Toolchain must be installed in order to install LemonIDE Windows. Refer to “Eddy_DK_Programmer_Guide”for installing instructions on Cywin, Toolchain and DK Sources. 3.2.1 JDK installation LemonIDE requires a Java Runtime Environment running on the Windows host system. Java 5 JRE (Java Runtime Environment) or higher is required.
LemonIDETM Chapter 3. Installing LemonIDE Windows Download the latest JDK 6 version by clicking the download button on the right. Note It is recommended that JDK be installed under “ C:\”. Install Wizard will be automatically executed and guide you through install process once download is complete. Downloading time may vary depending on your network environment. 3.2.2 Configuring Windows Environment Variables Path must be set for LemonIDE to reference Java Libraries.
LemonIDETM Chapter 3. Installing LemonIDE Windows 3.3 Creating Project Space If installation process is completed move to LemonIDE installed directory, /cygwin/opt/lemonix/lemonade, and execute “lemonide.exe”. LemonIDE execution program is located in “c:\cygwin\opt\lemoix\lemonide\lemonide.exe”. You may create shortcut icons for your convenience. LemonIDE logo will first appear, and after loading is completed LemonIDE will automatically display its initial screen.
LemonIDETM Chapter 3. Installing LemonIDE Windows 3.3.1 Creating Workspace Create a Workspace folder. As Workspace DK Source has been installed in previous section of this manual, select the directory where DK Source has been installed. Refer to “7.6 Changing Workspace” to change workspace. Note Blank space is not allowed when creating Workspace. (e.g.) “ C:\documents and settings” (not allowed) 3.3.2 Creating Projects Create a new project on a Workspace.
LemonIDETM Chapter 3. Installing LemonIDE Windows As this manual’s instructions are based on Eddy DK Source, add application & firmware image space under DK Source directory(Workspace) as projects. LemonIDE project can be classified into one of the following four categories depending whether makefile is created and whether C or C++ program is used.
LemonIDETM Chapter 3. Installing LemonIDE Windows 3.3.3 Configuring Path Some libraries provided by Cygwin are used in LemonIDE. For this reason, “/” used in Cygwin’s Path has to be converted to c:\cygwin\, and it also has to comply with Windows default Path C:\. Click “Windows Æ Preferences… Æ C/C++ Æ Debug Æ Common Source Lookup Path Æ Add Æ Path Mapping” from LemonIDE menu and “Path Mapping : New Mapping” will be created.
LemonIDETM Chapter 4. Installing LemonIDE Linux Chapter 4. Installing LemonIDE Linux This chapter describes how to install LemonIDE on the linux host system and configure cross-compile environment to connect it to LemonIDE. Refer to “Eddy_DK_Programmer_Guide”for installing instructions on Toolchain and DK Sources. 4.1 Install Environment 4.1.1 Linux Host System LemonIDE requires a Linux host system. It has been tested on the following Linux distributions. Red Hat 9.0 Red Hat Enterprise Linux 3.
LemonIDETM Chapter 4. Installing LemonIDE Linux 4.2 Installation LemonIDE, Integrated development Environment based on Eclipse platform will be installed on Linux host. 4.2.1 Toolchain & Package Installation LemonIDE is provided in tar.gz format. When the package file is extracted under the ‘/’ directory, LemonIDE is installed under /opt/lemonide. LemonIDE need not be installed again, if already installed while installing Toolchain with instruction provided in “Eddy_DK_Programmer_Guide”.
LemonIDETM Chapter 4. Installing LemonIDE Linux To access download site, click the red box in picture above. All versions of JDKs can be downloaded at this site. LemonIDE JDK Ver. 5.0(J2SE 5.0). The latest release (of current date) is JDK 6. Move to Previous Release to download older versions. Image captures below outlines this procedure.
LemonIDETM Chapter 4. Installing LemonIDE Linux # chmod +x jdk-1_5_0_-linux-i586.bin #./jdk-1_5_0_-linux-i586.bin # sudo cp –rf jdk1.5.0_ /opt/lemonix/jdk JDK installation is now complete. 4.3 4.3 Configuration Add a path to the .bashrc file in the home directory. export PATH=/opt/lemonix/bin:$PATH With the source command, reflect changes into the system. source .bashrc 4.
LemonIDETM Chapter 4. Installing LemonIDE Linux 4.6 Creating Projects Create a project on a Workspace. A project is a set of required resource needed in developing a program, and includes source code and build information. LemonIDE manages program modules to be executed in the target as a project. Project build environment is executed as a form of make command. A makefile is required to run make commands. LemonIDE projects can either create makefile automatically or manually.
LemonIDETM Chapter 4. Installing LemonIDE Linux Type in “src” for Project Name and click “Finish” to enlist an Eddy application project. Enlisting “src” means, src folder existing under DK Source will be registered as a project, as the folder that DK Source is installed is enlisted as a Workspace. Type in “ramdisk” for Project Name and click “Finish” to enlist a project to be used as File System Image Works in the same manner.
LemonIDETM Chapter 4.
LemonIDETM Chapter 5. Using IDE Chapter 5. Using IDE IDE features of LemonIDE will be explained in this chapter. We will create, build and execute a source file named hello.c on Eddy. Procedures for making a firmware image will be outlined. 5.1 LemonIDE Views LemonIDE IDE(Integrated Development Environment) is based on Eclipse and supports C/C++ source editing, cross compile, remote execution, and GUI builder integration.
LemonIDETM Chapter 5. Using IDE Project View Displays project lists included in Workspace. Make View Displays headers, functions, structures and classes of editing source code Edit View Used for source code editing. Composed of multiple tabs for multiple source code edit. Message View Display messages during project buid and LemonIDE supported Target Browers 5.2 Creating & Editing Source Codes Create a new source file or open an existing source file.
LemonIDETM Chapter 5. Using IDE Sample program “hello.c” is shown below to provide a better understanding on use of LemonIDE. #include void sub (int value); int main (int argc, char *argv[]) { sub (1000); return 0; } void sub (int value) { int sum=0, i; for (i=1; i<=value; i++) { sum += i; } printf ("SUM (1 ~ %4d) = %7d\n", value, sum); return; } 5.3 Compile Environment Settings & Build Compile refers to process of compiling and linking source files and making binary image executable for Eddy.
LemonIDETM Chapter 5. Using IDE 5.3.1 Creating & Updating Makefile If new source file is created or an existing source file in Project View has been altered, a makefile to compile source file must be created. Makefile provide in DK Source can be reference to create a new makefile. Below displays an example of creating a compile environment for makefile for source file, “hello.c” in “src” project, under “Eddy_APPs”folder.
LemonIDETM Chapter 5. Using IDE 5.3.2 Adding to Make Target , If source file and makefile are created, next step is to add makefile to Make Target. Make Target pane can be found in Make View. Select folder where source file and makefile exists, right click and select “Add Make Target”. As new source file “Hello.c”was created on “5.2 Creating & Editing Source Codes”and compile environment on “Hello.c “ was made on “5.3.1 Creating & Updating Makefile”, add compile environment as shown below.
LemonIDETM Chapter 5. Using IDE 5.3.3 Source Compile Source file is compiled to Eddy executable binary file. Compile is carried out by clicking Make Target created in “5.3.2 Adding to Make Target”. (Double click “Hello” on “MakeView”) Compiling process can be observed in “Console” of “Message View”. Make Targets provided in DK Source are “All” and “Clean”. “All” Make Target compiles all application sources associated to makefile, and “Clean” Make Target initializes all compiled applications.
LemonIDETM Chapter 5. Using IDE 5.4.1 Registering Method name and binary file Select “Main” tab and add name & path for executable binary file. Name : Method’s alias Project : The name of the project which binary file is located C/C++ Application : Binary file to be executed As shown in the image above, folder under the project directory may be added with executable binary file name (“Eddy_Apps/hello”), or “Browse” may be used to add its absolute path (“C:\eddy_DK_2xx\src\Eddy_APPs\hello”). 5.4.
LemonIDETM Chapter 5. Using IDE 5.4.4 Configuring Debugger Select “Debugger” tab and add debugger to be used. Debugger : Select debugger type. Select “Esto GDB Server”for LemonIDE Windows and “LemonIDE GDB Server”for LemonIDE Linux. GDB Debugger : Assign path of the selected debugger execution file. Select “c:\cygwin\opt\lemoix\lib\arm-linux-estogdb.
LemonIDETM Chapter 5. Using IDE 5.4.5 Configuring Common Select “Common” tab and check Debug and Run checkboxes to display Debug and Run result information. Normally both Debug and Run options are checked for full display of information. After configuring all options on “Hello” method, click “Close” to finish registor. 5.4.
LemonIDETM Chapter 5. Using IDE 5.5 Executing Run Method Procedures for uploading executable(built) binary files and its executing on Eddy will be introduced in this section. There are two ways to upload & execute binary file on Eddy. One is through LemonIDE’s GDB Server where upload, execution and debug processes can all be carried out automatically. Another way would be to upload the binary file using FTP and manually executing and debugging the binary file through Telnet.
LemonIDETM Chapter 5. Using IDE 5.5.2 Executing Run Method (with results to Serial Port) By default, Eddy’s Target Agent prints out its results through Eddy’s serial console port. Therefore, in order to verify the results printed out to Eddy’s serial console port, a serial communication emulator program is required. Steps on “5.5.1 Configuring Eddy’s Target Agent” must be followed first for this method.
LemonIDETM Chapter 5. Using IDE Click on the icon left to execute last executed Run Method. Clicking on the arrow would allow you to select a Run Method of your listing. The image below shows the result of executing hello.c (of 5.2 Creating & Editing Source Codes) from Telnet.
LemonIDETM Chapter 5. Using IDE 5.6 Creating a Firmware Image Application program which has been compiled and executed on the target (with the instructions of previous chapters) will now be made into a firmware image to be loaded to the target. This chapter will outline the process of creating a firmware image and loading it to its target. 5.6.1 Changing Makefile Changes to Makefile will be made to make a firmware image.
LemonIDETM Chapter 5. Using IDE install: #@echo "Making ramdisk image..." #$(TOOL) -b 8192 -d root -D device_table.txt ramdisk #../tool/genext2fs -U -b 5110 -d root -D device_table.txt ramdisk #../tool/genext2fs -U -b 7158 -d root -D device_table.txt ramdisk #../tool/mkcramfs -q -D device_table.txt root ramdisk ../tool/genext2fs.exe -U -b 10240 -d root -D device_table.txt ramdisk Æ Set Ramdisk size to 10,240K and refer to Device_table.txt to enlist device in Eddy/dev. gzip -vf9 ramdisk test -f ramdisk.
LemonIDETM Chapter 5. Using IDE 5.6.2 Adding to Make Target After creating/changing Makefile for firmware image, it must be added to Make Target. Make Target can be found in Make View pane on right side of LemonIDE. Select Ramdisk project and right click and select “Add Make Target”. cfg, release and install in DK source is already added to Make Target and need not be added again. Refer to “5.3.2 Adding to Make Target” for details on adding procedures to Make Target.
LemonIDETM Chapter 6. LemonIDE Debugger Chapter 6. LemonIDE Debugger LemonIDE supports breakpoint & tracepoint debugging methods. This chapter will demonstrate procedures of breakpoint debugging with the hello.c project introduced in section “5.2 Creating & Editing Source Codes” Adding a breakpoint Remote debugging configuration Starting remote debugging Program run control Moving into a function Confirm and modify the values of variables, registers, and equations. Leaving a function 6.
LemonIDETM Chapter 6. LemonIDE Debugger Debugging information is stripped out when compiled with this option and debugging is not possible.
LemonIDETM Chapter 6. LemonIDE Debugger . Stack View Module View Displays information on Threads and Stacks during debugging. Displays information on variables, breakpoint, equations and modules during debugging. Source Tracer view Displays breakpoint locations in source codes. Source Info View Displays functions and reverse assembly codes related to source file. Message View Displays target’s status. Debug Execution View Controls debugging start, stop and breakpoints.
LemonIDETM Chapter 6. LemonIDE Debugger 6.3 Breakpoint Debugging This chapter will introduce breakpoint debugging. After debugging, it is recommended that the completed program be restored with original CFLAGS option and STRIP values to optimize execution module. 6.3.1 Modifying compiling environment & Executing debugging As mentioned in “6.1.2 Cautions when setting compile options”, MakeFile must be modified for debugging.
LemonIDETM Chapter 6. LemonIDE Debugger 6.3.3 Program Run Control “Debug Execution View”provides commands to control program execution during debugging. Resume (continue) Step return (finish) Suspend Terminate Step into Step over (next) Main commands used to control program execution are as follows: Resume: Continue until the next breakpoint. Suspend: Pause the program. Terminate: Terminate the debugging session completely.
LemonIDETM Chapter 6. LemonIDE Debugger 6.4.2 Setting Tracepoints & Actions Register a new Tracepoint. Left click on the source code to be registered as a Tracepoint and click “Toggle Tracepoint”. A properties window where actions for the tracepoint can be set will appear. Pass count, registers, local variables, arguments can be selected as desired in “Tracepoint Properties” Click “OK” and a green trace point will appear.
LemonIDETM Chapter 6. LemonIDE Debugger Non-Breaking Debugging will stop when the line is executed this number of times. Non-Breaking Debugging must designated with a end point in order to check the status after tracing is over. Pass Count When Pass Count is 0, tracing will continue. When it is bigger than 0, debugging will stop after executing this number of times. In actual debugging, debugging area is divided into many steps.
LemonIDETM Chapter 6. LemonIDE Debugger 6.4.3 Program Trace Control Buttons used for tracing and replaying in Non-Breaking Debugging are as follows. Stop Replay Load Tracepoint Stop Replay Jump to Trace Frame Save Stop Tracepoint Replay Start Stop Tracing Replay To Previous Trace Frame Stop Stop Tracing Replay To Next Trace Frame Start Replay Start/Stop Tracing Click Start Tracing ( ), hello program in the target will be executed and tracing will start.
LemonIDETM Click Resume ( Chapter 6. LemonIDE Debugger ) to run through whole step or Terminate ( ) to quit debugging session. Various Debugging information can be checked on “Windows” Æ “Show View” Æ “Other..
LemonIDETM Chapter 7. Monitoring Tool Chapter 7. Monitoring Tool This chapter focuses on the target browser and the monitoring tool used to monitor target system information from LemonIDE. Select “Windows” Æ “Show View” from LemonIDE title menu to select a monitoring tool supported in LemonIDE. 7.1 Target Browser Target browser’s user interface & its usage will be discussed in this section. 7.1.1 Target Browser User Interface Target browser user interface is shown below.
LemonIDETM Chapter 7. Monitoring Tool Target architecture Connection status icon differs in color, depending on the current connection status. Red: Target is not connected or does not exist.(No ping response) Orange: Target is alive and is connected to the network, but target agent is not connected. Green: Target Agent is connected, so that remote monitoring is possible.
LemonIDETM Chapter 7. Monitoring Tool Activate Monitor Views: Activate target status monitor views. CPU/Memory view and process list view starts periodical monitoring. Pause Monitoring: Pause the remote monitoring to that target. CPU/Memory view and process list view stops periodical monitoring. Show Monitor Perspectives: Open LemonIDE Monitor perspective 7.1.
LemonIDETM Chapter 7. Monitoring Tool A recommended location of the target browser is the bottom-left side as shown in the image on the left. Add a target When the target does not appear in the target browser, you need to add a target. Click + mark to open ‘Input New Target’ window. Enter hostname, IP address, and target agent port number. Then, a new target node is created in the target browser. Now add a run configuration for the target node in the target browser.
LemonIDETM Chapter 7. Monitoring Tool As you drop the project to the node, a debugger select window will appear. By default, it is set to “gdb”. Select a correct debugger according to your target type. When a debugger is selected, default “Absolute Shared Library Path” information is set. When you need to change “Absolute Shared Library Path” to paths other than defaults, click Browse button.
LemonIDETM Chapter 7. Monitoring Tool “kill” to finish the process. Make sure the process is killed. Please note that the process list view refreshes every 10 seconds, so it may take a while for the finished process to disappear from the list. It might be the case that the process does not exist when you try to kill the process. If this is the case, you will be prompted with the following message. Select “Windows – Show View”menu to monitor views in LemonIDE Monitor. 7.
LemonIDETM Chapter 7. Monitoring Tool Note Followings must be set in orderto utilize Serial terminal. Copy jar & dll files to system according to LemonIDE installed OS’s environment. Refer to install file in /opt/lemonix/install_files directory for this operation. LemonIDE Windows requires 2 dll files under Windows/i386-mingw32 to be copied to Windows/system32. RXTXcomm.jar file is to be copied to jre/lib/ext (directory where JDK was installed in “3.2.1 Installing JDK”) and restart LemonIDE.
LemonIDETM starts CPU & Memory’s status check , and Chapter 7. Monitoring Tool stops the process. In order to execute “CPU Memory View” as an independent window outside of Message View, right click on “CPU Memory View” window’s title menu bar and select ‘Detached”. 7.5 Registers LemonIDE target system’s register status can be viewed. Select “Windows” Æ “Show View” Æ “Registers”from LemonIDE’s title menu to activate Registers view window. This window can be found in Make View on right side of LemonIDE.