
User Manual


6
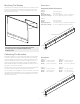
Option 3 - Key Hole Wall Mount
Sonance Soundbars can be mounted directly to the wall surface.
Choose the soundbar location and identify the studs in the wall with
a stud nder. Use a level and the supplied cardboard key hole wall
mount template to mark the locations on the wall where the screws
should be located. Temporarily tape the template to the wall once it
is level and mark the holes with a pencil. Make sure the template is
perfectly aligned with the display location then pre drill the pilot-hole
locations. The 400mm mounting points correspond to the spacing
of 16” on center studs.
Option 4 - Cabinet or Table Top Installation
Sonance Soundbars can be mounted in a cabinet or placed on a
table top using the included four rubber feet. Remove the adhesive
backing and place the rubber feet on the outer corners on the
bottom of the soundbar. When using the soundbar in a cabinet
make sure the soundbar is placed forward near the cabinet front
edge, not in the rear of the cabinet. This will ensure best
audio quality.
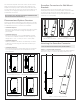
Place soundbar face down on a soft surface. Attach the two
supplied key hole wall mounts to the back of the soundbar using
the supplied A. screws. You can use any of the mounting points on
the back of the soundbar.
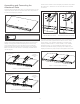
To hang key hole wall mount use only #10 - #12 pan head or at
head screws (not supplied). The screws must be rmly attached to
the studs to support the weight of the soundbar. Align the screw
heads into the large round portion of the key hole and gently slide
into place.
If attaching directly to drywall, we recommend self drilling drywall
anchors that can easily accommodate the weight of the soundbars.
Also highly recommended are the Toggler® high-performance
heavy duty toggle bolts. Rubber feet can be added to the left and
right rear top and bottom edges of the soundbar to rest against
the wall.
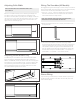
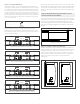
400mm
600mm
300mm
400mm
SB46 M VESA Standard Attachment Points
SB46 L VESA Standard Attachment Points
SB46-55 and SB46-65 Standard Attachment Points
SB46-75 and SB46-85 Standard Attachment Points
Rubber Feet on Rear Corners
400mm
300mm
600mm
400mm
NOTE: PUTTING SCREWS DIRECTLY INTO THE DRYWALL WILL NOT
SUPPORT THE WEIGHT OF THE SOUNDBAR.