
User manual


2 Operation of the analyzer
15
2 Operation of the analyzer
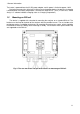
2.1 Buttons
The keyboard of the analyzer consists of four buttons: ON/OFF , LEFT , RIGHT
, START/STOP . To switch-on the analyzer, press ON/OFF button. Directional buttons
LEFT and RIGHT are used primarily to change the information screens. The screens change circu-
larly, i.e. after pressing RIGHT button, when 9/9 screen is displayed, the device goes to screen 1/9.
After pressing LEFT button, screens are displayed in reverse order. START/STOP button is used
to start and stop the recording as defined in the configuration of current set point.
2.2 Switching the analyzer ON/OFF
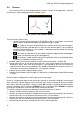
The analyzer may be switched-on by pressing button . Then a welcome screen is
displayed, showing the name of the meter, the internal software version (firmware), hardware
version and serial number. Then, the analyzer performs a self-test and in case of detecting
errors, the display shows an error message, accompanied by a long beep. When an error occurs
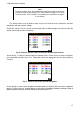
during memory card launching, the following message is displayed "Memory card error". If the
file system on the card is damaged (e.g. when the user manually formatted the card as mass
storage memory accessible only for the user) the analyzer will suggest formatting the memory
(message "Format memory card?") and button will trigger the process of formatting (3
short beeps). After the formatting is completed, the analyzer will repeat initialization of the card.
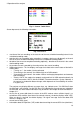
When during the card initialization, the analyzer detects FIRMWARE.PQF file in the root
directory, which includes a newer version of the firmware (internal software), the upgrade
process will be suggested by the analyzer by displaying message "Update firmware?". Button
triggers this process (3 short beeps) and its progress may be observed on the display.
The update may be skipped by pressing the briefly button . When he update is
successfully completed, message "Update successful!”, will be displayed or in other case
"Update Failed!”. Then the analyzer will automatically switch-off.
After switching on, the analyzer is activated at the last measurement point and displays 1/9
screen with a phasor diagram.
To switch the analyzer OFF, keep button pressed for 2 seconds, when no button or
recording lock are active.
Pressing the active button results in a short beep of a higher pitch; for inactive button the beep
is longer and at a lower pitch.
Pressing button or for at least 1.5 s refreshes the display.
2.3 Auto-off
When the analyzer operates for at least 30 minutes powered by the battery (no power supply
from mains) and it is not in the recording mode and PC connection is inactive, the device automat-
ically turns-off to prevent discharging the battery.
The analyzer turns off automatically also when the battery is fully discharged. Such emergency
shut-down is performed regardless of the mode of the device. In case of active recording, it will be
interrupted. When the power supply returns, the recording process is resumed. Emergency shut-
down is signalled by message "Battery discharged!".