
User manual


2 Operation of the analyzer
23
2.7 Taking measurements
2.7.1 Measurement Points
The analyzer allows the user to store four completely independent measurement configuration,
which are called "measurement points." Number of active measurement point is shown in the upper
left corner of the screen.
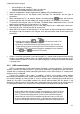
Press buttons and at the same time and hold them pressed for 1 second to display
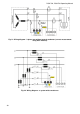
the screen for selecting the measurement point Fig. 14.
Fig. 14. Selection of the measurement point.
To select one of the four points, press the corresponding button indicated by a triangle on the
screen:
to select measurement point 1, select
to select measurement point 2, select
to select measurement point 3, select
to select measurement point 4, select
After selecting the measurement point the analyzer displays the phasor diagram (screen 1/9),
and checks the validity of mains connections. If an error is detected, the device emits a long beep.
If the user chooses to not to select the measurement point and does not press any key, after a
few seconds, the analyzer returns to the previous screen.
In some cases, changing the measurement point is not possible. At least two of such cases are
as follows:
the analyzer is recording; in such case the device displays message "Recording in progress",
the communication with a PC is in progress (via USB, OR-1 or GSM). In this case, LEFT and
RIGHT keys are inactive.
The user may assign any chosen percentage of memory to each point (e.g. 100% for the first
point and 0% for others or 25% for each point). If any measurement point has the whole memory
assigned, selecting any other measurement point results in displaying the number of selected point
alternately with the symbol of the sine wave, indicating that the parameters may be viewed only in
"LIVE" mode.
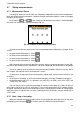
2.7.2 Start / stop of recording
When the selected measurement point still has the assigned disk space left, the user may start
recording by pressing button , or initiate it from the software using connected PC.