Aero-Classic Oil Cooler Upgrade JABIRU 3300 OIL COOLER UPGRADE
AeroClassics Oil Cooler This guide was written to help you achieve a dependable, proven Jabiru engine installation in your Sonex airframe using the Sonex/Jabiru Installation Kit. This Sonex/Jabiru specific guide supplements the Sonex drawings, Jabiru-provided manuals, and AeroCarb manual, but does not replace them. Used together, these resources will help you duplicate the Sonex-recommended Jabiru installation which has been proven successful through hundreds of flight hours.
MATERIALS LIST AeroClassics Oil Cooler Materials List Materials Shopping List by Supplier The following materials will be needed to install the AeroCalssics oil cooler. This list is also organized by supplier on the next page. Important: Your particular installation may require items not listed here. This is only a suggested list of the most commonly needed parts. Important: Your particular installation may require items not listed here. This is only a suggested list of the most commonly needed parts.
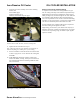
AeroClassics Oil Cooler OIL COOLER INSTALLATION This oil cooler installation applies to the Jabiru 3300 only. Install the Oil Cooler and Shroud Assemble and Attach the Oil Cooler 1. Attach the -43L and -43R brackets to the "back" of the oil cooler, as shown in the photo below. The brackets are attached to the cooler with: AN3-5A Bolt, Qty 4 AN960-10 Washer, Qty. 12 MS20365-1032 Elastic Stop Nut, Qty. 4 Materials Needed: q Aero-Classics Oil Cooler, Model 8000075 q AN3-5A Bolts, Qty 6.
AeroClassics Oil Cooler 2. Center the cooler mounting bracket on the oil cooler assembly and clamp it in place. The bottom of the vertical flange butts against the top of the oil cooler's flange. OIL COOLER INSTALLATION 5. Mount the oil cooler bracket (SNX-P20-42) to the bottom of the intake manifold with the two cap screws removed in step 4. Use Loctite 242 on the threads of the screws. Bracket SNX-P20-42 attached to the intake manifold. 6.
AeroClassics Oil Cooler 7. Attach the oil cooler assembly to the cooler mounting bracket with: AN3-5A Bolt, Qty 2 AN960-10 Washer, Qty. 2 MS20365-1032 Elastic Stop Nut, Qty. 2 OIL COOLER INSTALLATION Notes on Oil Cooling and Duct Sealing A complete seal is not critical in most applications. In general, oil cooling needs drop as the ambient temperature drops.
AeroClassics Oil Cooler Plumb the Oil Cooler Materials Needed: q AN816-6D Nipple, Qty. 2 q MS20822-6-6D elbow, Qty. 2 q 90O swivel hose end (Jeg's p/n 799-613160), Qty. 1 q Straight hose end (Jeg's p/n 799-610020), Qty. 3 q MS21919-WDF8 Clamp, Qty. 1 q -06 Pro-flex Hose q Teflon Paste 1. Remove the barbed fittings from the Jabiru-provided oil cooler adapter. 2. Drill through the existing hose fitting holes with a 7/16" drill and re-tap each hole with a 1/4 NPT tap. 3.
AeroClassics Oil Cooler OIL COOLER INSTALLATION 12. Install a straight hose end fitting to the end of the Pro-Flex hose that attaches to the oil cooler. 13. Install the hose assembly. Do not use sealing compounds or teflon tape on these fittings. 14. Secure the oil hose with a cushioned hose clamp (p/n MS21919-WDF8) mounted to the bottom of the intake manifold. Use an existing cap screw from the manifold to mount the hose clamp. Apply Locktite 242 to the manifold screw before re-installing it.
45/64" [17.859mm] 7/8" [22.225mm] Revision Letter Change Discription 4" [101.6mm] ���� Drawing Scale 1 1/2" [38.1mm] ���������� Drawing Number ��� Revision ���� ��� ������ ������� ����� 1 3/8" [34.925mm] Ø 9/32" [Ø 7.144mm] 2 Places ��� ������ ������� ������� � ����� ���� ���� ���������� ����� ������� �������� ����� 2 21/32" [67.
7/8" [22.225mm] 1/2" [12.7mm] 3/4" [19.05mm] 7/16" [11.113mm] 1 3/4" [44.45mm] 1 1/4" [31.75mm] Revision Letter Change Discription 5 1/2" [139.7mm] 4 7/8" [123.825mm] 1/4" [6.35mm] Ø 1/8" [Ø 3.175mm] Ø 3/16" [Ø 4.763mm] 2 Places 3 7/8" [98.425mm] ���� Drawing Scale ���������� Drawing Number ��� Revision ���� ��� ������ ������� ����� R 1/8" [R 3.175mm] 2 Places 7/8" [22.225mm] 7/16" [11.