Copyright © 2002 SONICblue Incorporated. All rights reserved. SONICblue Incorporated does not assume any responsibility for errors or omissions in this document or make any commitment to update the information contained herein. Rio is a registered trademark of RioPort, Inc. in the USA and/or other countries and is used under license. All other product names may be trademarks of the companies with which they are associated.
Safety Warnings CLASS 1 LASER PRODUCT CLASS 1 LASER PRODUCT This Compact Disc player is classified as a CLASS 1 LASER product. Use of controls, adjustments or performance of procedures other than those specified herein may result in hazardous radiation exposure. CAUTION RISK OF ELECTRIC SHOCK. DO NOT OPEN CAUTION: INVISIBLE LASER RADIATION WHEN OPEN AND INTER LOCKS DEFEATED. AVOID EXPOSURE TO BEAM. CAUTION: TO REDUCE THE RISK OF ELECTRIC SHOCK, DO NOT REMOVE REAR COVER.
Thank you for buying this Rio Executive Shelf System. Contents Please take time to read these instructions. They will allow you to operate your system with ease and take full advantage of its features. SAFETY WARNINGS .................................................................................................................................................................................... 2 INSTALLING YOUR EXECUTIVE SHELF SYSTEM Front Panel View ....................................................
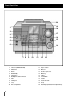
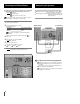
Front Panel View 20 19 18 1 2 3 17 4 16 15 5 6 14 7 8 4 9 10 11 12 13 1. Function (TUNER/CD/TAPE) 11. Skip or Search 2. REC/Pause 12. Mono/ST 3. Demo 13. CD Door open/close 4. On/Standby 14. Multi Jog 5. CD Synchro 15. S.Bass 6. Headphone Jack Connector 16. Sound Mode 7. AUX 17. Volume 8. CD Repeat 18. Power Surround 9. Stop 19. Sleep 10. Disc Compartment 20.
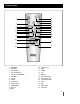
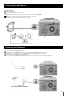
Remote Control 25 1 24 2 23 22 3 4 5 6 7 21 20 19 18 8 9 16 15 17 10 14 11 13 12 1. On/Standby 14. Volume Control 2. EQ/S.Bass 15. Band 3. Tape Rewind 16. CD Play 4. Tape Fast-Forward 17. +10 5. Rec/Pause, CD SYNCHRO 18. Random 6. REV. Mode 19. Tape Counter Reset 7. Repeat 20. Cassette Deck Stop 8. CD Stop 21. Cassette 6Deck Play 9. Program/Set 22. Sleep 10. Skip or Search 23. Aux 11. TUNE/CD Mode 24. Timer On/Off 12. Mono/ST 25. Timer/Clock 13.
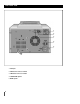
Rear Panel View 1 2 3 4 5 1. AUX Input 2. AM Antenna Connector Terminal 3. FM Antenna Connector Terminal 4. SUBWOOFER Speaker 5.
Where to Install your Executive Shelf System To take full advantage of your new Executive Shelf System, follow these installation instructions before connecting the unit. Install the system on a flat, stable surface. Never place this unit on carpeting. Never place this unit in an outdoor area. Maintain an open space of approximately 6 inches (15 cm) on the sides and rear of the system, for ventilation purposes. Make sure that you have enough room to open the compact disc compartment easily.
Connecting the Speakers Connecting to an External Source The auxiliary input can be used to take advantage of the sound quality of your Executive Shelf System when listening to other sources. Examples: A television A video disc player A Hi-Fi stereo video cassette recorder The System has Main Speaker jacks and Subwoofer Speaker jacks.
Connecting the AM Antenna The AM antenna can be: Placed on a stable surface Fixed to the wall (you must first remove the base) The AM antenna connector terminals are located on the rear of the system and are marked AM ANT. To avoid noise interference, check that the speaker wires do not run close to the antenna wires. Always keep them at least 2 inches (5 cm) apart. Connecting the FM Antenna Connect a 75ž antenna to the FM antenna terminal.
Viewing the Various Functions on Your System You can view the various functions available on your system. 1 Press the Demo button. Result: The various functions available are listed in turn on the display. Setting the Clock Your system is equipped with a clock, which allows you to turn your system on and off automatically. You should set the clock: When you first purchase the Executive Shelf System After a power failure After unplugging the unit All these functions are described in detail in this guide.
Playing CD/MP3-CD Discs Selecting a Track You can play 12 cm or 8 cm compact discs without an adapter. This unit has been designed to playback the following types of CDs: Audio CD, CD Text, CD-R and CD-RW. Continued use of irregular shaped CDs (heart-shape, octagonal, etc.) can damage the unit. 1 Select the CD function by pressing the CD button on the front panel. You can select the track you wish to listen to, either when the compact disc player is stopped or when a disc is playing.
Scanning a CD Track What is MP3? When listening to a compact disc, you can quickly scan a track on the CD. MP3 means MPEG1 Layer 3, the global standard for audio signal compression technology. It uses digital compression technology to compress original sound data by up to 12 times without sound quality degradation. To scan through the tracks... File Compatibility Forwards Backwards Press and hold down...
Repeating One or All Tracks on the Compact Discs Random Play Function You can listen to the tracks on a compact disc in random order. You can repeat indefinitely: A specific track on a compact disc. All tracks on the compact disc selected. 1 Press the Random button. If this button is pressed when the CD is being played back or stopped, any track recorded in the CD may be selected to playback again. 1 2 When you have finished the random playback, press Random button again. or press the 2 To repeat.
Checking or Changing Programmed Tracks Programming the Order of Playback You can check or change your selection of programmed tracks at any time. *This function does not operate while using an MP3-CD. You can decide: 1 2 the play order of the tracks to skip certain tracks The play order of up to 24 may be programmed. Press once if you have started listening to the selection. Press Program/Set. Result: The following is displayed: (01 = Program no., – – = Track no.
Selecting a Preset Station Searching for and Storing Radio Stations You can store up to: You can listen to a preset radio station as follows: 15 FM stations 15 AM stations 1 2 3 1 2 Switch the system on by pressing On/Standy ( ). Select the required band by pressing TUNER/Band on the front panel or Band on the remote control. Result: The appropriate indication is displayed: FM AM To search for a station... Press TUNE/CD Mode Manually One or more times until MANUAL is displayed.
Listening to a Cassette Tape Counter Always treat your cassettes with care; refer, if necessary, to the section entitled “Precautions When Using Audio Cassettes” on page 22. 1 2 3 4 Switch the system on by pressing On/Standby ( ). When playing a cassette, a counter is displayed to enable you to note locations on the tape. The counter is only displayed when a cassette is being played. Reset the counter by pressing Counter Reset.
Recording a Compact Disc Recording a Radio Program You can record a compact disc on a cassette in two different ways: You can record a radio program of your choice. Synchronized recording Direct recording You do not need to adjust the volume, as it has no effect on the recording. Synchronized recording This feature enables you to synchronize the start of the recording with the start of the disc or track of your choice. 1 2 3 4 5 6 Switch the system on by pressing On/Standby ( ).
Timer Function The timer enables you to switch the system on or off at specific times. Example: You wish to wake up to music every morning. 2 If you no longer want the system to be switched on or off automatically, you must cancel the timer. 1,9 Before setting the timer, check that the current time is correct. For each step, you have a few seconds to set the required options. If you exceed this time, you must start again.
Mute Function You can turn the sound off temporarily on your system. Example: You wish to answer a telephone call. S. Bass Function The S.Bass function enhances the bass sound, when enabled. Turn the S.Bass Level knob. 1 2 Press Mute. To switch the sound back on (at the same volume as before), press Mute again or the VOL+/VOL- buttons. Turn the knob clockwise or counterclockwise to switch between OFF ÷ S.Bass 1 ÷ S.Bass 2 ÷ S.Bass 3. Select the desired level for the bass.
Setting the System to Switch off Automatically While listening to a compact disc or a cassette, you can set the system to switch off automatically. Example: You wish to go to sleep to music. Press Sleep. Result: The is displayed: 2 Press Sleep one or more times to indicate how long the system should continue playing before it switches off: Prolonged use of headphones at a high volume may damage your hearing.
Cleaning Your Executive Shelf System Safety Precautions The following diagrams illustrate the precautions to be taken when using or moving your Executive Shelf System.
Precautions When Using Compact Discs Handle your compact discs with care. Always hold them by the edges to avoid leaving fingerprints on the shiny surface. When you have finished playing a compact disc, always put it back in its case. Do not fix paper or adhesive tape to the discs and do not write on the label. Clean discs with a special-purpose cloth. Store your compact discs in a clean place, out of direct sunlight, where they will not be exposed to high temperatures. Always use compact discs marked .
Technical Specifications Both the design specifications and these user instructions are subject to change without notice. RADIO AM Signal/noise ratio 40 dB Usable sensitivity 54 dB Total harmonic distortion 2% FM Signal/noise ratio 62 dB Usable sensitivity 3 dB Total harmonic distortion 1.0 % COMPACT DISC PLAYER Frequency range 20 Hz - 20 KHz (± 1 dB) Signal/noise ratio 90 dB (at 1 KHz) with filter Distortion 0.05 % (at 1 KHz) Channel separation 75 dB Disc sizes Diameter: 120 or 80 mm.
Warranty One Year Limited Warranty Our warranty to you SONICblue Incorporated warrants that your product will be free from defects in materials and workmanship for a period of one year from the date of original retail purchase. If you discover a defect covered by this warranty, we will repair or replace the product at our option using new or remanufactured components. SONICblue Incorporated’s liability is limited solely to the repair or replacement of the defective product.