FlexCare + 900+ series Rechargeable sonic toothbrush
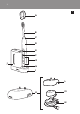
1 A B C D E F G J H I L K M N
HX6996,HX6995,HX6992,HX6972,HX6962,HX6942 English 4 Deutsch 15 Français 27 Italiano 39 Nederlands 51
English Introduction Congratulations on your purchase and welcome to Philips! To fully benefit from the support that Philips offers, register your product at www.philips. com/welcome. Important Read this user manual carefully before you use the appliance and save it for future reference. Danger -- Keep the charger and/or sanitiser away from water. Do not place or store it over or near water contained in a bathtub, washbasin, sink etc.
English 5 -- This appliance has only been designed for cleaning teeth, gums and tongue. Do not use it for any other purpose. Stop using the appliance and contact your doctor if you experience any discomfort or pain. -- Do not use other brush heads than the ones recommended by the manufacturer. -- If your toothpaste contains peroxide, baking soda or bicarbonate (common in whitening toothpastes), thoroughly clean the brush head with soap and water after each use.
English 1 Pull the colour code ring from the bottom of the brush head. 2 Install a new ring by slipping one edge of the new ring over the bottom of the brush head. Attaching the brush head 1 Align the brush head so the bristles face the front of the handle. 2 Firmly press the brush head down on the metal shaft until it stops. Note:There is a small gap between the colour code ring and the handle. Charging your Sonicare 1 Put the mains plug of the charger or sanitiser in the wall socket.
English 7 Using the Sonicare Brushing instructions 1 Wet the bristles and apply a small amount of toothpaste. 2 Place the toothbrush bristles against the teeth at a slight angle towards the gumline. 3 Press the power on/off button to switch on the Sonicare. 4 Apply light pressure to maximise Sonicare’s effectiveness and let the Sonicare toothbrush do the brushing for you. Do not scrub.
English Sensitive Gentle cleaning for sensitive gums and teeth (2 minutes). Massage Gentle gum stimulation (2 minutes). Note:When Sonicare is used in clinical studies, the default 2-minute Clean mode must be selected.The handle has to be fully charged. Deactivate the Easy-start feature. For areas where excess staining occurs, an additional 30 seconds of brushing time can be spent to help remove stains. Features Easy-start This Sonicare type comes with the Easy-start feature activated.
English 9 ,, You hear 1 beep to indicate the Quadpacer has been deactivated or you hear 2 beeps to indicate the Quadpacer has been activated. Cord wrap on deluxe charger (specific types only) If your type includes the deluxe charger cover and base, the travel charger is pre-installed inside the cover. If you want to shorten the mains cord, you can store excess cord in the cord wrap feature built into the charger base.
English Sanitising (specific types only) -- With the UV sanitiser you can clean your brush head after every use. Discontinue use of the sanitiser if the UV light bulb remains on when the door is open or if the blue window is broken or missing from the sanitiser. UV light can be harmful to the human eye and skin. This appliance should be kept out of reach of children at all times. Unplug the sanitiser and call Consumer Care if the sanitiser gives off smoke or a burning smell while it is operating.
English 11 Toothbrush handle 1 Remove the brush head and rinse the metal shaft area with warm water. Do not push on the rubber seal on the metal shaft with sharp objects, as this may cause damage. 2 Use a damp cloth to wipe the entire surface of the handle. Brush head 1 Rinse the brush head and bristles after each use. 2 Remove the brush head from the handle and rinse the brush head connection at least once a week with warm water. Charger 1 Unplug the charger.
English To reinsert the screen, align the pegs on the screen with the slots on the reflective surface near the UV light bulb. Push the screen straight into the slots on the sanitiser. Storage -- If you are not going to use the appliance for an extended period of time, remove the mains plug from the wall socket. Then clean the appliance and store it in a cool and dry place away from direct sunlight. You can use the cord wrap feature to store the mains cord neatly.
English 13 2 Insert a flat-head (standard) screwdriver into the slot located at the bottom of the handle. Turn the screwdriver anticlockwise to release the bottom cap. 3 Hold the handle upside down and push down on the shaft to release the internal components of the handle. 4 Insert the screwdriver under the circuit board, next to the battery connections, and twist to break the connections. Remove the circuit board and pry the battery from the plastic carrier.
English Frequently asked questions This chapter lists the questions most frequently asked about the appliance. If you cannot find the answer to your question, contact the Consumer Care Centre in your country. Question Answer Why doesn’t the Sonicare toothbrush work? You may need to recharge the Sonicare. Charge the Sonicare for at least 24 hours. The socket may not be live.
Deutsch 15 Einführung Herzlichen Glückwunsch zu Ihrem Kauf und willkommen bei Philips! Um den Support von Philips optimal nutzen zu können, registrieren Sie Ihr Produkt bitte unter www.philips.com/welcome. Wichtig Lesen Sie diese Bedienungsanleitung vor dem Gebrauch des Geräts aufmerksam durch, und bewahren Sie sie für eine spätere Verwendung auf. Gefahr -- Halten Sie das Ladegerät und/oder die UV-Reinigungsstation von Wasser fern.
16 Deutsch -- Die Sonicare Zahnbürste entspricht den Sicherheitsstandards für elektromagnetische Geräte. Wenn Sie als Träger eines Herzschrittmachers oder eines anderen Implantats Fragen zur Verwendung des Geräts haben, setzen Sie sich bitte mit Ihrem Arzt oder dem Hersteller des Schrittmachers oder Implantats in Verbindung. -- Sollten Sie Bedenken wegen Ihrer Gesundheit haben, konsultieren Sie vor Benutzung der Sonicare Ihren Arzt.
Deutsch 17 Vorbereitungen Den Farbring auswechseln Sonicare Bürstenköpfe haben auswechselbare Farbringe, mit denen Sie Ihren Bürstenkopf eindeutig kennzeichnen können. So wechseln Sie den Farbring aus: 1 Ziehen Sie den Farbring unten am Bürstenkopf ab. 2 Setzen Sie einen neuen Ring ein, indem Sie eine Seite des neuen Rings unten auf den Bürstenkopf ziehen. Den Bürstenkopf befestigen 1 Richten Sie den Bürstenkopf so aus, dass die Borsten zur Vorderseite des Handstücks zeigen.
18 Deutsch gelb. Hinweis: Damit der Akku immer vollständig aufgeladen ist, sollten Sie die Sonicare bei Nichtgebrauch in das Ladegerät stellen. Sobald die Sonicare vollständig aufgeladen ist, hat das Ladegerät nur einen minimalen Stromverbrauch. Hinweis: Ein vollständiges Aufladen des Akkus dauert mindestens 24 Stunden. Die Sonicare Zahnbürste benutzen Putzanleitung 1 Befeuchten Sie die Borsten, und tragen Sie etwas Zahnpasta auf.
Deutsch 19 Folgende Putzmodi sind verfügbar: Clean Reinigung aller Zähne (2 Minuten). Gum Care (Zahnfleischpflege) Reinigung aller Zähne (2 Minuten) plus sanfte Reinigung der Problemzonen und des Zahnfleisches (1 Minute). Refresh Einstellung für eine schnelle Reinigung (1 Minute). Sensitive Sanfte Reinigung für empfindliches Zahnfleisch und Zähne (2 Minuten). Massage Sanfte Zahnfleischmassage (2 Minuten).
20 Deutsch Quadpacer 1 2 4 3 -- Der Quadpacer ist ein Intervalltimer, der Sie anhand des kurzen Signals und einer Pause an das gleichmäßige Putzen der vier Abschnitte des Mundes erinnert. Je nach gewähltem Putzmodus ertönt das Signal nach unterschiedlichen Intervallen des Putzzyklus. Siehe dazu den Abschnitt “Putzmodi” im Kapitel “Die Sonicare Zahnbürste benutzen”. Die Quadpacer-Funktion wurde bei diesem Gerätetyp aktiviert. So deaktivieren bzw.
Deutsch 21 Kabelaufwicklung des Reinigungsgeräts mit integriertem Ladegerät (nur bestimmte Gerätetypen) -- Umfasst Ihr Gerätetyp eine UV-Reinigungsstation, können Sie das überschüssige Kabel in der Kabelaufwicklung auf der Unterseite der UV-Reinigungsstation verstauen. Keimfrei Reinigen (nur bestimmte Gerätetypen) -- Die UV-Reinigungsstation macht mit jedem Gebrauch eine Vielzahl von Keimen auf dem Bürstenkopf unschädlich.
22 Deutsch Gerät automatisch aus. ,, Die UV-Reinigungsstation ist in Betrieb, wenn das blaue Licht durch das Fenster scheint. ,, Sobald der Reinigungszyklus abgeschlossen ist, schaltet sich die UVReinigungsstation automatisch ab. Reinigung Reinigen Sie den Bürstenkopf, das Handstück, das Reiseladegerät, die Ladegerätabdeckung und die UV-Reinigungsstation niemals in der Spülmaschine. Handstück der Zahnbürste 1 Nehmen Sie den Bürstenkopf ab, und spülen Sie den Metallschaft mit warmem Wasser ab.
Deutsch 23 2 Ziehen Sie die Abtropfschale gerade heraus. Spülen Sie die Abtropfschale ab, und wischen Sie sie mit einem feuchten Tuch nach. 3 Reinigen Sie alle Reflektoroberflächen mit einem feuchten Tuch. 4 Nehmen Sie den Schutzschirm vor der UV-Lampe heraus. Um den Schutzschirm zu entfernen, greifen Sie die Ecken der Schnappvorrichtungen, drücken Sie sie behutsam zusammen, und ziehen Sie den Schutzschirm heraus. 5 Nehmen Sie die UV-Lampe heraus.
24 Deutsch Umweltschutz -- Der integrierte Akku enthält Substanzen, die die Umwelt gefährden können. Entfernen Sie den Akku, bevor Sie das Gerät an einer offiziellen Recyclingstelle abgeben. Geben Sie den gebrauchten Akku bei einer Batteriesammelstelle ab. Falls Sie beim Entfernen des Akkus Probleme haben, können Sie das Gerät auch an ein Philips Service-Center geben. Dort wird der Akku umweltgerecht entsorgt.
Deutsch 25 4 Stecken Sie den Schraubendreher neben den Akkuverbindungen unter die Platine, und drehen Sie ihn, bis die Verbindungen zerbrechen. Nehmen Sie die Platine heraus, und lösen Sie den Akku aus der Plastikhalterung. Garantie und Kundendienst Benötigen Sie weitere Informationen oder treten Probleme auf, besuchen Sie bitte die Philips Website (www.philips.com), oder setzen Sie sich mit einem Philips Service-Center in Ihrem Land in Verbindung (Telefonnummer siehe Garantieschrift).
26 Deutsch Frage Antwort Beim Reinigen der Zähne ist eine kurze Pause bei der Schwingbewegung zu verzeichnen. Warum ist das so? Hierfür ist die Quadpacer-Funktion verantwortlich, die Sie darauf aufmerksam macht, mit dem nächsten Abschnitt im Mund fortzufahren. Diese Funktion sorgt dafür, dass Sie für das Reinigen aller Mundpartien gleich viel Zeit aufwenden (weitere Informationen finden Sie im Kapitel “Die Sonicare Zahnbürste benutzen” im Abschnitt “Putzanleitung”).
Français 27 Introduction Félicitations pour votre achat et bienvenue dans l’univers Philips ! Pour profiter pleinement de l’assistance Philips, enregistrez votre produit sur le site à l’adresse suivante : www.philips.com/welcome. Important Lisez attentivement ce mode d’emploi avant d’utiliser l’appareil et conservez-le pour un usage ultérieur. Danger -- Évitez tout contact du chargeur et/ou de l’assainisseur avec l’eau.
Français --- ----- --- médecin traitant ou le fabricant de ce dispositif avant utilisation de la brosse à dents Sonicare. Si vous avez des problèmes de santé, consultez votre médecin avant d’utiliser la brosse à dents Sonicare. Cet appareil a été conçu exclusivement pour le brossage des dents, des gencives et de la langue. Ne l’utilisez jamais à d’autres fins. Si son utilisation devait s’avérer inconfortable ou douloureuse, cessez d’utiliser l’appareil et consultez votre médecin.
Français 29 Avant l’utilisation Changement de l’anneau de couleur Les têtes de brosse Sonicare sont fournies avec des anneaux de couleur interchangeables, qui vous permettent de les identifier. Pour changer l’anneau de couleur : 1 Retirez l’anneau de couleur situé à la base de la tête de brosse. 2 Fixez un autre anneau en faisant glisser le nouvel anneau sur la base de la tête de brosse.
Français Remarque : Lorsque vous n’utilisez pas la brosse à dents Sonicare, placez-la sur le chargeur pour que la batterie soit toujours entièrement chargée. Une fois la batterie complètement chargée, la consommation d’électricité est minime. Remarque : Il faut au moins 24 heures pour charger entièrement la batterie. Utilisation de la brosse à dents Sonicare Instructions de brossage 1 Humidifiez les poils de la tête de brosse, puis appliquez une petite quantité de dentifrice.
Français 31 Remarque : Lorsque la brosse à dents est allumée, vous ne pouvez pas changer de mode de brossage. Les modes de brossage disponibles sont : Clean Propreté : nettoyage complet de la bouche (2 minutes). Gum Care Soin des gencives : nettoyage complet de la bouche (2 minutes) et nettoyage doux pour les zones sensibles et le long des gencives (1 minute). Refresh Rafraîchissement : nettoyage rapide (1 minute). Sensitive Sensible : nettoyage doux pour les dents et les gencives sensibles (2 minutes).
Français Fonction Smartimer (minuterie 2 minutes) La fonction Smartimer indique que le cycle de brossage est terminé en éteignant automatiquement la brosse à dents à la fin du cycle de brossage. Les dentistes recommandent de se brosser les dents 2 fois par jour pendant au moins 2 minutes.
Français 33 3 Insérez ensuite le cordon d’alimentation dans la petite fente située à l’arrière du socle gris. 4 Pour refermer le couvercle, exercez une pression jusqu’à ce qu’il s’enclenche. Conseil : Pour plus de confort lors de vos déplacements, vous pouvez retirer le chargeur de voyage et l’utiliser sans le couvercle ni le socle.
Français 3 Placez la tête de brosse sur l’un des 2 supports de l’assainisseur. -- Assurez-vous de placer les poils de la tête de brosse directement face à la lampe. Remarque : Les têtes de brosse Sonicare ProResults ne doivent être nettoyées que dans l’assainisseur. 4 Assurez-vous que l’assainisseur est branché sur la prise secteur. 5 Fermez l’appareil et appuyez une fois sur le bouton vert marche/ arrêt pour sélectionner le cycle de nettoyage UV.
Français 35 Chargeur 1 Débranchez le chargeur. 2 Essuyez la surface du chargeur à l’aide d’un chiffon humide. Assainisseur (sur certains modèles uniquement) Ne nettoyez pas l’assainisseur lorsque la lampe UV est chaude. Pour une efficacité optimale, il est recommandé de nettoyer l’assainisseur une fois par semaine. 1 Débranchez l’assainisseur. 2 Retirez le plateau égouttoir et rincez-le à l’aide d’un chiffon humide. 3 Nettoyez toutes les surfaces du réflecteur à l’aide d’un chiffon humide.
Français Environnement -- La batterie rechargeable intégrée contient des substances qui peuvent nuire à l’environnement. Veillez à toujours retirer la batterie avant de mettre l’appareil au rebut ou de le déposer à un endroit assigné à cet effet. Déposez la batterie usagée à un endroit assigné à cet effet. Si vous n’arrivez pas à retirer la batterie, vous pouvez apporter l’appareil dans un Centre Service Agréé Philips qui prendra toute l’opération en charge pour préserver l’environnement.
Français 37 Garantie et service Si vous souhaitez obtenir des informations supplémentaires ou si vous rencontrez un problème, rendez-vous sur le site Web de Philips à l’adresse www.philips.com ou contactez le Service Consommateurs Philips de votre pays (vous trouverez le numéro de téléphone correspondant sur le dépliant de garantie internationale). S’il n’existe pas de Service Consommateurs Philips dans votre pays, renseignez-vous auprès de votre revendeur Philips.
Français Question Réponse Pourquoi le bouton Mode ne fonctionne-t-il pas lors du brossage ? Les modes de brossage doivent être sélectionnés avant d’allumer la brosse à dents Sonicare. Pourquoi le voyant de l’assainisseur UV ne s’allume-t-il pas ? Il faut peut-être brancher l’assainisseur sur une prise alimentée. Il faut peut-être fermer le portillon de l’assainisseur. Il faut peut-être remplacer la lampe UV (voir le chapitre « Remplacement »).
Italiano 39 Introduzione Congratulazioni per l’acquisto e benvenuti in Philips! Per trarre il massimo vantaggio dall’assistenza Philips, registrate il vostro prodotto su www.philips. com/welcome. Importante Prima di utilizzare l’apparecchio, leggete attentamente il presente manuale e conservatelo per eventuali riferimenti futuri. Pericolo -- Tenete il caricabatterie e/o l’igienizzatore lontani dall’acqua. Non appoggiateli né riponeteli vicino a vasche, lavandini, lavabi ecc.
Italiano ------- --- dispositivo impiantato, consultate il vostro medico o il produttore del dispositivo di cui siete portatori prima dell’uso. In caso di problemi orali, consultate il medico prima di utilizzare Sonicare. Questo apparecchio è destinato esclusivamente alla pulizia di denti e gengive. Non utilizzatelo per scopi diversi da quelli previsti. Qualora avvertiate dolore durante l’utilizzo, contattate il vostro medico.
Italiano 41 Predisposizione dell’apparecchio Sostituzione della ghiera colorata Le testine Sonicare vengono fornite insieme a ghiere colorate intercambiabili ideali per personalizzare la testina. Per sostituire la ghiera colorata: 1 Estraete la ghiera colorata dalla base della testina. 2 Installate una nuova ghiera facendola scorrere da una parte sulla base della testina. Inserimento della testina 1 Allineate la testina in modo che le setole siano in corrispondenza del lato anteriore dell’impugnatura.
Italiano Nota Per mantenere la batteria sempre carica, potete tenere lo spazzolino Sonicare sul caricabatterie quando non viene utilizzato. Una volta completamente carico, il caricabatterie assorbe una quantità minima di corrente dalla presa. Nota Sono necessarie almeno 24 ore per ricaricare completamente le batterie. Modalità d’uso dello spazzolino Sonicare Istruzioni d’uso 1 Bagnate le setole e applicate una piccola quantità di dentifricio.
Italiano 43 Pulizia Pulizia completa della bocca (2 minuti). Cura delle gengive Pulizia completa della bocca (2 minuti) più pulizia delicata delle zone più difficili e di quelle intorno alle gengive (1 minuto). Pulizia veloce Pulizia dei denti di breve durata (1 minuto). Denti sensibili Pulizia delicata per denti e gengive sensibili (2 minuti). Massaggio Stimolazione delicata delle gengive (2 minuti).
Italiano Quadpacer 1 2 4 3 -- La funzione Quadpacer è un timer a intervalli che emette un breve segnale acustico e interrompe il funzionamento per indicare di pulire le 4 sezioni della bocca. A seconda della modalità o del programma di pulizia selezionato, la funzione Quadpacer emette un segnale acustico a intervalli differenti durante il ciclo di pulizia (vedere la sezione “Modalità di utilizzo” all’interno del capitolo “Modalità d’uso dello spazzolino Sonicare”).
Italiano 45 Avvolgicavo dell’igienizzatore con caricabatterie integrato (solo alcuni modelli) -- Se il modello acquistato comprende l’igienizzatore, potete riporre il cavo in eccesso utilizzando la funzione avvolgicavo integrata nella base dell’igienizzatore. Igienizzazione (solo alcuni modelli) -- Grazie all’igienizzatore UV, potete pulire la testina dopo ogni utilizzo.
Italiano ,, Una volta concluso il ciclo di igienizzazione, l’igienizzatore si spegne automaticamente. Pulizia Non pulite la testina, l’impugnatura, il caricabatterie da viaggio, il coperchio del caricabatterie e l’igienizzatore UV in lavastoviglie. Impugnatura dello spazzolino 1 Rimuovete la testina e sciacquate le parte metallica con acqua calda. Non utilizzate oggetti appuntiti sulla guarnizione in gomma intorno alla parte metallica onde evitare danneggiamenti.
Italiano 47 4 Rimuovete lo schermo protettivo posto dinanzi alla lampadina UV. Per rimuovere lo schermo protettivo, afferrate le estremità vicino ai ganci, premetele delicatamente e tirate. 5 Rimuovete la lampadina UV. Per rimuovere la lampadina, afferratela e estraetela dal gancio metallico. 6 Pulite lo schermo protettivo e la lampadina UV con un panno morbido. 7 Reinserite la lampadina UV.
Italiano -- Per contribuire alla tutela dell’ambiente, non smaltite l’apparecchio o la lampadina a raggi UV (che contiene mercurio) con i normali rifiuti domestici, ma consegnateli a un centro di raccolta autorizzato per il riciclaggio. In tal modo, potrete contribuire a mantenere l’ambiente pulito. Rimozione della batteria ricaricabile Ricordate che questo processo non è reversibile. Per togliere le batterie ricaricabili, utilizzate un normale cacciavite a testa piatta.
Italiano 49 -- I danni dovuti a un uso improprio, abuso, trascuratezza o alterazioni. -- La normale usura, incluso scheggiature, graffi, abrasioni, scoloritura o alterazione dei colori. -- Lampadina a raggi UV Domande frequenti Nella presente sezione sono riportate le domande più frequenti relative all’apparecchio. Se non riuscite a trovare una risposta esaustiva alla vostra domanda, rivolgetevi al Centro Assistenza Clienti del vostro paese.
Italiano Domanda Risposta Devo utilizzare un caricabatterie Il caricabatterie da viaggio, il caricabatterie deluxe e l’igienizzatore speciale per lo spazzolino possono essere utilizzati ovunque sia disponibile una tensione Sonicare durante gli spostamenti? compresa tra 100-240 V CA, a 50 o 60 Hz. È sufficiente utilizzare un adattatore. Consiglio durante i viaggi: la batteria dello spazzolino Sonicare è stata progettata per durare fino a 3 settimane tra una carica e l’altra.
Nederlands 51 Inleiding Gefeliciteerd met uw aankoop en welkom bij Philips! Als u volledig wilt profiteren van de ondersteuning die Philips biedt, registreer uw product dan op www.philips.com/welcome. Belangrijk Lees deze gebruiksaanwijzing zorgvuldig door voordat u het apparaat gaat gebruiken. Bewaar de gebruiksaanwijzing om deze indien nodig te kunnen raadplegen. Gevaar -- Houd de oplader en/of de UV-reiniger uit de buurt van water.
Nederlands -- De Sonicare-tandenborstel voldoet aan de veiligheidseisen voor elektromagnetische apparaten. Als u een pacemaker of ander geïmplanteerd apparaat hebt, neem dan contact op met uw arts of de fabrikant van het geïmplanteerde apparaat voor u de tandenborstel gaat gebruiken. -- Raadpleeg uw arts voordat u de Sonicare gebruikt als u medische klachten hebt. -- Dit apparaat is alleen bedoeld voor het reinigen van tanden, tandvlees en de tong. Gebruik het niet voor andere doeleinden.
Nederlands 53 -- Niet afgebeeld: lekbakje voor UV-reiniger -- Niet afgebeeld: afdekscherm voor UV-lamp Klaarmaken voor gebruik De ring met kleurcode vervangen Sonicare-opzetborstels worden geleverd met verwisselbare ringen met kleurcodes waarmee u uw eigen opzetborstel herkenbaar kunt maken. Een ring met kleurcode vervangen: 1 Verwijder de ring met kleurcode van de onderkant van de opzetborstel. 2 Plaats een nieuwe ring door één kant van de nieuwe ring over de onderkant van de opzetborstel te schuiven.
Nederlands Opmerking: Om de accu altijd volledig opgeladen te houden, kunt u uw Sonicare op de oplader plaatsen wanneer u deze niet gebruikt. Als de Sonicare volledig is opgeladen, gebruikt de oplader een minimale hoeveelheid netstroom. Opmerking: Het duurt minimaal 24 uur om de accu volledig op te laden. De Sonicare gebruiken Poetsinstructies 1 Maak de borstelharen nat en doe er een kleine hoeveelheid tandpasta op.
Nederlands 55 Clean Volledige mondreiniging (2 minuten). Gum Care Volledige mondreiniging (2 minuten) plus zachte reiniging voor probleemgebieden en langs het tandvlees (1 minuut). Refresh Snelle reiniging (1 minuut). Sensitive Zachte reiniging van gevoelig tandvlees en gevoelige tanden (2 minuten). Massage Zachte tandvleesstimulatie (2 minuten). Opmerking:Wanneer de Sonicare wordt gebruikt voor klinisch onderzoek, moet de standaard Clean-modus van 2 minuten worden gekozen.
Nederlands Quadpacer 1 2 4 3 -- De Quadpacer is een timer die een kort piepje laat horen en voor een korte onderbreking van de poetsbeurt zorgt om u eraan te herinneren elk van de 4 kwadranten in uw mond te poetsen. Afhankelijk van de gekozen poetsmodus, laat de Quadpacer tijdens de poetsbeurt na een bepaald aantal seconden een piepje horen. Zie ‘Poetsmodi’ in hoofdstuk ‘De Sonicare gebruiken’. Op dit type is de Quadpacer ingeschakeld.
Nederlands 57 Snoerwikkelaar van UV-reiniger met ingebouwde oplader (alleen bepaalde typen) -- Als uw type tandenborstel wordt geleverd met een UV-reiniger, dan kunt u het overtollige netsnoer om de snoerwikkelaar in het onderste deel van de UV-reiniger wikkelen. UV-reinigen (alleen bepaalde typen) -- Met de UV-reiniger kunt u uw opzetborstel na elke poetsbeurt reinigen.
Nederlands ,, De UV-reiniger is in werking wanneer het blauwe licht door het venster schijnt. ,, Wanneer de reinigingscyclus is voltooid, schakelt de UV-reiniger automatisch uit. Schoonmaken Reinig de opzetborstel, het handvat, de reisoplader, de opladerkap en de UV-reiniger niet in de vaatwasmachine. Handvat van tandenborstel 1 Verwijder de opzetborstel en spoel de metalen aandrijfas af met warm water.
Nederlands 59 2 Trek de lekbak recht naar buiten. Spoel de lekbak af en veeg deze schoon met een vochtige doek. 3 Maak alle reflectorvlakken schoon met een vochtige doek. 4 Verwijder het afdekscherm dat zich voor de UV-lamp bevindt. U verwijdert het scherm door de randjes naast de vergrendelingen beet te pakken, zachtjes te knijpen en het scherm dan naar buiten te trekken. 5 Verwijder de UV-lamp. Verwijder de lamp door deze vast te pakken en uit de metalen klem te trekken.
Nederlands Milieu -- De ingebouwde accu bevat stoffen die schadelijk kunnen zijn voor het milieu. Verwijder altijd de accu voordat u het apparaat afdankt en inlevert op een door de overheid aangewezen inzamelpunt. Lever de accu in op een officieel inzamelpunt voor batterijen. Als u problemen ondervindt bij het verwijderen van de accu, kunt u met het apparaat ook naar een Philips-servicecentrum gaan.
Nederlands 61 4 Steek de schroevendraaier onder de printplaat naast de accuaansluitingen en beweeg de schroevendraaier heen en weer om de aansluitingen af te breken.Verwijder de printplaat en wrik de accu los uit de plastic houder. Garantie & service Als u informatie nodig hebt of als u een probleem hebt, bezoek dan de Philips-website www.philips.nl, of neem contact op met het Philips Consumer Care Centre in uw land (u vindt het telefoonnummer in het ‘worldwide guarantee’-vouwblad).
Nederlands Vraag Antwoord De borstel klappert tegen mijn tanden. Wat moet ik doen? U kunt dit voorkomen door de borstel volgens de instructies vast te houden, d.w.z. met de borstelharen enigszins schuin op de tandvleesrand. Waarom lijkt de tandborstel minder krachtig te poetsen? Mogelijk moet de Sonicare worden opgeladen. Mogelijk is de Easy-start-functie ingeschakeld. Schakel de Easy-startfunctie uit (zie hoofdstuk ‘Functies’). Mogelijk moet de opzetborstel worden vervangen.
www.philips.com/support ©2009 Koninklijke Philips Electronics NV (KPENV). All rights reserved. PHILIPS and the Philips shield are registered trademarks of KPENV. Quadpacer, Sonicare, and the Sonicare logo are trademarks of Philips Oral Healthcare, Inc. and/or KPENV. Printed in the U.S.A. Printed on 100% recycled paper. Protected by U.S. and international patents. Other patents pending. Reg. U.S. Pat. & Tm. Off. 4235.020.3302.