SonicWALL Email Security Solutions EMAIL SECURITY SonicWALL Email Security SonicWALL Email Security 7.
Getting Started Guide 7.0 | 1 SonicWALL Email Security 8000 Getting Started Guide This Getting Started Guide contains installation procedures and configuration guidelines for deploying a SonicWALL Email Security appliance on your network. SonicWALL Email Security provides effective, high-performance, and easy-to-use inbound and outbound email threat protection.
2 | Email Security Software Contents This document contains the following sections: 1 2 3 4 Before You Begin { “Check Package Contents” on page 3 { “What You Need to Begin” on page 4 { “Record Configuration Information” on page 4 { “Overview of the SonicWALL Email Security Appliance” on page 6 Registering Your SonicWALL Email Security Appliance { “Before You Register” on page 7 { “Creating a mysonicwall.
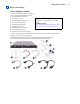
Getting Started Guide 7.0 1 Before You Begin Check Package Contents One SonicWALL Email Security appliance One Getting Started Guide document One Release Note document One Thank You card Any Items Missing? One SonicWALL Resource CD If any items are missing from your package, contact: SonicWALL Support Email: customer_service@sonicwall.
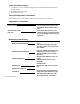
What You Need to Begin z A computer to use as a management station for initial configuration of SonicWALL Email Security software z Internet Explorer 5.0 or higher z An Internet connection Record Configuration Information Before continuing, record the following configuration information for your reference: Registration Information Serial Number: (xxxxxx-xxxxxx) Record the serial number found on the top right access panel of your SonicWALL Email Security appliance.
Getting Started Guide 7.0 Password: Email Server IP: LDAP Server IP: | 5 Select a password for your SonicWALL Email Security appliance (default is password). Record the IP address or hostname of your email server. Record the IP address or hostname of your directory services server, such as LDAP or Microsoft Active Directory.
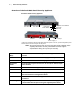
6 | Email Security Software Overview of the SonicWALL Email Security Appliance SonicWALL Email Security Appliance SCSI Drive 1 SCSI Drive 2 LAN Port Diagnostic Panel Release Power LED Power Button Serial Port Alert LED* HDD LED Power Supply 2 Power Supply 1 * Alerts are explained in detail in light path diagnostic panel. To access, push the diagnostic panel release latch to the left and pull out the panel.
Getting Started Guide 7.0 2 | 7 Registering Your SonicWALL Email Security Appliance Register your appliance and activate your licenses for the SonicWALL Email Protection Subscription and Dynamic Support. This section contains the following sub-sections: { “Before You Register” on page 7 { “Creating a mysonicwall.com Account” on page 7 { “Registering Your SonicWALL Email Security Appliance” on page 8 Before You Register You need a mysonicwall.
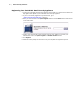
8 | Email Security Software Registering Your SonicWALL Email Security Appliance 1. Locate your SonicWALL Email Security Software serial number. It is printed on the label on the top right access panel of your SonicWALL Email Security Appliance. 2. If you are not already logged into mysonicwall.com, go to and log in. 3. Enter your serial number in the Quick Register field and click the Next button. Follow the onscreen instructions. 4.
Getting Started Guide 7.0 3 | 9 Initial Setup and Configuration This section contains the following sub-sections: z “Apply Power to the SonicWALL Email Security” on page 9 z “Connect Directly to the SonicWALL Email Security Appliance” on page 9 z “Login to the SonicWALL Email Security Appliance” on page 9 z “Initial System Configuration” on page 10 z “Activating the Email Security License Subscriptions” on page 12 Apply Power to the SonicWALL Email Security 1.
10 | Email Security Software Note: z Depending on your browser settings, one or more security warnings may display while connecting to the Email Security Web management interface. Choose to accept the certificates in order to log into the SonicWALL Email Security appliance. 3. Log into SonicWALL Email Security appliance using “admin” as the user name and “password” as the password. Initial System Configuration 1.
Getting Started Guide 7.0 | 11 Monitoring Email address of the administrator who receives emergency alerts: The email address of the mail server administrator. Enter the complete email address. For example, user@example.com Postmaster for the MTA: The email address of the Mail Transfer Agent administrator who will receive non-deliverable receipts. For example, mail@example.com Name or IP address of backup SMTP servers: Enter fully qualified domain names or IP addresses. For example, mail2.example.
12 | Email Security Software Select the proper time zone to ensure optimal network performance of your SonicWALL Email Security appliance. 1. Click the Apply Changes button to save this configuration. 2. A popup will display. Click the Continue button to reboot the SonicWALL Email Security appliance with your new settings. 3. Disconnect the crossover cable from the SonicWALL Email Security appliance. 4. Reset your administration computer’s IP settings to work with your network.
Getting Started Guide 7.
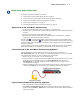
14 | Email Security Software The SonicWALL Email Security Interface This section describes the SonicWALL Email Security user interface. User’s login User’s role Click here to send a message to SonicWALL Technical Support Click here to get application Click here to change UI language information For a detailed SonicWALL Email Security user interface overview, refer to the SonicWALL Email Security Administrator’s Guide.
Getting Started Guide 7.0 | 15 Using Quick Configuration to Set Up Email Management The Quick Configuration page will walk you step-by-step through the configuration of your SonicWALL Email Security appliance. Use this window the first time you configure SonicWALL Email Security if you are installing SonicWALL Email Security as an All-In-One server and have only one downstream server.
16 | Email Security Software 8. Select the type of LDAP server from the LDAP server type drop-down list. 9. Enter a valid LDAP login name and password into the Login name and Password fields. Click What is this? for more information. 10. Click Test LDAP Login and Test LDAP Query to verify your settings. 11. Enter one or more NetBIOS domain name in the NetBIOS domain names field. Click What is this? for more information. 12.
Getting Started Guide 7.
18 | Email Security Software 2. Right-click Default SMTP Virtual Server, and select Properties. 3. Browse to the Delivery tab, and click the Advanced button. 4. In the Smart Host field, enter the FQDN on your SonicWALL Email Security appliance (such as, esa.example.com). Note: The Exchange Server must be able to resolve this host name. 5. Click OK.
Getting Started Guide 7.0 | 19 Configure the path to use the MTA (MX routing or SmartHost) under Destination of Path. You need to configure something unique between the inbound and outbound path to distinguish inbound from outbound mail flow. A very simple way to do this is to have them listen on different ports or enter the IP address of the Exchange Server as the Source IP Contacting Path on the outbound path. Example Given: 10.100.0.10: Exchange Server (exch1.example.com) 10.100.0.
20 6 | Email Security Software Troubleshooting This section contains the following subsection: z Configuring a Static IP Address Configuring a Static IP Address Complete the following section based on your operating system in order to configure your management computer with a static IP address: Windows XP 1. From the Start menu, highlight Connect To and then select Show All Connections. 2. Open the Local Area Connection Properties window. 3.
Getting Started Guide 7.0 | 21 SonicWALL Email Security Appliance Regulatory Statement and Safety Instructions Regulatory Model/Type Product Name 1RK10-04D Email Security 8000 This product hardware based on IBM xSeries 336 Type 8837, Model 15U. Refer to safety documentation in this manual and to the complete IBM Safety and EMC information on the SonicWALL Resource CD included with this product.
22 | Email Security Software
Getting Started Guide 7.
24 | Email Security Software For additional safety and regulatory information, refer to the IBM documentation located on the SonicWALL Resource CD included with this product.
Getting Started Guide 7.0 Rack Installation Instructions Review the documentation that comes with your rack cabinet for safety and cabling information. Before installing your server in a rack cabinet, review the following guidelines: v Make sure that the room air temperature is below 35°C (95°F). v Do not block any air vents; usually, 15 cm (6 in.) of air space in the rear and 5 cm (2 in.) in the front provides proper airflow. v Plan the device installation starting at the bottom of the rack cabinet.
26 | Email Security Software 1 2 Pins extended through: • Rack-mount flange • Rail-mount flange Pins not extended through: • Rack-mount flange • Rail-mount flange Slide the pins away from the rail-mount flange: Attach the rear rail-adjustment bracket to the rack: Press behind the slide-rail release latch 1 and hold it to prevent the rail from sliding back. Press the tab 2 away from the rail. Press the tab 3 back, and slide the rear rack-bracket pins away from the rail-mount flange 4 .
Getting Started Guide 7.0 3 Pins extended through: • Rack-mount flange • Rail-mount flange 4 Server Pins not extended through: • Rack-mount flange • Rail-mount flange Side release latch Rail-lock pin Attach the front rail bracket to the rack: Insert the server into the rack cabinet: Press the tab 2 away from the rail. Slide the front rack-bracket pins 1 away from the rail-mount flange 3 until the front rail bracket stays open.
28 | Email Security Software 7 Extend the cable-management arm and fasten the cables: Attention: Make sure that you route Fibre Channel cables through the tab 1 , to ensure proper bend radius and prevent damage to these cables. Extend the cable-management arm by sliding the server toward the front of the rack. The rail-lock pins stop the server halfway along the rack. Secure the cables by using the straps that are attached to the cable-management arm.
Getting Started Guide 7.0 | 29 Copyright Notice © 2008 SonicWALL, Inc. All rights reserved. Under the copyright laws, this manual or the software described within, cannot be copied, in whole or part, without the written consent of the manufacturer, except in the normal use of the software to make a backup copy. The same proprietary and copyright notices must be affixed to any permitted copies as were affixed to the original.
30 | Email Security Software
SonicWALL, Inc. 1143 Borregas Avenue T +1 408.745.9600 Sunnyvale CA 94089-1306 F +1 408.745.9300 www.sonicwall.com PN: 232-000703-00 Revision A ©2008 SonicWALL, Inc. is a registered trademark of SonicWALL, Inc. Other product names mentioned herein may be trademarks and/or registered trademarks of their respective companies. Specifications and descriptions subject to change without notice.