SonicWALL SonicOS 2.x Enhanced Quick Start Guide Rev 1.
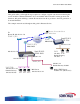
Sonic OS 2.x Quick Start Guide Introduction This guide walks you through the steps required to configure a typical customer network using the new SonicOS 2.x Enhanced firmware. If you are familiar with Sonicwall’s existing products and firmware, this guide will help you make the transition from those products to the next generation of Sonicwall firmware. The example network used throughout this guide is illustrated below: Remote User with Global VPN Client T1 Router IP: 208.48.32.
Sonic OS 2.x Quick Start Guide Basic WAN & LAN Configuration Refer to the Sonicwall Quick Start Guide included on the product CD. Security Zones and Objects There are several new concepts introduced with SonicOS 2.x Enhanced firmware. In this section, we’ll discuss the Security Zones and Objects. When configuring the new products, you will need to define your Security Zones early in the setup process so that your rules, NAT entries, and objects will be easier to work with.
Sonic OS 2.x Quick Start Guide Creating a Custom Zone There are four fixed Zone types: Trusted, Untrusted, Public and Encrypted. Only the number of interfaces limits the number of Zone instances for Trusted and Public Zone types. The Untrusted Zone type (i.e. the WAN) is reserved for the WAN interface(s). The Encrypted Zone type is a special system Zone comprising all VPN traffic and doesn’t have any associated interface. To create a custom zone, proceed as follows: 1.
Sonic OS 2.x Quick Start Guide Security Zones - Configuration The following will guide you through the process of configuring and assigning interfaces to Security Zones: 1. We start out with the LAN and WAN interfaces as previously defined. 2. Click the configure icon ( ) associated with the X2 interface. 3. Select the ZONE as WAN and the IP assignment as PPPoE. 4. Add the User Name and Password assigned to the PPPoE DSL account. 5. Enter a Comment if desired. 6.
Sonic OS 2.x Quick Start Guide 15. Select the Zone as DMZ. 16. Enter the IP address assigned to the X3 interface. Enter the network mask assigned to the interface. 17. Enter your comments as applicable. 18. Decide if you want to allow Management and User Logins on this interface. 19. Select the Ethernet tab. As above, make the appropriate entries based on the equipment to be installed on the DMZ Zone. 20. Click OK to save your settings. The new DMZ interface is displayed in the settings.
Sonic OS 2.x Quick Start Guide Objects and Groups - Configuration The following will guide you through the process of creating objects and groups. We will use the Instant Messenger example from above. Define the Objects: 1. Select the Address Objects option under the Network button of the GUI. 2. Click the Add button under Address Objects. 3. Enter an applicable name for the object. 4. Select the object type (Host, Range, or Network). NOTE – Settings will be slightly different for other objects.
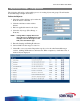
Sonic OS 2.x Quick Start Guide 8. Repeat the steps above to define other address objects required for your installation. In the case of our example, you’ll need to create objects for: a. b. c. d. Web Server (10.0.0.2/32) Mail Server (192.168.168.4/32) Local Pro 4060 LAN for the VPN (192.168.168.0/24) Remote TZ170 LAN for the VPN (192.168.1.0/24) Define the Group: 1. Click the Add Group button under Address Groups. 2. Enter a name for the Address Group. 3.
Sonic OS 2.x Quick Start Guide Firewall Access Rules With Sonic OS Enhanced, you will find much more functionality and flexibility when configuring Firewall Access Rules. However, rule configuration requires advance planning and depends on the proper configuration of Interfaces, Zones, NAT Policies, Network Address Objects, Service Objects, and Schedules. Now that we’ve covered Interfaces, Zones, and Address Objects, let’s compare rule creation on SonicOS Enhanced to Sonicwall 6.x firmware.
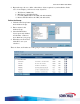
Sonic OS 2.x Quick Start Guide Mail Server NAT Policy: To create an Inbound NAT policy for our Mail Server: 1. Select the NAT Policies option under the Network button of the GUI. 2. Click the ADD button. 3. For Original Source, select ANY. Allow E-Mail from anywhere on the Internet. 4. For Translated Source, select Original. We want to leave the original source IP address alone. 5. For Original Destination, select WAN Primary IP. Incoming mail is being sent to the routable WAN IP of the Sonicwall. 6.
Sonic OS 2.x Quick Start Guide 1. Click the intersection of the WAN (on the left) and LAN (on the top) to display any rules applicable for incoming packets from the WAN to the LAN. 2. Click ADD, to create a new entry in the WAN > LAN ruleset for our Mail Server. 3. Select the ALLOW radio button. 4. For Service, select SMTP (Send E-Mail). We only want to allow E-Mail in to our mail server. 5. For Source, select ANY. Allow incoming E-Mail from any location. NOTE – Unlike the 6.
Sonic OS 2.x Quick Start Guide While there are many other possibilities for creating Access Rules in SonicOS Enhanced, this “Public LAN Server” example should give you an understanding of where to start. In this section, we saved a couple fields for future explanation, so let’s talk about them now: User Level Authentication and Schedules Back in the “Objects” section we created an Address Object Group called “Instant Messengers”.
Sonic OS 2.x Quick Start Guide 3. Click ADD, to create a new entry in the LAN -> WAN ruleset for our IM users. 4. Select the ALLOW radio button. 5. For Service, select ANY. We want to block all access to the IM registration sites. 6. For Source, select LAN Subnets. This will apply the rule to all networks in the LAN Subnets group. 7. For Destination, select the custom address object group, Instant Messengers. You can add additional IM sites as required. 8.
Sonic OS 2.x Quick Start Guide * The ability to NAT traffic as it enters the VPN Tunnel, or as it exits (inbound or outbound), and the capability to have firewall rules specified on VPN traffic. Defining the Security Associations (SA) For the purpose of this example, we will keep the VPN configuration simple. Refer to the network diagram at the beginning of the document for the specifics.
Sonic OS 2.x Quick Start Guide 11. Select the Proposal tab. 12. For Exchange, select Aggressive Mode. Remember, the TZ170 receives a dynamic IP address from the ISP. 13. Select the rest of the Phase 1 and 2 proposal settings as required. Ensure that they match up with the settings you make on the TZ170. 14. We will not use any of the Advanced Setting for this example. 15. Click OK. For the TZ170, we assume that it is also running the Enhanced software. Define the TZ170 SA as follows: 1.
Sonic OS 2.x Quick Start Guide 8. For the Remote IKE ID, select Sonicwall Identifier and enter the serial number of the Pro 4060. 9. Select the Network Tab. 10. For the Local Network, choose LAN Primary Subnet. This is a pre-defined address object for the LAN interface of the TZ170. 11. For Destination Networks, select the previously defined address object for the network located behind the Pro 4060 (192.168.168.0/24) 12. Select the Proposal tab. 13. For Exchange, select Aggressive Mode.
Sonic OS 2.x Quick Start Guide WAN-WAN Load Balancing & Fail Over SonicOS Enhanced provides the capability to connect two WAN links and configure them for Load Balancing and/or Fail Over. This is the perfect feature for customers who want to back up their T1 lines with DSL or Cable. The dual WAN links can be setup either as Active-Active or ActivePassive. Depending on your customer’s requirements, you’ll need to determine which set up best fits their needs.
Sonic OS 2.x Quick Start Guide 3. Customize the probing interval, deactivate, and reactivate values as required. NOTE – Be careful with the values you set. Making them too small may cause the Sonicwall to identify a link as down even if connectivity was only briefly interrupted. 4. Select the Enable Probe Monitoring, if you want to do both physical and logical link monitoring. If selected, you will also need to configure the monitoring. 5. Click the configure button. 6.
Sonic OS 2.x Quick Start Guide WAN Load Balancing As previously mentioned, the Load Balancing capability can be Active-Passive, or Active-Active. If you decide to use the Active-Active option, you will select one of the three load balancing algorithms. Round Robin The Sonicwall balances the outgoing traffic on a per-destination basis by examining source and destination IP addresses.
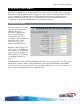
Sonic OS 2.x Quick Start Guide 9. For Translated Destination, select Original. We want the traffic to still go to its original destination. 10. For Original Service, select ANY. Leave the service as the original service. 11. For Translated Service, select Original. Again, we want the traffic to go to its original destination, via its original service (protocol). 12. For Inbound Interface, select ANY or you could select the X0 LAN interface only. 13. For Outbound Interface, select X2.