Reference Monitors User Handbook RM-2S4 Reference Monitor, 2 LED meters & 4 stereo channel inputs RM-2S10 Reference Monitor, 2 LED meters & 10 stereo channel inputs RM-4C8 Reference Monitor, 4 LED meters, 8 channel inputs & dual selectors RM-HD1 HD-SDI expansion card RM-HDE1 HD-SDI & Dolby* E Decoder expansion card
REFERENCE MON I TORS REFERENCE MONITOR USER HANDBOOK This handbook is for use with the following product: RM-2S4 Reference Monitor, 2 LED meters & 4 stereo channel inputs RM-2S10 Reference Monitor, 2 LED meters & 10 stereo channel inputs RM-4C8 Reference Monitor, 4 LED meters, 8 channel inputs & dual selectors RM-HD1 HD-SDI expansion card RM-HDE1 HD-SDI & Dolby* E Decoder expansion card ©Sonifex Ltd, 2008 All Rights Reserved Revision 1.
CONTENTS Warranty i i iii iii Safety Information iv Safety of Mains Operated Equipment Voltage Setting Checks Fuse Rating Power Cable and Connection Ordering the Correct Mains Lead iv iv iv iv v Installation Information v Atmosphere Electromagnetic Radiation WEEE & RoHS Directives - Sonifex Statement v v vi Reference Monitors Introduction 1 RM-2S4 Reference Monitor, 2 LED meters & 4 stereo channel inputs 3 RM-2S10 Reference Monitor, 2 LED meters & 10 stereo channel inputs 3 Introduction Syst
FIGURES FI G U RE S Figures d Fig A: Packing List iii Fig B: Power Connections iv Fig C: Mains Lead Table v Fig 1-1: RM-2S4 Reference Monitor Front Panel 3 Fig 1-2: RM-2S10 Reference Monitor Front Panel 3 Fig 1-3: Reference Monitor Block Diagram 4 Fig 1-4: RM-2S4 Front Panel Controls 5 Fig 1-5: RM-2S10 Front Panel Controls 5 Fig 1-6: RM-2S4 Source Selector 5 Fig 1-7: RM-2S10 Source Selector 5 Fig 1-8: RM-2S4 & RM-2S10 Meters 7 Fig 1-9: RM-2S4 & RM-2S10 DIPSwitch Settings 8 Fig 1-
WARRANTY Warranty Warranty and Liability Important: the purchaser is advised to read this clause (a) The Company agrees to repair or (at its discretion) replace Goods which are found to be defective (fair wear and tear excepted) and which are returned to the Company within 12 months of the date of despatch provided that each of the following are satisfied: notification of any defect is given to the Company immediately upon its becoming apparent to the Purchaser; (ii) the Goods have only been operated un
WARRANTY WA RR A N T Y (c) ii The Company accepts liability: (i) for death or personal injury to the extent that it results from the negligence of the Company, its employees (whilst in the course of their employment) or its agents (in the course of the agency); (ii) for any breach by the Company of any statutory undertaking as to title, quiet possession and freedom from encumbrance.
WARRANTY Unpacking the Reference Monitor The Reference Monitor is shipped with the following equipment. Please check your packaging to ensure that you have all of the items below. If anything is missing, please contact the supplier of your equipment immediately. Quantity Reference Monitor 1 1 1 1 1 Fig A: Packing List Each Reference Monitor is shipped in protective packaging and should be inspected for damage before use.
SAFETY INFORMATION Safety Information Safety of Mains Operated Equipment This equipment has been designed to meet the safety regulations currently advised in the country of purchase and it conforms to the safety regulations specified by use of the CE Mark. SAFE T Y IN FORMAT I ON Warning : There are no user serviceable parts inside the equipment. If you should ever need to look inside the unit, always disconnect the mains supply before removing the equipment covers.
SAFETY INFORMATION Ordering the Correct Mains Lead When ordering a Reference Monitor from Sonifex, it is helpful if you can specify your required operating voltage and mains lead. After the product code add: UK, for 230V, UK 3 pin to IEC lead EC, for 230V, European Schuko 2 pin to IEC lead US, for 115V, 3 pin to IEC lead Fig C: Mains Lead Table E.g. order RM-2S4 UK for a UK IEC lead to be supplied.
WEEE & ROHS DIRECTIVE WEEE & RoHS Directives - Sonifex Statement WEEE & ROHS D I RE C T I VE The Waste Electrical and Electronic Equipment (WEEE) Directive was agreed on 13 February 2003, along with the related Directive 2002/95/EC on Restrictions of the use of certain Hazardous Substances in electrical and electronic equipment (RoHS).
REFERENCE MONITORS The Reference Monitor Range is a series of rack-mount audio monitors, combining the latest DSP technology with outstanding audio enclosure design to produce monitors of the highest standards with exceptional sound quality, a comprehensive feature set and good looks in the rack. Uniquely an embedded 5 band parametric EQ allows you to configure the monitor for your environment or to suit your listening tastes.
REFERENCE MONITORS Each of the drivers is magnetically shielded so that the monitors are perfectly safe to use near CRTs and TFT displays and each speaker uses a separate, highly efficient class-D switching amplifier. Even cable lengths to and from the speaker enclosures have been kept short to reduce any potential microphonic induction. REFEREN CE MON I TORS DSP Based Design The use of a modern electronic architecture allows a much better audio performance to be realised.
REFERENCE MONITORS RM-2S4 & RM-2S10 1 RM-2S4 Reference Monitor, 2 LED meters & 4 stereo channel inputs RM-2S10 Reference Monitor, 2 LED meters & 10 stereo channel inputs Introduction Fig 1-2: RM-2S10 Reference Monitor Front Panel The RM-2S4 and RM-2S10 are 1U rack-mount units offering quality loudspeaker monitoring and accurate, high-resolution metering of up to four (RM-2S4) or twenty (RM-2S10 both analogue and digital) stereo audio sources and more with the addition of optional expansion cards.
1 REFERENCE MONITORS RM-2S4 & RM-2S10 A further five-band parametric equaliser can be accessed for room-equalisation purposes via Sonifex SCi Windows-based remote control software. Source selection, status monitoring and unit ID functions, plus firmware updates to add extra functionality, are all accessible remotely via both USB and RS232 connections in conjunction with Sonifex SCi software. The open control protocol also allows operation with terminal programs or customised applications.
REFERENCE MONITORS RM-2S4 & RM-2S10 1 Front Panel Indicators & Controls Fig 1-4: RM-2S4 Front Panel Controls Power LED The POWER LED illuminates whilst internal power is present within the unit. If this indicator is not on, the most likely reason is simply the absence of mains power, but under fault conditions it may also indicate a ruptured mains fuse or a problem with the internal power supply module.
1 REFERENCE MONITORS RM-2S4 & RM-2S10 than four (RM-2S4) or ten (RM-2S10) Sources, it will not be possible to select unimplemented Sources. R EFER EN C E MO NITORS RM - 2S4 & RM - 2 S 1 0 When mains power is removed, the currently selected Source is stored in non-volatile memory and recalled instantly once power is restored. Auto-Selection of Inputs As standard, the RM-2S4 has auto-selection of the inputs, i.e. whichever analogue or digital signal is connected to the input will be used.
REFERENCE MONITORS RM-2S4 & RM-2S10 1 Source Presence Indicators (RM-2S10 only) On the RM-2S10, the presence of active audio on a Source input is indicated by green illumination of the corresponding Source LED. The currently selected Source is indicated by yellow illumination. This feature may optionally be disabled through the use of the remote control OPT command (see the appropriate section of this manual).
1 REFERENCE MONITORS RM-2S4 & RM-2S10 ON R EFER EN C E MO NITORS RM - 2S4 & RM - 2 S 1 0 1 2 DIP 3 4 5 6 7 8 ON 9 10 11 12 1 2 DIP 3 4 5 6 7 8 9 10 11 12 Reference Monitor underside ON 1 2 DIP 3 4 5 6 7 8 ON 9 10 11 12 1 DIPSwitch Block 1 2 DIP 3 4 5 6 7 8 9 10 11 12 DIPSwitch Block 2 Fig 1-9: RM-2S4 & RM-2S10 DIPSwitch Settings Note that power should be removed from the unit while making changes to the configuration switches and reapplied once the changes a
REFERENCE MONITORS RM-2S4 & RM-2S10 1 Meter Labelling Each meter characteristic possesses different scaling, range and ballistics according to the relevant British or International standards and self-adhesive scales for each of the characteristics are supplied with the unit. Once the desired meter characteristic has been chosen, proper scale labelling may be ensured by removing the appropriate scale from the backing paper and applying it to the recess provided between the two meters.
1 REFERENCE MONITORS RM-2S4 & RM-2S10 PHASE Meter RE FER ENC E M O NITORS RM - 2S4 & RM - 2 S 1 0 The five-segment LED phase meter indicates the average phase correlation between the left and right channels of the currently selected stereo audio source. It is labelled in both degrees of phase shift and amount of correlation. The phase meter is an “output” meter, reflecting exactly what is being heard from the loudspeakers including any front panel signal modifiers that are active.
REFERENCE MONITORS RM-2S4 & RM-2S10 1 Inserting a plug into the headphone socket automatically mutes the internal loudspeakers. STATUS LED Indicators Fig 1-14: Status LEDs The protection limiter is a fast-attack, slow-release type. Brief flashes of the LIMIT indicator on signal peaks are not cause for concern, but significant illumination indicates that the signal is being compressed and that reproduction may be compromised. In those circumstances the setting of the volume control should be reduced.
1 REFERENCE MONITORS RM-2S4 & RM-2S10 Audio Modifiers R EFER EN C E MO NITORS RM - 2S4 & RM - 2 S 1 0 The audio modifiers are controlled using the 6 white illuminated buttons on the front panel. Each of the modifiers is operated via an illuminated pushbutton switch, with each press of the button toggling the modifier from on to off or vice-versa. When using the audio modifiers in combination, it is necessary to consider the order in which they are applied since that will affect the results.
REFERENCE MONITORS RM-2S4 & RM-2S10 1 PHASE INVERT Audio Modifier When on, the PHASE INVERT button is illuminated and the right channel of the currently selected stereo audio Source is inverted (phase shifted by 180 degrees) prior to further processing and reproduction. The PHASE INVERT modifier will affect the loudspeaker audio, line-level audio outputs, phase meter reading and also, by default, the main meter readings (refer to the Main Meters section of this manual).
1 REFERENCE MONITORS RM-2S4 & RM-2S10 Rear Panel Connections & Operation R EFER EN C E MO NITORS RM - 2S4 & RM - 2 S 1 0 Fig 1-16: Reference Monitor RM-2S4 Rear Fig 1-17: Reference Monitor RM-2S10 Rear Mains Power Power is applied via a standard three-pin IEC male socket. Mains voltages between 85V and 264V AC and frequencies between 47 and 63Hz are accepted without adjustment. A 2A, 5 x 20mm SB fuse is used. The Earth pin MUST be connected to ensure safety.
REFERENCE MONITORS RM-2S4 & RM-2S10 ON 1 2 DIP 3 4 5 6 7 8 ON 9 10 11 12 1 2 DIP 3 4 5 6 7 8 9 10 11 12 1 2 DIP 3 4 5 6 7 8 9 10 11 12 DIPSwitch Block 1 ON 1 2 DIP 3 4 5 6 7 8 9 10 11 12 DIPSwitch Block 2 Fig 1-18: RM-2S4 & RM-2S10 DIPswitch Settings Audio Inputs (RM-2S4) Three-pin female XLR connectors are provided for the connection of up to four stereo audio sources. Together, these four stereo sources comprise BANK A.
1 REFERENCE MONITORS RM-2S4 & RM-2S10 SW1: SW2: SW11: SW12: When set to ON, digital input 1 is terminated with 110Ω. When set to ON, digital input 2 is terminated with 110Ω. When set to ON, digital input 3 is terminated with 110Ω. When set to ON, digital input 4 is terminated with 110Ω.
REFERENCE MONITORS RM-2S4 & RM-2S10 1 Unbalanced signals may also be used by linking the out-of-phase (-) signal pin to Ground and applying the unbalanced signal to the in-phase (+) signal pin. A full-scale digital input signal (0dBFS) corresponds to the maximum analogue input signal level of +18dBu (with no extra input gain applied).
1 REFERENCE MONITORS RM-2S4 & RM-2S10 The line-level output signals are always affected by the setting of the front-panel audio modifiers, with one exception - DIM only affects the line-level outputs when Variable output level is selected. R EFER EN C E MO NITORS RM - 2S4 & RM - 2 S 1 0 Expansion Port An internal expansion card (RM-HD1 or RM-HDE1) may be fitted to the RM-2S4 or RM-2S10 to increase the number of inputs and/or add to the available functions.
REFERENCE MONITORS RM-2S4 & RM-2S10 1 The AES/EBU Lock output is a real-time (non-latching) status output which becomes active if a valid AES/EBU signal is detected on the currently selected Source input. By default, the open-collector output is low (conducting) when a valid AES signal is detected, but this behaviour may be reversed using the serial remote control LCK: command. The active-low control inputs all have internal pull-ups. Equipment driving these inputs need sink only 1mA and block 5V.
1 REFERENCE MONITORS RM-2S4 & RM-2S10 USB Remote Control A Type B USB socket carries a standard Universal Serial Bus interface via which advanced configuration options may be set and many functions may be remotely controlled. R EFER EN C E MO NITORS RM - 2S4 & RM - 2 S 1 0 The RM-2S4 and RM-2S10 will interface directly with personal computer USB ports using a standard USB cable.
REFERENCE MONITORS RM-2S4 & RM-2S10 1 Technical Specification RM-2S4 & RM-2S10 Inputs Audio Inputs (RM-2S4): 4 x stereo analogue or AES/EBU digital (autoselecting) Audio Inputs (RM-2S10): 10 x stereo analogue, plus 10 x stereo AES/EBU digital Max Level (0dB Input Gain): +18dBu (analogue)/0dBFS (digital) >60dB typical Input Impedance: 20kΩ (analogue) 110 Ω (digital with termination switchable) AES/EBU Sample Rate: 32 to 192kHz, converted internally to 48kHz Input Gain: 0, +6, +12 or +18dB digital
1 REFERENCE MONITORS RM-2S4 & RM-2S10 R EFER EN C E MO NITORS RM - 2S4 & RM - 2 S 1 0 User-Variable Equalisation 22 Type: Parametric Bands: Five Centre Frequency: 200Hz to 18kHz Bandwidth: 0.
REFERENCE MONITORS RM-2S4 & RM-2S10 1 Phase Metering Type: 5-segment, indication at 0, 45, 90, 135 and 180 degrees Remote Control Slave device, 19200 baud Serial: RS232, 19200 baud, 3-wire connection Alarm Outputs: 1. Audio underlevel/fail (latching) 2. Audio overlevel (latching) 3. Sustained phase error (latching) 4. AES/EBU input unlock (non-latching) Open-collector outputs rated at 30V, 50mA maximum Output low/conducting in normal condition (no alarm) Control Inputs: 1. Mute audio 2.
1 REFERENCE MONITORS RM-2S4 & RM-2S10 DIP Switch Settings (Underneath The Unit, See Fig 1-17) R EFE REN CE MON ITORS RM - 2S4 & RM - 2 S 1 0 Block 1 (RM-2S4 & RM-2S10) 24 SW1 Audio Output Analogue ON Digital OFF SW2 Audio Output Analogue ON Digital OFF SW3 Audio Output Digital ON Analogue OFF SW4 Audio Output Digital ON Analogue OFF SW5 Output Level Fixed ON Variable OFF SW6 Input Gain Matrix SW7 Input Gain Matrix SW8 Meter Ballistics & Scaling Matrix SW9 Meter Ballistics &
REFERENCE MONITORS RM-2S4 & RM-2S10 SW10 Digital Input Termination Input 1 110Ω ON 1 Unterminated OFF SW11 Unused Set to OFF SW12 Unused Set to OFF Equipment Type Reference Monitor, 2 LED meters, 4 stereo channel inputs RM-2S10 Reference Monitor, 2 LED meters, 10 stereo channel inputs Physical Specification Dimensions (Raw): 48cm (W) x 30.5cm (D) x 4.4cm (H) (1U) 19” (W) x 12” (D*) x 1.7” (H) (1U) Dimensions (Boxed): 55cm (W) x 43cm (D) x18cm (H) 21.7” (W) x 16.9” (D*) x 7.
2 REFERENCE MONITORS RM-4C8 RM-4C8 Reference Monitor, 4 LED meters, 8 channel inputs & dual selectors Introduction R EFEREN CE MON ITORS RM - 4 C8 Fig 2-1: RM-4C8 Reference Monitor Front Panel The RM-4C8 is a 1U rack-mount unit offering quality loudspeaker monitoring and accurate, high-resolution metering of up to eight mono audio sources and more with the addition of an optional expansion card.
REFERENCE MONITORS RM-4C8 2 Optional additions to the RM-4C8 include HD video input expansion cards, allowing multiple AES groups embedded within an HD-SDI or SD-SDI signal to be de-embedded and monitored, either with Dolby E and Dolby Digital decoding (RM-HDE1) or without (RM-HD1). The RM-4C8 operates from global mains voltages (85-264V AC, 47-63Hz) without adjustment.
2 REFERENCE MONITORS RM-4C8 Front Panel Indicators & Controls R EFEREN CE MON ITORS RM - 4 C8 Fig 2-3: RM-4C8 Front Panel Controls Power LED The POWER LED illuminates whilst internal power is present within the unit. If this indicator is not on, the most likely reason is simply the absence of mains power, but under fault conditions it may also indicate a ruptured mains fuse or a problem with the internal power supply module.
REFERENCE MONITORS RM-4C8 2 Auto-Selection of Inputs As standard, the RM-4C8 has auto-selection of the inputs, i.e. whichever analogue or digital signal is connected to the input will be used. As standard, the RM-4C8 possesses two Banks, A and B. Both comprise four monophonic Sources, each of which may be a mono analogue signal, part of a stereo analogue signal, part of a stereo AES/EBU digital signal or any combination thereof.
2 REFERENCE MONITORS RM-4C8 ON R EFEREN CE MON ITORS RM - 4 C8 1 2 DIP 3 4 5 6 7 8 ON 9 10 11 12 1 2 DIP 3 4 5 6 7 8 9 10 11 12 Reference Monitor underside ON 1 2 DIP 3 4 5 6 7 8 9 10 11 12 DIPSwitch Block 1 ON 1 2 DIP 3 4 5 6 7 8 9 10 11 12 DIPSwitch Block 2 Fig 2-6: RM-4C8 DIPSwitch Settings Note that power should be removed from the unit while making changes to the configuration switches and reapplied once the changes are complete.
REFERENCE MONITORS RM-4C8 2 Meter Labelling Each meter characteristic possesses different scaling, range and ballistics according to the relevant British or International standards and self-adhesive scales for each of the characteristics are supplied with the unit.
2 REFERENCE MONITORS RM-4C8 Brightness Control The brightness of the bargraph meters and all other front panel indicators may be adjusted to suit user preference or to match similar units nearby. RE FER ENCE MONITORS RM - 4 C8 Fig 2-8: Brightness Control A miniature flat-bladed screwdriver inserted into the hole marked BRIGHTNESS should be turned clockwise to increase the brightness or anti-clockwise to decrease.
REFERENCE MONITORS RM-4C8 2 LEVEL Control The LEVEL, or volume, control is a rotary potentiometer allowing volume adjustment of the internal loudspeaker system, the headphone output and optionally the line level outputs (see Line Level Audio Outputs on page 37). A usable control range of 36dB is provided, and with the volume control in the fully anti-clockwise position the signal is completely muted.
2 REFERENCE MONITORS RM-4C8 R EFE REN CE MON ITORS RM - 4 C8 The digital audio inputs of the RM-4C8 cannot in themselves clip unless extra input gain has been applied, but signal peaks may come within 0.5dB of maximum if the input signal has undergone aggressive processing at an earlier stage, and the CLIP indicator will respond to this. LOCK L and LOCK R indicators The LOCK indicators illuminate when a valid digital audio signal is present on the corresponding currently selected Source input.
REFERENCE MONITORS RM-4C8 2 such that two selected Sources each measuring 0dBu will deliver a mono signal measuring 0dBu to both channels. The MONO modifier will affect the loudspeaker audio, line-level audio outputs and phase meter reading. PHASE INVERT Audio Modifier When on, the button is illuminated and the selected right-hand Source signal is inverted (phase shifted by 180 degrees) prior to further processing and reproduction.
2 REFERENCE MONITORS RM-4C8 Rear Panel Connections & Operation RE FER ENCE MONITORS RM - 4 C8 Fig 2-13: RM-4C8 Rear Mains Power Power is applied to the unit via a standard three-pin IEC male socket. Mains voltages between 85 and 264V AC and frequencies between 47 and 63Hz are accepted without adjustment. The Earth pin MUST be connected to ensure safety.
REFERENCE MONITORS RM-4C8 2 Note that the application of extra input gain reduces the maximum signal level permitted before signal clipping occurs. The front panel CLIP indicator illuminates at the onset of clipping, with extended illumination indicating that the input gain should be reduced and/ or the input signal levels attenuated. Audio Inputs Three-pin female XLR connectors are provided for the connection of up to eight balanced audio Sources in two Banks (A and B) of four.
2 REFERENCE MONITORS RM-4C8 Output Format Output Level SW1 & 2 SW3 & 4 SW5 Analogue Analogue AES/EBU Digital AES/EBU Digital Variable Fixed Variable Fixed Both ON Both ON Both OFF Both OFF Both OFF Both OFF Both ON Both ON OFF ON OFF ON RE FER ENCE MONITORS RM - 4 C8 The line-level output signals are always affected by the setting of the front-panel audio Modifiers, with one exception - DIM only affects the line-level outputs when Variable output level is selected.
REFERENCE MONITORS RM-4C8 2 The Audio Underlevel alarm is triggered if either currently selected input Source remains below -20dBu for longer than 20 seconds. The Sustained Phase Error alarm is triggered if the phase difference between the two currently selected input Sources remains consistently above 90 degrees for longer than 5 seconds. The active-low control inputs all have internal pull-ups. Equipment driving these inputs need sink only 1mA and block 5V.
2 REFERENCE MONITORS RM-4C8 USB Remote Control A Type B USB socket carries a standard Universal Serial Bus interface via which advanced configuration options may be set and many functions may be remotely controlled. RE FER ENCE MONITORS RM - 4 C8 The RM-4C8 will interface directly with personal computer USB ports using a standard USB cable.
REFERENCE MONITORS RM-4C8 2 Technical Specification RM-4C8 Inputs Number of Channels: 8 x analogue or AES/EBU digital inputs (autoselecting). Max Level (0dB Input Gain): +18dBu (analogue)/0dBFS (digital). > 60dB typical Input impedance: 20kΩ (analogue) 110 Ω (digital with termination switchable). AES/EBU Sample Rate: 32 to 192kHz, converted internally to 48kHz. Input Gain: 0, +6, +12 or +18dB digital gain (switchable). Selection: 2 x Front panel rotary controls with indicator LEDs.
2 REFERENCE MONITORS RM-4C8 RE FER ENCE MONITORS RM - 4 C8 User-Variable Equalisation 42 Type: Parametric Bands: Five Centre Frequency: 200Hz to 18kHz Bandwidth: 0.25 to 2 octaves Boost/Cut: ±12dB Programming: Via USB/serial control port Amplifier/Loudspeakers Configuration: Three-way with stereo mid/high-frequency drivers & mono low-frequency driver Power Output: 2 x 5W (HF) + 20W (LF) with protective limiter Crossover: 500Hz (3rd order Butterworth) Distortion (HF Outputs): < 0.
REFERENCE MONITORS RM-4C8 2 Phase Metering Type: 5-segment, indication at 0, 45, 90, 135 and 180 degrees. Remote Control Slave device, 19200 baud Serial: RS232, 19200 baud, 3-wire connection Alarm Outputs: 1. Audio underlevel/fail (latching) 2. Audio overlevel (latching) 3. Sustained phase error (latching) 4. AES/EBU input unlock (non-latching) Open-collector outputs rated at 30V, 50mA maximum Output low/conducting in normal condition (no alarm) Control Inputs: 1. Mute audio 2. Dim audio 3.
2 REFERENCE MONITORS RM-4C8 DIP Switch Settings (Underneath The Unit, See Fig 2-6) R EFE REN CE MON ITORS RM - 4 C8 Block 1 SW1 Audio Output Analogue ON Digital OFF SW2 Audio Output Analogue ON Digital OFF SW3 Audio Output Digital ON Analogue OFF SW4 Audio Output Digital ON Analogue OFF SW5 Output Level Fixed ON Variable OFF SW6 Input Gain Matrix SW7 Input Gain Matrix SW8 Meter Ballistics & Scaling Matrix SW9 Meter Ballistics & Scaling Matrix SW10 Meter Ballistics & Scaling M
REFERENCE MONITORS RM-4C8 2 Options RM-HD1 HD-SDI expansion card RM-HDE1 HD-SDI & Dolby E Decoder expansion card RE FE RE N CE MON ITORS RM - 4C8 Reference Monitors User Handbook 45
2 3 REFERENCE MONITORS RM-HD(E)1 RM-4C8 RM-HD1 Reference Monitor HD-SDI Expansion Card & RM-HDE1 Reference Monitor HD-SDI & Dolby E Expansion Card REFERE NCE MONITORS RM - H D ( E ) 1 These expansion boards for the Sonifex Reference Monitor allow the monitoring of embedded audio channels within an SD/HD-SDI video signal. The embedded audio can be either non-encoded linear PCM (RM-HD1), Dolby E Decoder or Dolby Digital Decoder (RM-HDE1) depending on which card is used.
REFERENCE REFERENCE MONITORS MONITORS RM-HD(E)1 RM-4C8 2 3 System Block Diagram Fitting The Expansion Card To install an RM-HD1 or RM-HDE1 expansion card into a Reference Monitor, follow the procedure below. 1) Disconnect the Reference Monitor from the mains supply. 2) Remove all the lid screws and take off the lid. 3) Remove the rear blanking plate (4 x M3 x 6 screws).
2 3 REFERENCE MONITORS RM-HD(E)1 RM-4C8 Technical Specification RM-HD1 & RM-HDE1 SDI Input SDI Video: SMPTE 259M – SD @ 270 Mbps or SMPTE 292M – HD @ 1.5 Gbps Input Impedance: 75Ω REFERE NCE MONITORS RM - H D ( E ) 1 SDI Output SDI Video: Reclocked input Output Impedance: 75Ω Output Level: 0.8 Vp-p Return Loss: > 15 dB (1.5 GHz) Jitter: < 0.2UI Embedded Audio Standard: SMPTE 272M or SMPTE 299M 24 bit 48 kHz synchronous/ asynchronous* *Audio must be synchronous in SD.
SERIAL INTERFACE REFERENCE MONITORS RM-4C8 COMMANDS & RESPONSES 2 4 Serial Interface Commands & Responses Protocol Sonifex SCi remote control software handles all communication with the Reference Monitors via a convenient graphical user interface. However, this protocol is provided for those users who wish to develop their own remote control applications or communicate with the Reference Monitors using a text-based terminal program.
SER IAL INTERFACE COMMAND S & RE S P ON S E S 4 SERIAL INTERFACE COMMANDS & RESPONSES Command LCK: Description Response - AES/EBU PLL Lock status Request Response depends on model type: RM-2S4 responds: LCK:x Where: x = lock status of selected stereo source. No further lock information is available. RM-2S10 responds: LCK:x+yyyyyyyyyy Where: x = lock status of selected stereo source. y = lock status of all ten AES inputs. RM-4C8 responds: LCK:xy+zzzz Where: x = lock status of left selected mono source.
SERIAL INTERFACE COMMANDS & RESPONSES Command Description OPT:2,xx Source autodetection for RM-2S10 (see page 6): ACK: Where: x = 00 selects normal operation (default setting) x = 01 enables source autoselection (hex values 01 to FF accepted and have same effect as 01). 4 Response The SRQ: query will correctly report the bank currently in use. The UID: query will report a single bank of 10 sources rather than two when autoselect is enabled.
4 SERIAL INTERFACE COMMANDS & RESPONSES If using a terminal program, to achieve reliable data transfer the Line Delay (found under File>Properties>Settings>ASCII Setup in Hyperteminal) should be set to 20ms. SE RIAL IN TER FAC E COMMAN D S & RE S P ON S E S It is vital that neither the serial connection nor mains power to the Reference Monitor should be interrupted during the update process.
SERIAL INTERFACE COMMANDS & RESPONSES 4 User-Variable EQ Parameter Format The DSP coefficients for the user-variable EQ need to be pre-calculated before being sent to the Reference Monitor. Each band of EQ is a parametric equaliser with the following parameters: F = centre frequency in Hz, BW = bandwidth in octaves G = height of peak/trough at centre frequency (linear, so 6dB=2.0, 12dB=4.
5 SCI REMOTE CONTROL SOFTWARE Reference Monitor SCi Remote Control Software Sonifex SCi software is free of charge software available to control the Reference Monitor range of audio monitors, as well as other Sonifex products, using either RS232 or USB connections. Download the Latest SCi Software This is located on the Sonifex website in the Software Downloads section: http://www.sonifex.co.uk/technical/software/index.shtml S CI R EM OTE CONTROL S OFT WA RE Download and install the software.
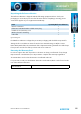
SCI REMOTE CONTROL SOFTWARE 5 S CI RE MOT E CON TROL SO FT WARE Fig 5-2: SCi Device Discovery Panel Your attached Reference Monitor(s) will be shown in the list. If they are not listed, check the cable(s) between the Reference Monitor and your PC. Fig 5-3: SCi Device Information Panel Close the device dialog by clicking on the cross in the top right corner. The Reference Monitor now appears in the SCi Launcher. Loaded Launcher Double-click on this to gain access to the Reference Monitor controls.
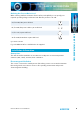
5 SCI REMOTE CONTROL SOFTWARE SCi For Reference Monitors S CI R EM OTE CONTROL S OFT WA RE The graphical interface allows you to control the Reference Monitor remotely. Bank/Source Selection, EQ parameter adjustment and front panel Modifier controls can all be accessed and adjusted from this main panel. Fig 5-5: SCi Main Screen Bank & Source Selection & Editing On the left hand side of this panel you have the ability to select Banks and their respected Sources and to edit their names.
SCI REMOTE CONTROL SOFTWARE 5 To create a new EQ preset, click the ‘New’ Icon on the top toolbar. You will now be in EQ edit mode. Click the Enable button for the EQ band that you wish to adjust, e.g. Band 1. This will activate the EQ for that selected band. By clicking in the Frequency, Bandwidth and Gain edit boxes for Band 1, the 3 EQ faders respectively are enabled for that band and can be adjusted to your taste.
w w w. s o n i fe x . c o. u k t:+44 (0)1933 650 700 f:+44 (0)1933 650 726 s a l e s @ s o n i fe x . co.